
Grinding and Shaping Onglette Gravers
7 Minute Read
This article contains the following detailed steps to give you a better understanding why grinding and shaping onglette gravers are necessary and important.
One of the most important aspects of diamond/stone setting is the correct preparation of your tools. Your gravers are a prime example of this. It is absolutely essential to transform a simple cutting blade into a well-defined, designed tool that will accommodate all of your intricate cutting in gold or platinum.
For many setters, this has been totally overlooked. The following detailed steps will allow you to reach a greater understanding of just what is necessary to shape these tools and why it is so important to achieve these gradual shaped cuts on the graver blade. For this article I'll use a#2 Onglette, however, the process is similar for other shapes of gravers. I will not suggest which tool manufacturer is better suited for your needs as I am satisfied with many of the tools they all supply.
Attaching the Handle
After donning your safety glasses, sit at a comfortable height in front of your grinding wheel, and place a small container of water to use for cooling within easy reach. Be aware of the center axis of the grinding wheel; your graver MUST always be held below the center axis of the rotating wheel.
With the edge of the rotating grinding wheel, cut into the 'root' or tang end of the blade, removing half of its length. While cutting do not let the hot blade come in contact with your fingers or a dangerous skin burn will occur.
After you remove half of the root, shape this end of the blade into a tapered spear-shape. This will make it easier to insert it into the handle. you will heat this section up to 'red hot' with the help of a torch in order to burn a seat into your prepared wooden handle for the new blade.
To prepare the wooden handle use a large bud bur to carve out an oval spear-shaped hole. Make sure that this hole is deep enough into the handle to accommodate the tang of the blade.
Hold the graver blade with a pair of pliers and using a torch, heat the tang red hot. The jaws of the pliers will prevent the rest of the blade from heating up. If the major part of the blade becomes a blue color it has softened and the blade is rendered totally useless. While the tang is red hot, proceed to gently push it into the hole in the handle. Let the wooden handle hold the graver blade solidly. If you actually see smoke rising, you will know that the tang is finding its own level, or space in the handle.
Once you 'bum the graver' into the handle, be very sure that the graver is sitting perpendicular to the axis of the handle and absolutely straight. Then quickly immerse it into a container of water. I suggest that you have an assistant help you with holding the torch while you do the hot immersion into the wooden handle.
Shaping the Blade
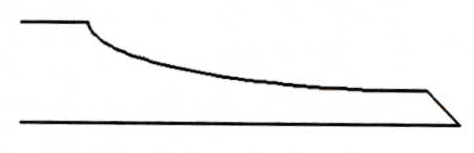
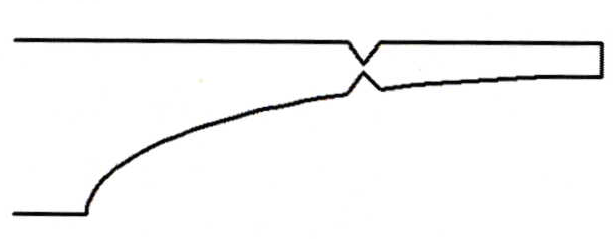
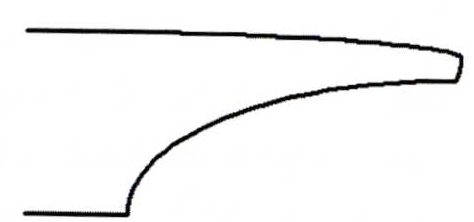
The next item on the agenda is to remove or shave off the very front comer of the graver. There must be a gentle curve from the front to the top of the blade. Now that the blade is securely positioned in a handle you can start. Hold the handle in your right hand and have the tool blade resting on your left forefinger using it as a 'tool-rest,. When you start shaping, there will be increased heat to the front of the blade. If the blade over-heats it will get soft or turn a shade ofblue and will not allow you to achieve the superior bright cutting necessary in diamond setting. To avoid this make sure that all grinding cuts are water-soaked to a ratio of 2-3 cuts to one dunking in water.
It is absolutely critical that you wear safety glasses. If you don't use them, a particle of metal can hit your eye and cause severe, long-term damage.
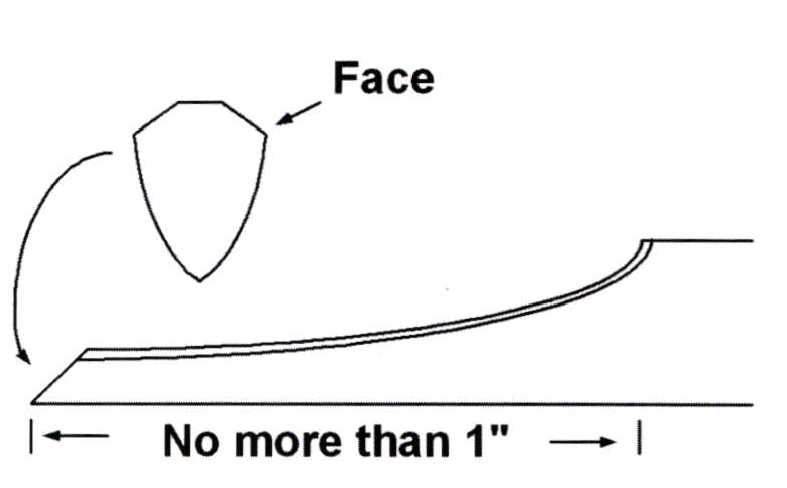
Next, apply direct pressure from the left side of the grinding wheel and start to remove the metal from the front side of the blade. The initial cut must occur on either side of the #2 Onglette blade. What you need to do is to start shaping each side of the area you just ground. You should shave off the sides equally, methodically and with great care. The sides of an Onglette graver must always stay rounded or curved towards its base.
The actual grinding area must not be longer than one inch from the front point to the back of the shaping section. The reason for this is that if the cutting area is too long the front of the blade will bend and eventually break during use. Remember, if you don't water-soak the graver blade during grinding, there might be a build up of heat and a subsequent softening of the metal. To feel the heat, lightly touch the blade front whenever possible.
Polishing the Gutting Edge
Now comes the Emery and Polishing Paper schedule of events. You will need Emery paper #1, Emery paper #2, Polishing paper #210 and #410. These papers must be wrapped around a wooden stick similar to the wooden sticks used for stirring paints. As you wrap them maintain a flat working edge. This is very important as you cannot expect a smooth finishing of the blade if the paper has no flat surface.
Start to use the Emery Paper #l (coarser grit) and remove the lines on the side of the blade nearest to the front and along the side nearest to the bottom of the curve. Holding the wooden handle of the graver apply a continuous forward action and emery the angled sides nearest the bottom of the graver approaching the edge of the blade.
Once you are satisfied with the removal of any lines proceed to use the finer Emery Paper#2. You can again use the same technique in sanding off any marks made by the graver manufacturer. At this time, emery but with lighter pressure applied to the steel blade.
You can now use the 'Polishing Paper' numbers #2/0 and #4/0. Use the #210 first, as this paper has a rougher grit, i.e. the pores of the paper actually have a less close knit. You are now 'rubbing'the metal to a finer sheen, hence the name 'polishing paper'. You must at this juncture be absolutely sure that there are no little marks or gouges left on the metal's cutting area, nearest to the pointed bottom edge of the blade. Then you should start to put more downward pressure onto the blade while rubbing with the #210 paper, and after every few forward strokes, look at the blade and examine the results.
Remember that the graver has a gradual role or slight barrel shape and you should maintain this gradual shape at ALL TIMES. This is very important in 'bright-cutting', as this particular area of the graver is the most important part for the whole process.
Once you are sure that all defects and marks have been removed you can move along to the very final step, what I like to call "Making the graver the Hubble telescope". This is because the resulting mirror like shine should be almost as bright, free of marks, clean, and reflective as the renowned astronomical instrument. After all, it is here that many marks can be transferred to the gold or platinum, so you must remove any marks prior to this stage.
To do this use the #4 polishing paper and separate it into 2 different papers, #410 and a soft pencil rubbing which will give you a#610 rating on the same paperboard. You have to use a soft cored pencil that can be bought in any Arts and Crafts store. This method was shown to me by my "mentor-teacher" some 40 years ago.
First rub the graver on the #410 paper and examine every few seconds to make sure that you are having great results. Then apply the pencil rubbing to this specific area, and make sure that the pencil lead has completely covered all of the #410 paper section you wish to use as the #6/0 area. With a little downward pressure, rub lightly and with little effort, on this rubbing section. You should now see a remarkable sight: a highly polished, brightly contoured piece of steel that has been achieved with very careful and definite hand cleaning.
To check if the graver is sharp, lightly let the graver point touch your fingernail. If it binds, then the graver blade is sharp. If the point of the blade slides off, it is dull and you must re-sharpen it with an oil stone and re-polish using the above steps.
You can now embark upon Bright-Cutting with far greater results, knowing that you have achieved what you thought to be impossible, that is producing a sharpened, highly polished graver point. As long as you maintain the graver shape and polish on the surfaces and sides of this Onglette graver, you will have no problem in producing a fine polished cut in the precious metal of your choice.
Related Articles

Half-Ground Round Bur

Reusing Broken Saw Blades

Australian Ingenuity

How to Customize Short Insulated Tweezers


The All-In-One Jewelry Making Solution At Your Fingertips
When you join the Ganoksin community, you get the tools you need to take your work to the next level.
