
Making Custom-Designed Diamond and Tourmaline Earrings
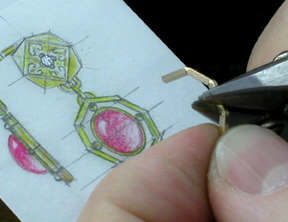
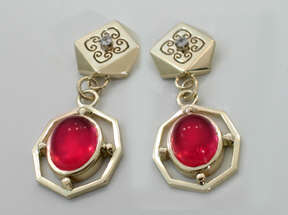
The customer has selected the pair of earrings shown the rough sketch. The top portion is cast, the bottom piece is hand fabricated and the two units are joined by wire links. Materials used in the custom designed earrings include: 14-karat yellow gold with 14-karat white gold settings, Diamonds and tourmaline cabochons.
5 Minute Read
this article describes the steps, and materials used, in manufacturing or making a custom-designed diamond and tourmaline earrings.
Materials used in the custom designed earrings include:
- 14-karat yellow gold with 14-karat white gold settings
- Diamonds and tourmaline cabochons
Making Custom-Designed Diamond and Tourmaline Earrings | |
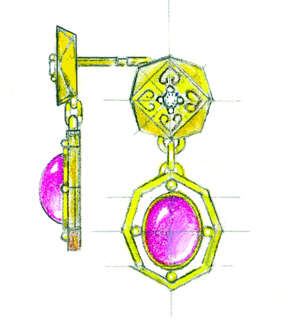 | The customer has selected the pair of earrings shown the rough sketch. The top portion is cast, the bottom piece is hand fabricated and the two units are joined by wire links. |
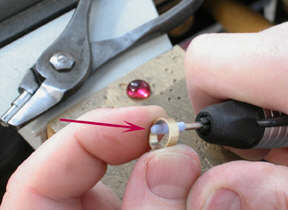 | The 14-karat yellow gold bezels were formed using wire measuring 3 x 1 millimeters. The inside dimension of the bezels were enlarged with a Foredom CeramCut Blue® Stone. The new Foredom No. 20 quick-release handpiece was used which provides fast, effortless tool changes. |
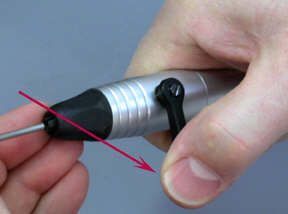 | This image shows the lever in the open position. The No. 20 quick-release handpiece operates smoothly, is easy to use and fits comfortably in my hand. It also retails for $79.00 making it the most inexpensive quick-release handpiece on the market. |
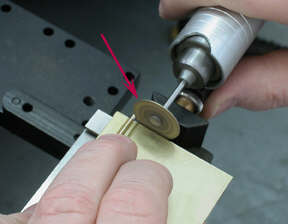
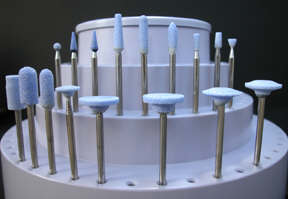 | Shown here are a variety of Foredom's CeramCut Blue ® Stones. They come mounted on a 3/32 shank and are made of ceramic and aluminum oxide abrasive materials. The stones are widely used on hard and precious metals. Personally, they have become the âgo to' tools as they maintain their shape and hold a superior cutting/grinding edge. With the wide selection of shapes and sizes of wheels, they are used in a variety of applications. |
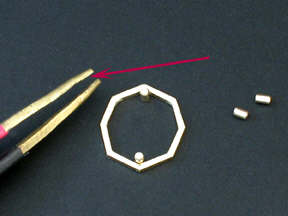
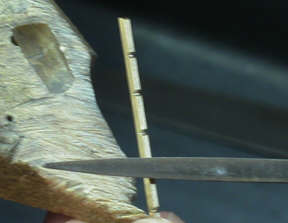 | Next, the octagonal frames were formed for the bottom section of the earrings using 1.5 x 1.5 millimeter square 14-karat yellow gold wire. Lines were scribed at evenly spaced intervals (on what would become the inside of the frames) on each wire. Then grooves were filed about one-third of the depth into each wire at those marks. This facilitates precise bending and consistent sizes of the octagonal shapes. |
 | Using parallel pliers, the wire frames were formed. The pieces for the upper portion of the earrings were cast. |
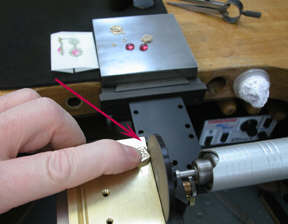
 | To quickly and precisely pre-finish the flat-planed surfaces of the four earring components, the Foredom AllSet ® Sander and Planer were used. The AllSet Sander and Planer is designed to be used with the Foredom No. 30 handpiece for grinding, shaping, sanding and polishing. It quickly and easily adjusts to any angle from 0 degrees to 90 degrees. The new Foredom adapter holds the AllSet Sander and Planer for use. It is designed to fit onto the GRS mounting plate to allow hands-free operation. In this photo, the 45 and 90 degree angle guide (indicated by arrow) are used to ensure a precise 90 degree angle for sanding the project. |
 | To pre-finish the octagonal frames, a sanding system was used that includes seven 2 inch discs with varying grits of 3M microfinishing abrasives that range from coarse to ultra-fine. The 3M abrasive discs are PSA backed so they are easy to remove when worn. To support the proper sanding angle of the frame, the angle bracket that's supplied with the kit was used (indicated by arrow). |
 | The table of the AllSet Sander and Planer was adjusted for the correct angle of each set of facets on the top pieces. The Sander Planer is being powered by my Foredom TX flexshaft, offering the ultimate torque and control at all speeds. |
 | The upper piece of the earring on the right side of this image has been pre-finished. Notice how flat, even and smooth the surface is. |
 | This time, using the AllSet Sander and Planer, spacer wires were cut for the lower octagon frame. The wire is marked for length using dividers. The wire is placed in the groove on the Sander and Planer platform and cut with a mounted diamond disc (indicated by arrow). The No. 30 Foredom handpiece rotates on the AllSet guide and acts like a âchop-sawâ. This tool configuration is also ideal for cutting tubing. |
 | With the upper and lower portions of the earrings pre-finished, tacking the spacers to the lower frames is the next step. For tacking, the ABI Tack II welder and the double-pole tweezers were used. To accommodate the sharp edges of the frame, a ball bur was used to make an indentation in one side of the tweezers for a better hold. Note: Attempting to tack the spacer to the frame without creating an indentation to accept the frame would likely result in a destructive arc. |
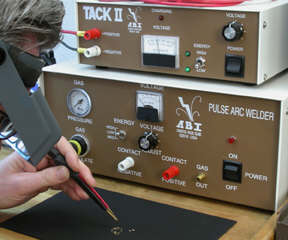 | To tack the spacers to the frame, I set the Tack II (the upper unit in the photo) to the low energy setting and used 35 volts of energy with the double pole tweezers. After tacking the four spacers in each frame, I soldered them using easy solder. |
 | Next the earring posts were tacked to the upper pieces. The ABI Tack II was set on the high energy setting at 35 volts. A pliers lead was used with a notch in both sides (indicated by arrows) to hold the post. The earring was placed face-down on the graphite portion of the contact pad. After tacking the earring posts, they were soldered with easy solder. |
 | After soldering, the earring was placed face-up into a hole drilled in the graphite and contact pad. Holding a 14-karat white gold setting with the notched brass tweezers, the head was tacked. The ABI Tack II was set on 35 volts on the high energy setting. No part of the tweezers came in contact with the earring (a destructive arc would have occurred). The ABI Tack II is an ideal unit for tack-welding because the pieces become prepared for soldering with no trace of the tack-welding visible. If the alignment is slightly off, the components may be easily dissembled and re-tacked. |
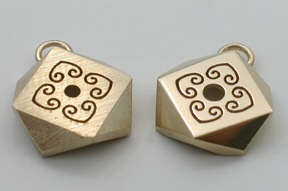
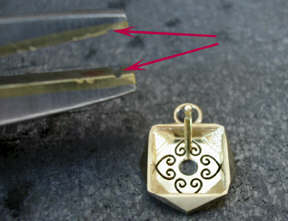
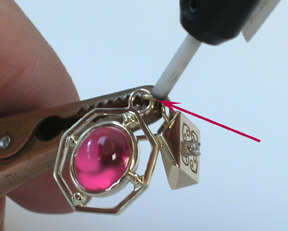 | The setting and finishing was completed. The last step is to pulse-arc-weld the connecting jump ring. To do this, the ABI Pulse Arc welder was used (the lower unit in image #13). The #1 tip was used with the unit set on the high energy setting at 40 volts. Three or four pulses of energy were required to weld the connector. After welding, a pumice wheel and a brush were used to polish the ring and complete the project. |
 | Using Foredom's tools and accessories and ABI's welding technology guaranteed superior quality and more efficient methods for completing this project. |
Related Articles

Nickel White Gold Welding

Aluminum: Welded and Wearable

Laser Welding Basics – Part 4

Basic Bead Setting Techniques


The All-In-One Jewelry Making Solution At Your Fingertips
When you join the Ganoksin community, you get the tools you need to take your work to the next level.
