
Remount Preparation Using Tack Welding
Tacking settings in location on remounts using tack-welding technology offers the bench jeweler many advantages over traditional assembly methods... Tack-welding provides a temporary working weld of the setting between it and the ring. This process is quickly accomplished and with this advantage, sales personnel can easily show customers placement of the settings on a remount prior to soldering, final setting and finishing.
2 Minute Read
Tacking settings in location on remounts using tack-welding technology offers the bench jeweler many advantages over traditional assembly methods.
- Tack-welding provides a temporary working weld of the setting between it and the ring. This process is quickly accomplished and with this advantage, sales personnel can easily show customers placement of the settings on a remount prior to soldering, final setting and finishing.
- After tack-welding, settings are easily removed and repositioned in the event of poor alignment prior to final assembly making it easy to accomplish a professional layout and appearance.
- When the settings are tacked, they do not move or shift when using traditional torch soldering techniques for the assembly.
- Solder can be tacked at each solder joint decreasing the time required for the overall soldering process.
- No cumbersome holding devices and heat sinks such as cross-locking tweezers are required to hold of settings during the soldering process allowing for less heat from the torch, reducing the potential for overheating and oxidation on the parts being assembled.
- Pre-assembly work for the remount is accomplished in a fraction of the time.
Remount Preparation Using Tack Welding Technology | |
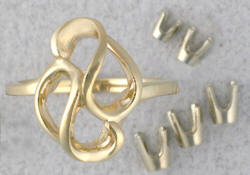 | Materials for this project include a 14-karat yellow gold ring remount (from Stuller in Lafayette, LA - stock number 5157) and various sized 14-karat white gold settings. |
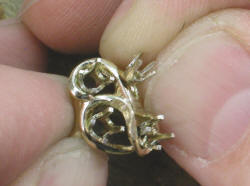
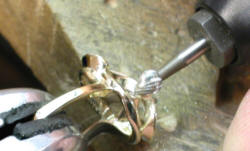 | Good contact between the setting and ring is essential for tack-welding and soldering. Prepare the pre-polished remount for assembly by notching the area where the head will be located using a ball or bud bur. |
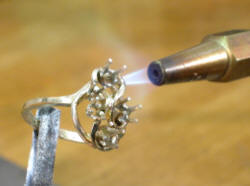
 | For these materials and the amount of contact, the ABI Tack II Tack-Welder was set on the high energy setting at 40 volts. Secure the ring in the pliers lead or the optional ring clamp lead (not shown). Firmly hold the setting to be tacked with the tweezers lead. Depress the foot pedal to release a pulse of energy to complete the process. NOTE: Firm pressure and good metal-to-metal contact free of debris is essential to properly complete the tack-welding. |
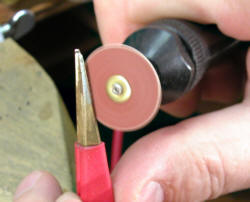 | When new, the brass tweezers lead have sharp inner edges. Sand or file to soften the edges. |
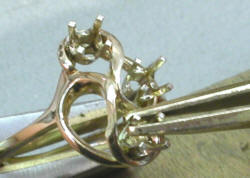
 | Check to insure all settings are arranged and aligned to professional specifications. If not, use moderate finger pressure to remove the misaligned setting from the ring. Re-bur the location where the setting is to be replaced and tacked. |
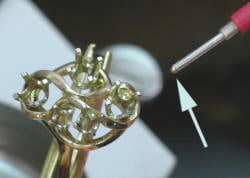 | After tacking the settings, tack easy-flowing ball solder beads (exclusively available from Stuller) at each solder joint. Use the optional ABI vacuum attachment for this procedure. For these materials, the ABI Tack II Tack-Welder was set on 30 volts on the low-energy setting. The arrow indicates a bead of easy solder that's being held by the vacuum pressure. |
| Firecoat the ring and pre-heat. Flux each solder joint and solder the settings. Pickle and rinse the assembly. |
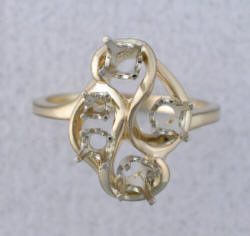 | The ring is ready for setting and final finishing. |
Important
All tack-, fusion- and pulse-arc equipment settings will differ and are based upon the volume, amount of contact and alloy of the material you assembling. Working with like materials will give you a parameter for the settings required for your application. Keep a record of settings and tasks for future reference.
Related Articles

950 Palladium: Fabrication and Assembly

Welding Technology Tool Modifications Part 1
Laser Welding Sterling Silver

Aluminum: Welded and Wearable


The All-In-One Jewelry Making Solution At Your Fingertips
When you join the Ganoksin community, you get the tools you need to take your work to the next level.
