Stone Setting Techniques
Claw Setting
There is much hesitation on doing claw setting but once that has been overcome it is way glorious to see the result of setting gems.
As we prepare for the upcoming Christmas season, we will be totally inundated with requests to do some repairs or original fabrications. We will be asked to do some very quick "putting together" as the customer is waiting, many duties you can administer. If its ring polishing, sizing, re-tipping or just supplying new shanks, these are all up your alley.
But one thing that comes to MY mind is stone setting, "Yikes, what should I do? Well my friends of both genders, I will try and make your life a bit easier to live with. A basic Claw or Solitaire setting is one of the most needed items to learn. The "horror index" is a bit high, but once the 'fear factor' is over, life is just that much easier, trust me!
So grab yourselves some coffee, have a bagel and cheese…. and read on!
"Fear Factor of Setting", should be left with the movie "Little Shop of Horrors", its no horror to set for the first time a solitaire diamond in a 4 or a 6 claw head! Yes, it might take you an hour to do it, but after 300 - 400 of them, you can cut the time down to minutes! You will be needing certain separate tools just for this little experiment…not while the customer is standing over your shoulders, I might add. You need to try this out on your own time, please!
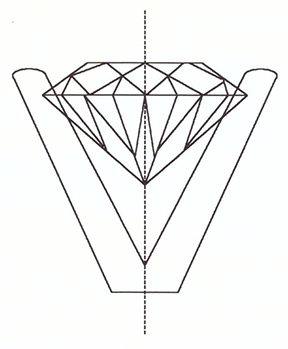
I will try and use the CORRECT NAMES for most all of the jewellery tools, (however, please excuse my Canadian accent, eh!) The very first thing you must do is to check out the nature of the diamond, are there ANY inclusions near the girdle of the stone? Is the girdle thick or ultra thin? I won't be delving into the worst-case scenarios in this article, as these kinds of stones are the ones you won't purchase in the first place, eh?
When you first put the ring into the ring clamp, make extra sure that the ring is very secure and it won't slide around when ANY PRESSURE IS APPLIED TO ANY OF THE CLAWS.
Place the stone on top of the claws, does it over-lap the claws or does it just nicely seem to fit the opening of the 4 claw head? With a pair of pliers, carefully pull apart the claws a tad more. Why? Glad you asked! You must have room for the stone to slide into the new seat you are making for it, NOW! Have a drink of your coffee!
Cutting the Seat
Obtain a "High Speed Steel" undercutting burr 25% smaller than the diamond size. The regular 156C burrs are too fine to cut into the gold on a long-term basis. The H.S.S. burrs have teeth on them that are not spaced so closed together. They will grind and remove the gold as it's turning. Keep this burr well oiled at all times, any motor lubricating-oil will suffice.
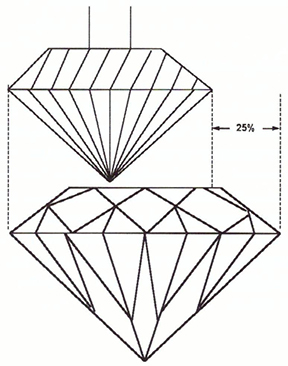
Just how far down would you place and start the turning of the burr in to the hole of the 4 claws? Remember this part very carefully - the distance allowed for safety and the thickness on the tops of the claws is now governed at this moment. Look at the burr you are now using, from the very bottom of the plain shaft just above the teeth to the widest point of the burr, that distance is where the actual drilling will take place in the claws. When set, the diamond table should be almost at the top of the claws.
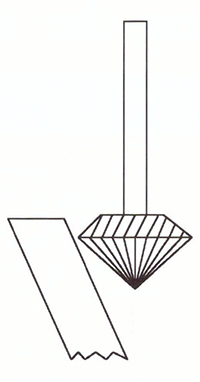
At this point do not let the burr turn too fast, or the burr will rotate itself around the claws on you, bad news! Activate the motor at a rather slow deliberate speed, so you have the complete control over the actual drilling action.
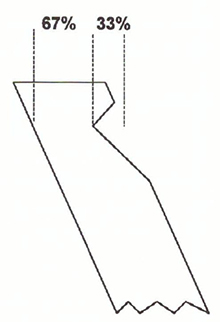
Very slow at first, then second time turn a bit faster until you have made a very well defined depth of a bearing seat into the claw. Do not drill into the claw beyond 33% of the metal, or you might have genuine weakness in the bending over of the claw. Now enjoy your "bagel & cheese" spread, it's simple from now on!
Tightening the Stone
Now place the diamond into this new seat. Is the diamond straight? If so, using a pair of pliers gently bring together the two opposing claws first, then the other two, on the other side. "12 - 6 o'clock" then the "3 - 9 o'clock' configuration, Keep bringing the two claws together until there is no space between the diamond pavillion and the bearing seat. Is the culet of the stone pointing straight down and pointing to the exact bottom of the four claws?
DO NOT LET THE CULET TOUCH THE BASE OF THE 4 CLAW HEAD. If you do you might damage the culet, ream it out with a small round burr. Turn around the whole ring and check for the centering of the 'culet' at all times. Now we can go onto the next stage, hopefully it is now getting easier.
Filing The Claws - Finally, Eh?
With an #2 Barrette file, trim the sides of the claws, front and back, use an emery paper, and just trim all around the "worked on" areas. I use a pumice wheel to 'touch-up' any plier marks and trim to the polishing stage. What I do is leave the front of the claws square and trim to round in the back. No customer wants her clothing ripped or her hands scratched!
So how did you enjoy this exercise? Fun, eh? So now, you can do a few thousand more, just remember that the time spent here is the most important thing, do it right the first time!

The All-In-One Jewelry Making Solution At Your Fingertips
When you join the Ganoksin community, you get the tools you need to take your work to the next level.
