
Setting a Three Stone Ring with Foredom Tools
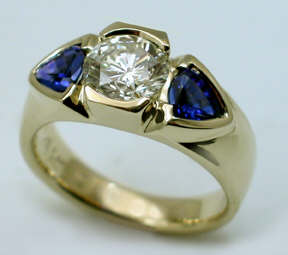
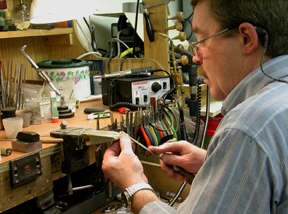
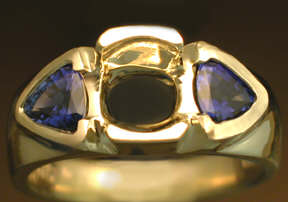
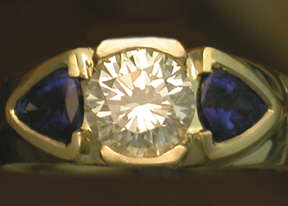
This three stone ring designed by Barney Jette has two flush set trillion sapphire side stones with a total weight of 0.81 carats and a 1.05 carat round brilliant diamond center stone. Jette prepared the wax using build-up techniques and cast it in 14-karat yellow gold. Rod Smith, Jette's shop manager completed and.
4 Minute Read
This three stone ring designed by Barney Jette has two flush set trillion sapphire side stones with a total weight of 0.81 carats and a 1.05 carat round brilliant diamond center stone. Jette prepared the wax using build-up techniques and cast it in 14-karat yellow gold. Rod Smith, Jette's shop manager completed and set gemstones in the ring.
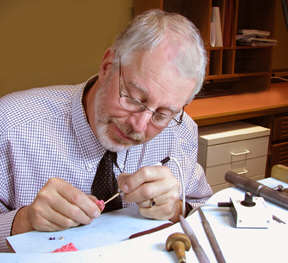 | Shown here, Barney Jette is using the Foredom Wax Carver wax working pen to build up a wax for the three-stone ring shown above. He prefers the Foredom wax pen due to its compact size, variable heat control, variety and assortment of the pen tips and the flexible nature of the pen's cord from the control box. |
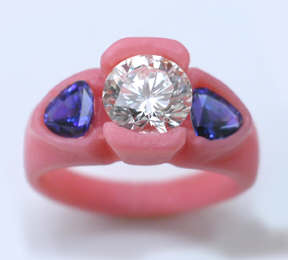 | After Jette completes the wax, he places the gemstones in it to visualize and to confirm the structure of his design. He removes the gemstones and prepares the ring for casting. |
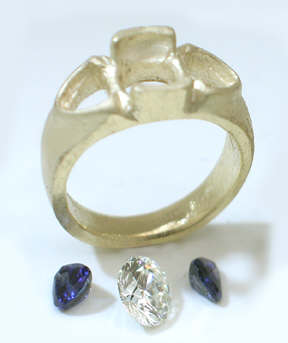 | Jette cast the ring in 14-karat yellow gold and handed it off to Rod Smith, his shop manager for pre-finishing, stone setting and finishing. Smith files to remove the remaining portion of the sprue and does some basic clean-up. |
 | Smith then files the inside of the ring and rounds it using a mandrel and a rawhide mallet. After the ring is round, he sands the inside of the shank with three grades of abrasives, starting with 320 and ending with 600 grit. |
 | With his Foredom Flexible Shaft Motor, Smith uses a Foredom No. 18 Quick Change Handpiece. To insert or remove a bur, he simply depresses the lever on the grip of the handpiece. Notice that the nose cone of the handpiece has been removed and replaced with a nose cone from the Foredom No. 18 AllSet® Quick Change adapter kit. The new nose cone is threaded and will accept the stone setting guides from the adapter kit as needed. It is made of stainless steel and is tough and rigid. |
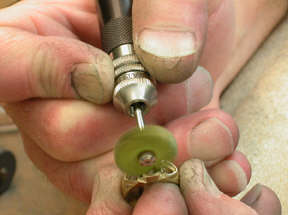
| Here Smith is using three-quarter inch 3M Radial Bristle Discs to pre-finish the outer surface of the cast ring. He starts with the yellow disc which is equivalent to 80-grit. Smith's technique is to only allow the ends of the flexible bristles to come in contact with the ring. In addition to pre-finishing the outer surface, he pre-finishes the area which will be below the gemstones after setting. | |
 | Smith uses four grades of the bristle discs. Shown here, he's using pink (pumice grit) as the final step in the pre-finishing procedure. Notice the rings even surface and luster he's achieved. There are two finer grades of radial bristle discs that he will use when he's finishing the ring after setting. |
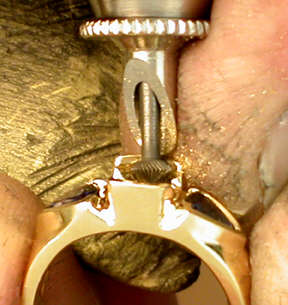
 | The ring is ready for setting. For flush setting the trillions, he screws one of the channel guides from the No. 18 Foredom AllSet® adapter kit into the nosecone. He inserts a 1.0 millimeter inverted cone bur into the quick change handpiece and adjusts the AllSet® for the optimum cutting height. |
| Remember, the trillion was fit and inserted into the wax. In this step, he's primarily smoothing the bearing and cutting into the wall just a small amount. The AllSet® guide guarantees that he cuts a level bearing as the guide rides the upper wall of the mounting, controlling the depth of the cut from the top. | |
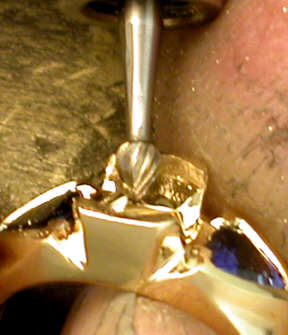
 | Smith has finished the flush setting. For the hammering he used the Foredom Micro Motor with the Setting/Engraving Reciprocating Handpiece. Smith prefers this reciprocating handpiece as he's able to adjust the impact to his specific needs. |
| Further, the impact action of the hammer is not activated until he places the anvil tip onto the metal he wishes to hammer, giving him better control. The metal over the trillion on the right has only been hammered at this stage and the one on the left has been hammered and bright cut with a flat bottom graver. | |
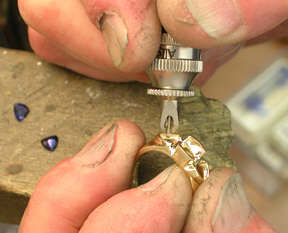
 | To prepare the bearing for the center diamond, Smith again uses the Foredom No. 18 Quick Change Handpiece with the AllSet® channel guide. He's using a 3.0 millimeter bearing bur. Because he installed the nosecone from the adapter kit on the handpiece, installing guides for various setting jobs only takes seconds. |
 | In this step, Smith is using a bud bur to open the angle left by the bearing bur so the bearing will conform to the crown and pavilion angles of the diamond. |
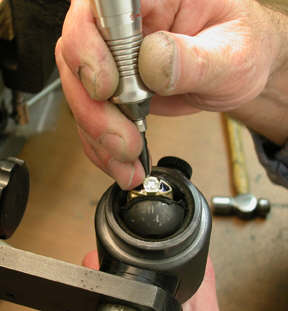
 | He has cut the bearing, fit the diamond and has determined the ring is ready to set the center diamond. He places the diamond in the bearing and tightens it by using a hammer and punch. Note: his mandrel is suspended in a cradle he custom built. His cradle holds and supports the ring mandrel and he's able to work it in any direction for use since it's not affixed to his bench. |
 | After he's secured the diamond with the hammer and punch, he uses the Foredom Micro Motor and the Setting/Engraving Reciprocating Handpiece to hammer all the metal of the partial bezel. |
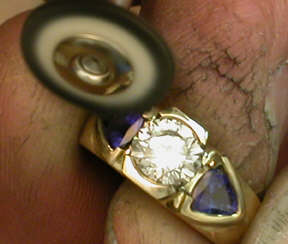
 | To true the partial bezel after setting and hammering, Smith uses a flat bottom graver to create a bright cut. Next he finishes the ring and prepares it for polishing. |
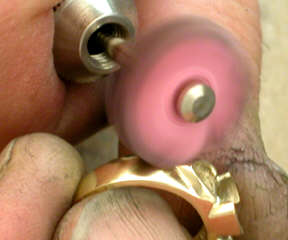
 | For the first step of polishing, Smith uses the Foredom Blue Platinum Polishing compound and a natural bristle brush. Since Smith pre-finished the ring using the radial bristle discs, all that's required at this stage is a quick cut down process. |
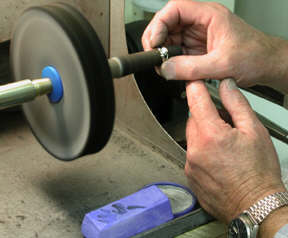 | He finishes the polishing by using Foredom Blue polishing compound, cleaning it in the ultrasonic and then uses the Foredom White compound with a muslin buff for the final finish and ultimate luster and color. |
For questions related to this procedure, contact Barney Jette. Jette operates a design and manufacturing retail store specializing in design, custom order, repair and they produce a line of one-of-a-kind original designs. Jette can be reached at barneyjettejewelry.com
Related Articles

Tool Alterations

The Jewelry of Barbara Seidenath

The Future of Design

Christian Bauer: Wedding Rings


The All-In-One Jewelry Making Solution At Your Fingertips
When you join the Ganoksin community, you get the tools you need to take your work to the next level.
