
How to Mix Industrial Liquid Enamels
Industrial liquid enamel is a versatile material. It can be used as a base coat, directly on the metal, or as subsequent coats. It can be used to coat one side at a time, or both sides at the same time. It can be applied by pouring, dipping, daubing with a brush, spraying, ear syringe, and more.
6 Minute Read
Industrial liquid enamels are versatile materials. It can be used as a base coat, directly on the metal, or as subsequent coats. It can be used to coat one side at a time, or both sides at the same time. It can be applied by pouring, dipping, daubing with a brush, spraying, ear syringe, and more.
How does it differ from my 80 mesh enamel?
There is much similarity with 80 mesh enamel which has been prepared for 'wet charging'. You have added a little water and probably a little adhesive if you plan to coat a three-dimensional object. The prin ciple material in your mix is enamel (glass), next is water, and finally the smallest is the adhesive. It is the same with industrial liquid enamel; the principle ingredient is enamel (glass), however, it has a fineness of one to four percent on 200 mesh, meaning the rest is finer than 200 mesh. The second largest ingredient is again water, however, it is a higher percentage than before. The third ingredient is clay, about 5%, which serves as a suspension agent and a weak adhesive. It also contains about one half of one percent of a fourth item called electrolytes. These may be borax, magnesium carbonate, sodium aluminate, or other metal salts. They attach themselves to the clay particles and form a thicker consistency which is called 'set'.
Industrial liquid enamel is sold by Thompson as well as others. Thompson sells it as, 'water base liquid enamel'. It is available in both liquid and powder form. Though the liquid may appear to be more convenient, there are some disadvantages. First, it occasionally freezes when shipped during cold weather. Second, it often settles, due to vibration during shipment and is difficult to remix. Third, the shelf life is somewhat limited as the material settles, the water evaporates, and in time, forms a hard cake in the bottom of the container. On the other hand, when shipped in powder form, the shelf life is practically unlimited. Mixing as needed is not difficult, the quality is more consistent, and there is sizeable saving.
How to Mix
Since the powder contains a workable blend of glass, clay and electrolytes, only water needs to be added. The question is, how much? The amount varies some, but generally the water required ranges from 38 to 42 percent of the weight of the powder. Eight ounces of powder will require 85 to 95 milliliters of water for a workable mix (slip). Since some readers may not have a pound scale or a graduated cylinder in milliliters, we provide a rule of thumb. One container level full of water, between two and two and one half containers (same size container) level full of powder will produce a useable mix of most any industrial liquid enamel. If you would rather not judge when a container is half full, use two of water and five of powder; four will usually be required and frequently most of the fifth.
Do I put water in the powder or vise versa?
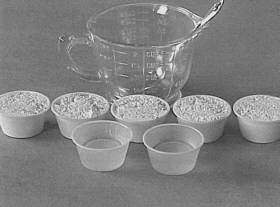 | 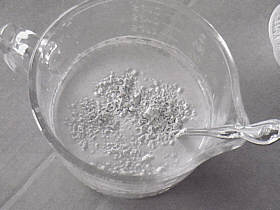 |
| Figure 1, set up showing ratio of powder to water. | Figure 2, powder floating on top |
Again, the answer is easy; it can be done either way. First, the powder into the water. Figure 1 shows a set up (not necessarily the best). Put two containers of water into the measuring cup. Add the five contain ers of powder one at a time slowly while stirring the enamel. The powder should be scattered onto the entire surface of the water, not poured in one spot. At first, the powder disappears quickly, dispersing in the water and little stirring appears necessary. The elec trolytes are being dissolved in the water, the rest of the powder, being insoluble, is being dispersed. Usually, as the second container is being added, powder will begin to float on top instead of being dispersed immediately, Figure 2. Hesitate a few seconds while it wets and sinks. You are in the process of wetting a few square miles of surface area.
As you near the end of the third container, the waiting time for the powder to sink will test your patience and you will start stirring before it sinks. This results in a soft mass which disperses easily. You will soon notice the film on the spoon, when removed from the liquid, is different-it now has a fairly nice coat. This coat becomes thicker and more uniform as the fourth container is added. Perhaps near the end of the fourth container, the mix should be checked. Wash the spoon, dry it thoroughly, dip it into the mix, move it through the mix, then straight up and out with a continuous movement, holding it vertical while the enamel runs off, as in Figure 3. When draining has ceased, raise the spoon as shown in Figure 4. The coating should be smooth, and show no signs of beginning to drain again (second drain) after raising the spoon to the Figure 4 position. The ultimate test is to dip a small test piece, dry and fire.
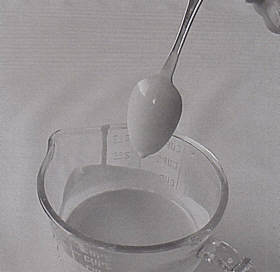 |  |
| Figure 3, draining liquid enamel from spoon. | Figure 4, correct coating of spoon. |
The final step of mixing is straining the enamel, Figure 5. A tea strainer is quite adequate. With a little practice, the coating thickness desired can be obtained rather easily. Once the procedure is understood, weights and measures will probably be of little concern.
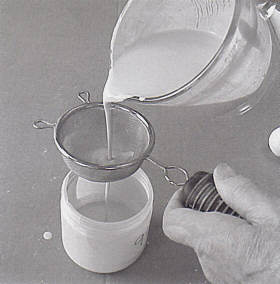 |  |
| Figure 5, straining liquid enamel. | Figure 6, showing cavity formed in dry powder. |
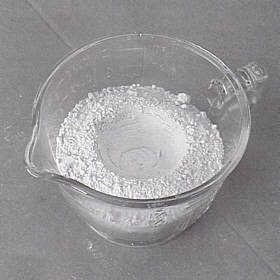
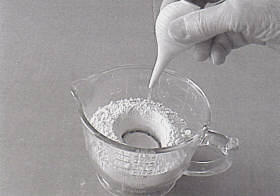
It may appear redundant to describe water into the powder, however, there are some advantages, and happens to be the author's choice of methods. Place the powder (use the five container procedure, or be adventurous) into the mixing cup and make a small cavity in the center, Figure 6. The cavity shown was made with the large end of an ear syringe shown in Figure 7, being used to add water. Adding water in this manner provides more control than pouring from a coffee cup. Fill the cavity about half full, stop, and allow the water to soak into the powder. Add a little more water, again stop and give it time. Soon, there is an interesting erosion pattern.
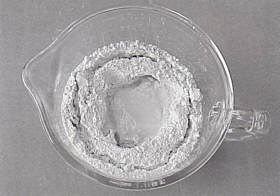
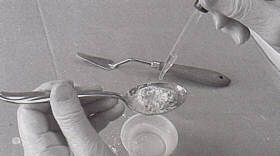
The water is forming its own container within the measuring cup, Figure 8. A palette knife is ideal for pulling the dry powder into the center without disturbing the wall of the inside container. Very little additional water will be required to make the entire top surface appear moist. Begin to stir with the palette knife, add a little water, check the thickness of the coating on the knife, and continuing until the desired coating thickness is obtained. Again, the last step is screening the enamel. The author prefers this method because it is easier to estimate how much powder might be needed for a project than the amount of water. Starting with a mix which is too thick, needing only water to make a workable material, is more reassuring than starting with one so thin and hoping you will have enough powder to arrive at a good product. Plus, this latter method is more versatile. Figure 9 shows a small amount being mixed in a table spoon.
 |  |
| Figure 7, adding water to cavity in powder using an ear syringe. | Figure 8, showing water forming it's own 'container' |
Frequently, grey lines will be seen while stirring. These are not contamination, but either air bubbles which have come to the top, or an indication of low `set', which is normal at this stage. Generally, the mix will be better for application by the dipping method after aging for twelve hours or more. Needless to say (but we will), powder is added to obtain a thicker coat, and water is added to obtain a thinner coat, when adjustment is desired.
 |
| Figure 9, mixing liquid form enamel in tablespoon. |
Related Articles

The Enamelware of Radka Urbanova

21st International Cloisonne Jewelry Contest 2008

Enameling Techniques for Beginners

How to Step-Roll Wire


The All-In-One Jewelry Making Solution At Your Fingertips
When you join the Ganoksin community, you get the tools you need to take your work to the next level.
