
Enameling Tips: Enamel Suppositions
8 Minute Read
This article is a part of a series offering enameling tips and what is most occurring that enamelists encounter. This part talks about enamel suppositions and assumptions.
*******************************************
As taught and written about, far too much is assumed. "I've always done it this way," calloused with "it has never happened before," the question of "what happened?" receives a blank stare when answered with the question "what did you do?" There is no admission, let alone cognition, that anything was different. Those who teach are constantly bombarded by "what happened?" The answers should pick up on the obvious first, then trace it back to the original occurrence with a clear explanation based on probable cause evidence. Most of what is 'taught' about enamel and enameling is supposition.
All that appears will have indicators. Just think about it, look at the footprints, and take nothing as granted without question.
None of the examples are contrived. Each is actual. Some examples have occurred to the author. None have been faked. The obvious is not incidental. The examples are actual size, 1-1/2″ x 1-1/2″, 18 gauge, with the initial temperature of 1450°F for three minutes. Test yourself before reading on. Give yourself an exercise in what was going on before, during and after the fact of firing.
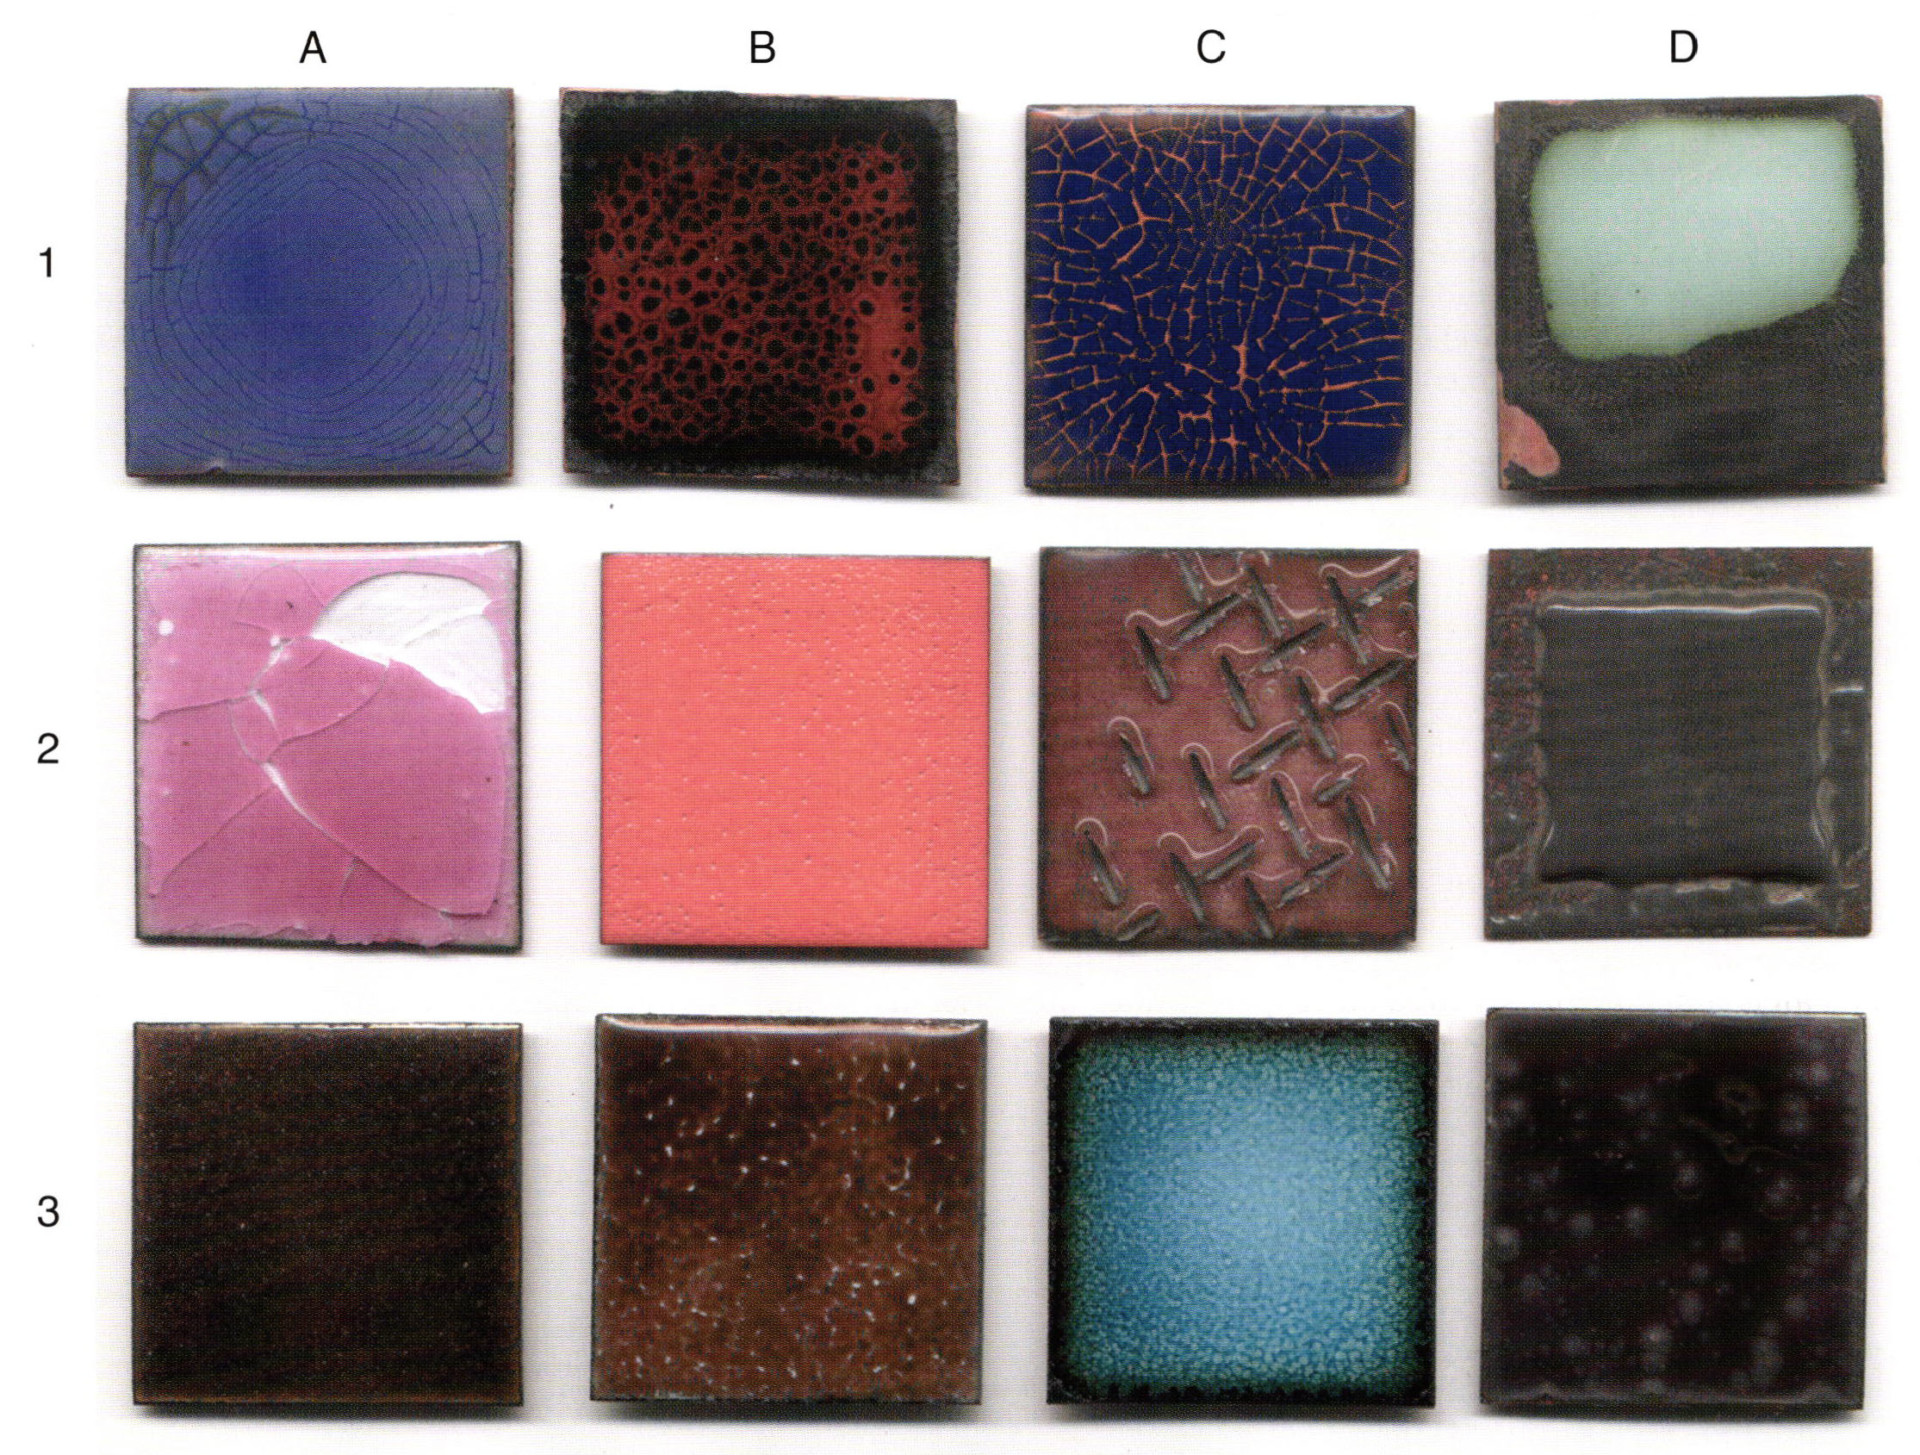
1-A - A previously-fired color check of an opaque blue was extracted from the pile of tests normally run by the company. It was cleaned in nitric acid and water, so as to perform another test on the cleaned side. What occurred, the previously fired side had decomposed by the acid, the age, or both, when subjected to a new firing, there was a uniform craze, expansion of the metal broke the glass bond. The enamel softened and pulled to itself exposing enamel not decomposed. Thus, there are glossed and mat surfaces, side by side, in concentric circles.
1-B - A color test firing of a cadmium-selenium opaque red enamel was left too long in the fire. The normal test would have been for three minutes at 1450°F. This example went further. The metal elements oxidized. The glass pulled together in an attempt to save itself. The copper was reducing the cadmium. Everything was oxidizing. Thus, there is a pattern created. Spotted with oxidation, the glass was consumed.
1-C - A liquid form enamel designed for application to low carbon steel that has been ground coated or for cast iron that did not need a ground coat was coated on an enamel previously fired on copper. Under the elements of refire the base coat of enamel on copper crazed, the coat of dry liquid enamel cracked, broke apart. The conditions of heat caused the finely ground liquid form material to naturally seek itself under the conditions of heat accelerated. Thus, there is a crackle appearance. This is an accident by design once known.
1-D - A test firing of 1020 titanium white was fired longer than three minutes at 1450°F, due to a phone interruption. The glass drew together as the copper oxidized. Copper was also being taken into the solution of the glass. The oxidation is obvious as it turned the white enamel green. The copper scale did release from the lower left corner on cooling. There was no bonding.
2-A - While the sample was not counter enameled, it does exemplify that a transparent color was fired on white. This was needed for quality check of the red color. It is also an excellent example of coefficient of expansion. The cover coat of enamel on the copper was 1030 white, coefficient of expansion 288. The coefficient of expansion of the enamel applied on top is 344. The base metal has an expansion of 500. The sandwich couldn't exist. They had to split. Counter enamel would have assisted in the equalization of tension, but for how long? Lower expansion enamels go on top of higher expansion enamel, not the reverse.
2-B - This is an example of orange peel. Not all enamels have the same viscosity. Each color has its own characteristics and more so under the conditions of heat. The extreme would be sample 1-8. Be aware of the latitude of the material being used, in this case viscosity.
2-C - What could be more obvious? The example was fired with its previously fired coated enamel back, on a firing rack. This slip of cognizance confirms a lack of attention.
2-D - This example exemplifies a perfect uniform coat of enamel. The enamel was over ground, too fine. The application was also too heavy. Under the conditions of heat, the enamel contracted unto itself, before fusing to the metal in it's contracted form.

3-A - The enamel had decomposed over time before application and firing. The surface is fuzzy, with a small pebble-like surface. All enamels should be tested before use.
3-B - Application, softening point, and viscosity determine breakup. Enamels are not created to be the same. Each has its own individuality, just as you do. Effort is required. Pre-check the enamels being used in the same manner and sequence.
3-C - While trying to illustrate example 6-4, the sample was over fired. The results exemplify how the new can become known. This evidence of origin devastates because it was unexpected, when it, in fact, exemplified the very crisp edge of knowledge. There is no fault when the natural takes over. The question would be about just how willing you are to conform or discover. The color comes from the copper. See example 6-A.
3-D - There is no question here. Something is wrong. There has been a contamination, an error in manufacture, or a mix of incompatible glasses where on would flux out the other. In this case, the manufacturer should be quickly notified. Those who manufacture a product so basic do not have room to intentionally ship a poor product, and there is always the case that the material was not contaminated at the factory.
4-A - The example is clear. Excessive enamel was applied to copper that had no counter enamel.
4-B - This is the backside of a previously fired example that cracked during the second fire. The parted enamel characteristically drew to itself, rather than eliminating itself from the surface based on gravity, volume and heat, creating a raised lump and a shallow. Consider the difference between example 1-A and 4-A. Each have unique differences to be considered.
4-C - Some enamels have fugitive colors. Each firing creates a different tint, at the same time-temperature relationship. This is more true of lead bearing opaque enamels that are fired high, then fired lower. The example illustrated is lead free. The right side has been fired once, the left side has been fired twice at the same time and temperature. The first fire coated the whole piece. The second fire coated only the right side.
4-D - This is a supreme example of over fire. In running the many tests that I have do to, the example was placed in the furnace around fifteen after four in the afternoon. It was forgotten and removed the next morning shortly after eight. That would make for a sixteen hour firing at 1450°F. The copper consumed the glass. The reticulation is all natural and one can relate examples 1-D and 6-B to the process of chemical activity under the conditions of heat. Example 2-D is not in play. Could the surface of the example sustain being enameled is yet to be confirmed. The copper appears to be completely oxidized, meaning through the entire thickness. It is now more than two times thicker than the original .040 of an inch thickness.
5-A - 1030 clear enamel was fired on copper for three minutes at 1450°F. The time was not sufficient for the copper oxide that formed at the interface to be taken into solution and clear.
5-B - 1030 clear enamel was fired on gilding metal (95 parts copper and 5 parts zinc) for three minutes at 1450°F. The zinc takes on the oxygen before the copper, leaving no oxygen for the copper to form copper oxide, thus a very clear coating.
5-C - 2839 clear transparent gold bearing red was fired on gilding metal for three minutes at 1450°F. The coating is clear and very much an orange red. There was no copper oxide to coat the colloidal gold crystal that forms the color.
5-D - The same as above on copper. The result is a very deep red to the point of appearing opaque. Though not quite the same, the occurrence of the oxidization will also occur with cadmium and selenium transparent colors on copper.
6-A - It is very common for similar looking enamels to become mixed. 2010 clear was carelessly put into the 1030 container. The effect is a mottle when fired; the result was unanticipated.
6-8 - 2007 is a low viscosity clear with a low softening point. When the piece was counter enameled, the front or first surface over fired. The firing temperature - time relationship should have been lowered. The copper oxide is acting as a colorant. The edge shows a sufficient increase of burnout moving into the transparent mass. Note the half circle 'humps' intruding. This is a reminder that the edge of the enameled object should have the oxidation removed before a second firing occurs. The oxidation will continue to develop as seen in 3-C. Always true the enamel edge to the copper alter each firing.
6-C - 2010 was applied to a copper surface that had not had the copper oxide removed. This is OK, if it is intentional. Note that the enamel can pull back when the metal edge still has a copper oxide coating. Poor edges draw the eye away from the whole piece and become a distraction.
6-D - The piece was being prepared for enameling. The acid was too strong, or the piece was left in too long. The pattern is interesting for Basse Taille. The gas bubbles have created a pattern that might not have been expected or wanted.
Related articles:
Related Articles

The Enamelware of Alan Mudd

Josiane Tragesar’s “A Way of the Cross”

Enameled Spiral Beads

The Ceramic Tissue Method


The All-In-One Jewelry Making Solution At Your Fingertips
When you join the Ganoksin community, you get the tools you need to take your work to the next level.
