
Enameling Tips: Cause and Effect
8 Minute Read
This article is a part of a series offering enameling tips and what is most occurring that enamelists encounter. This part talks about the cause and effect of basic knowledge.
*******************************************
There are contributing factors at every turn. The Titanic sank. Evidence survived. What is to be learned or understood or considered? Fact is not a fault unless it interferes with projected assumption, causing a diversion different to the expectation. Cause and effect confirms the elemental skills of basic knowledge.
7-A. 533 liquid from dry powder was tested on copper. The dry powder was mixed with water into a cream consistency. This material was then applied by brush to the copper with a heavy hand and vibrated into a consistent, even coating, and dried. That coating would be about .020 of an inch or slightly less for a test firing. In this case, after drying, the application was scratched through with a long tapered stylus to create a pattern. Loose particles were blown away, and the piece was fired for three minutes at 1450°F.
The example is a typical result.
7-B. The same as above was true for BC 1070. However, note that the line, cut through, is wider after firing. This is due to the viscosity and softening point of the material.
7-C. The same as above was true for BC 969. Note that the line, cut through, is even wider than that of the 1070 or the 533. There is again a difference in the viscosity and softening point of all three examples.
7-D. The same as above was true for BC 303. Note that the cut through line is even wider than the previous three examples. There is again a difference in the viscosity and softening point. There should be no expectation for any two enamels to react the same at the same time/temperature relationship.
The examples in row 7 also illustrate different compositions of the enamel. A and B are white. C and D are 'clear.' A is a titanium white. B is an antimony white. C and D are not clear because particles of glass lose transparency the finer they are ground. In the case of liquid form enamel, the particle size is less than 325 mesh.
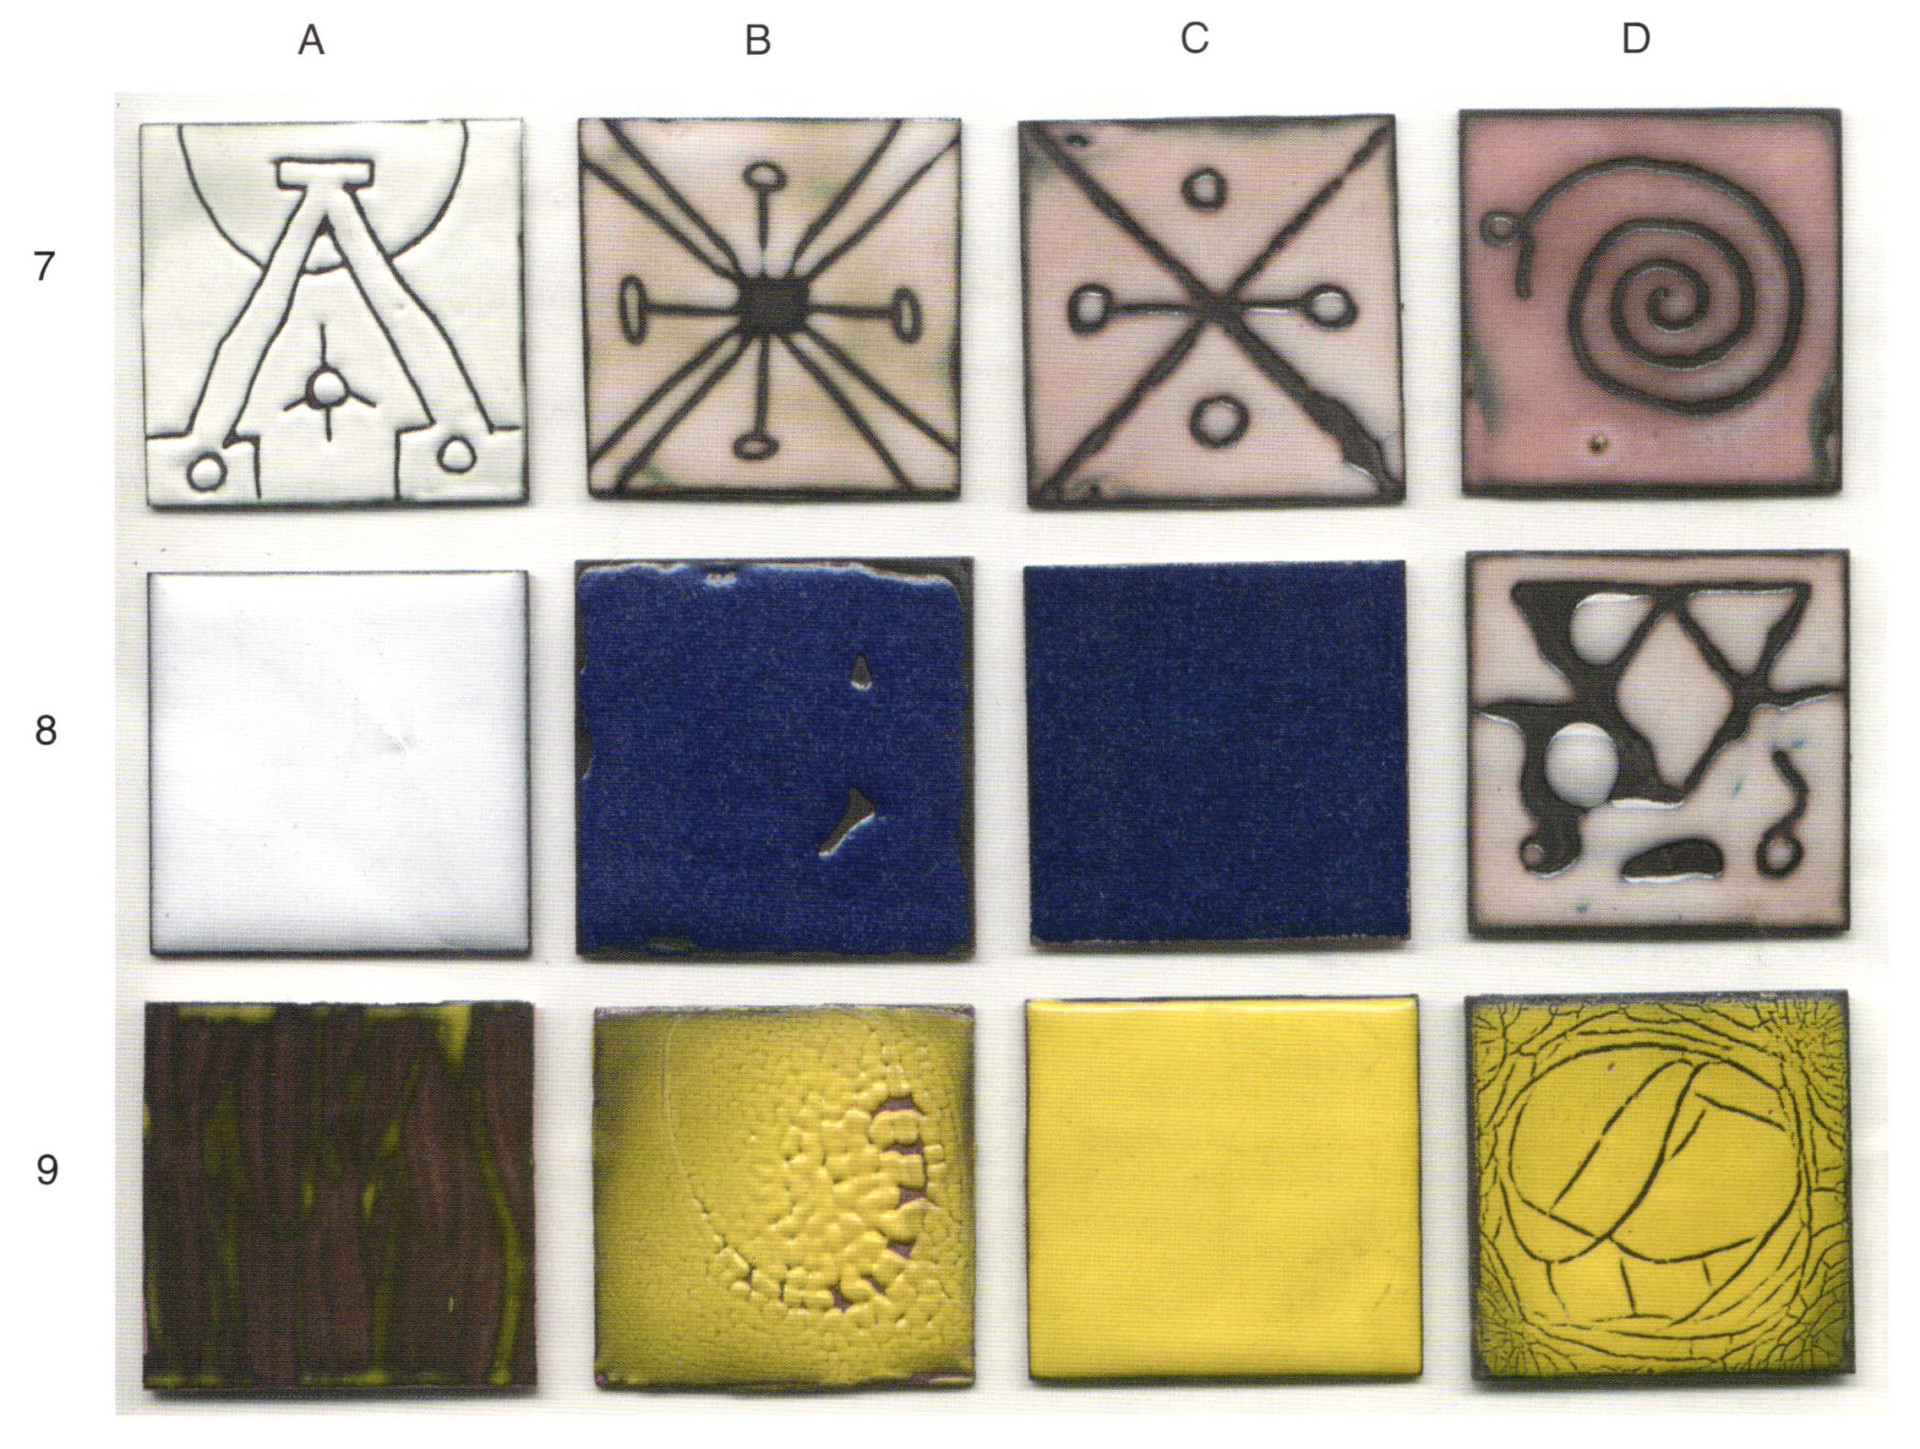
8-A. This example is correct. 80 mesh 1010 enamel was applied and fired at the standard time and temperature. It is included here to illustrate the difference in what is called 'white.' Check the color of 7-A, above. 1010 is the same enamel that was called 621A, Undercoat for Transparents, in the lead-bearing days of Thompson Enamel. The formula was never changed and it was never lead-bearing.
8-B. A sample of CE-3, 80 mesh, was fired. CE-3 is a mix of opaque, white, blue, and black in equal proportions for a counter enamel that would resemble 'granite' ware. In this example, the film of plastic on the copper wasn't removed from the copper before application and firing. The enamel is full of pin holes and has tears in the surface and from the edge.
8-C. Sample of CE-3 fired correctly.
8-D. Sample of BC 969. The coating was thicker than necessary. The enamel pulled to itself, away from the cut line due to amount applied and particle size.
9-A. Sample of 769 liquid form enamel, like example 7-A, but the application was not sufficient, even, or vibrated into evenness before firing. There are several factors here that must also include that769 is a cadmium/selenium color. This colorant has a chemical reaction with copper and will reduce the colorant to black. Is this an error of application, fault, or potential technique?
9-B. The same 769, applied direct on copper, evened out and dried. A drop of water was applied to the upper edge twice. The water broke the bond of the enamel particles and formed the double U shaped pattern upon a normal firing. Again, is this an error of application, fault, or potential technique?
9-C. The same 769, with the same problems of application and firing as 9-B was dipped into the same liquid form enamel, drained and dried. There was no fault or tears showing on the second application and firing. The tear can occur with a heavier than necessary coating and/or when the enamel is ground too fine. There are customers who complain that the material must be finer so that it will go through an air brush. There are those who use a spray gun, not an air brush. When in fact that the majority of those purchasing this material use it for the crackle effect, the point becomes moot because it does cover and not tear on an enameled surface.
9-D. The same 796 does crackle when used in the 'typical' craft technique.
10-A. The same as 9-A, with three exceptions. After firing, the piece was pickled and more than three spots of black were picked at with a metal probe in the upper left quadrant. Then the piece was sifted with 2030 clear that did not have the fines removed and fired to the standard. The picked at areas show and the clear coat is cloudy. Both are faults that compromise the visual result.
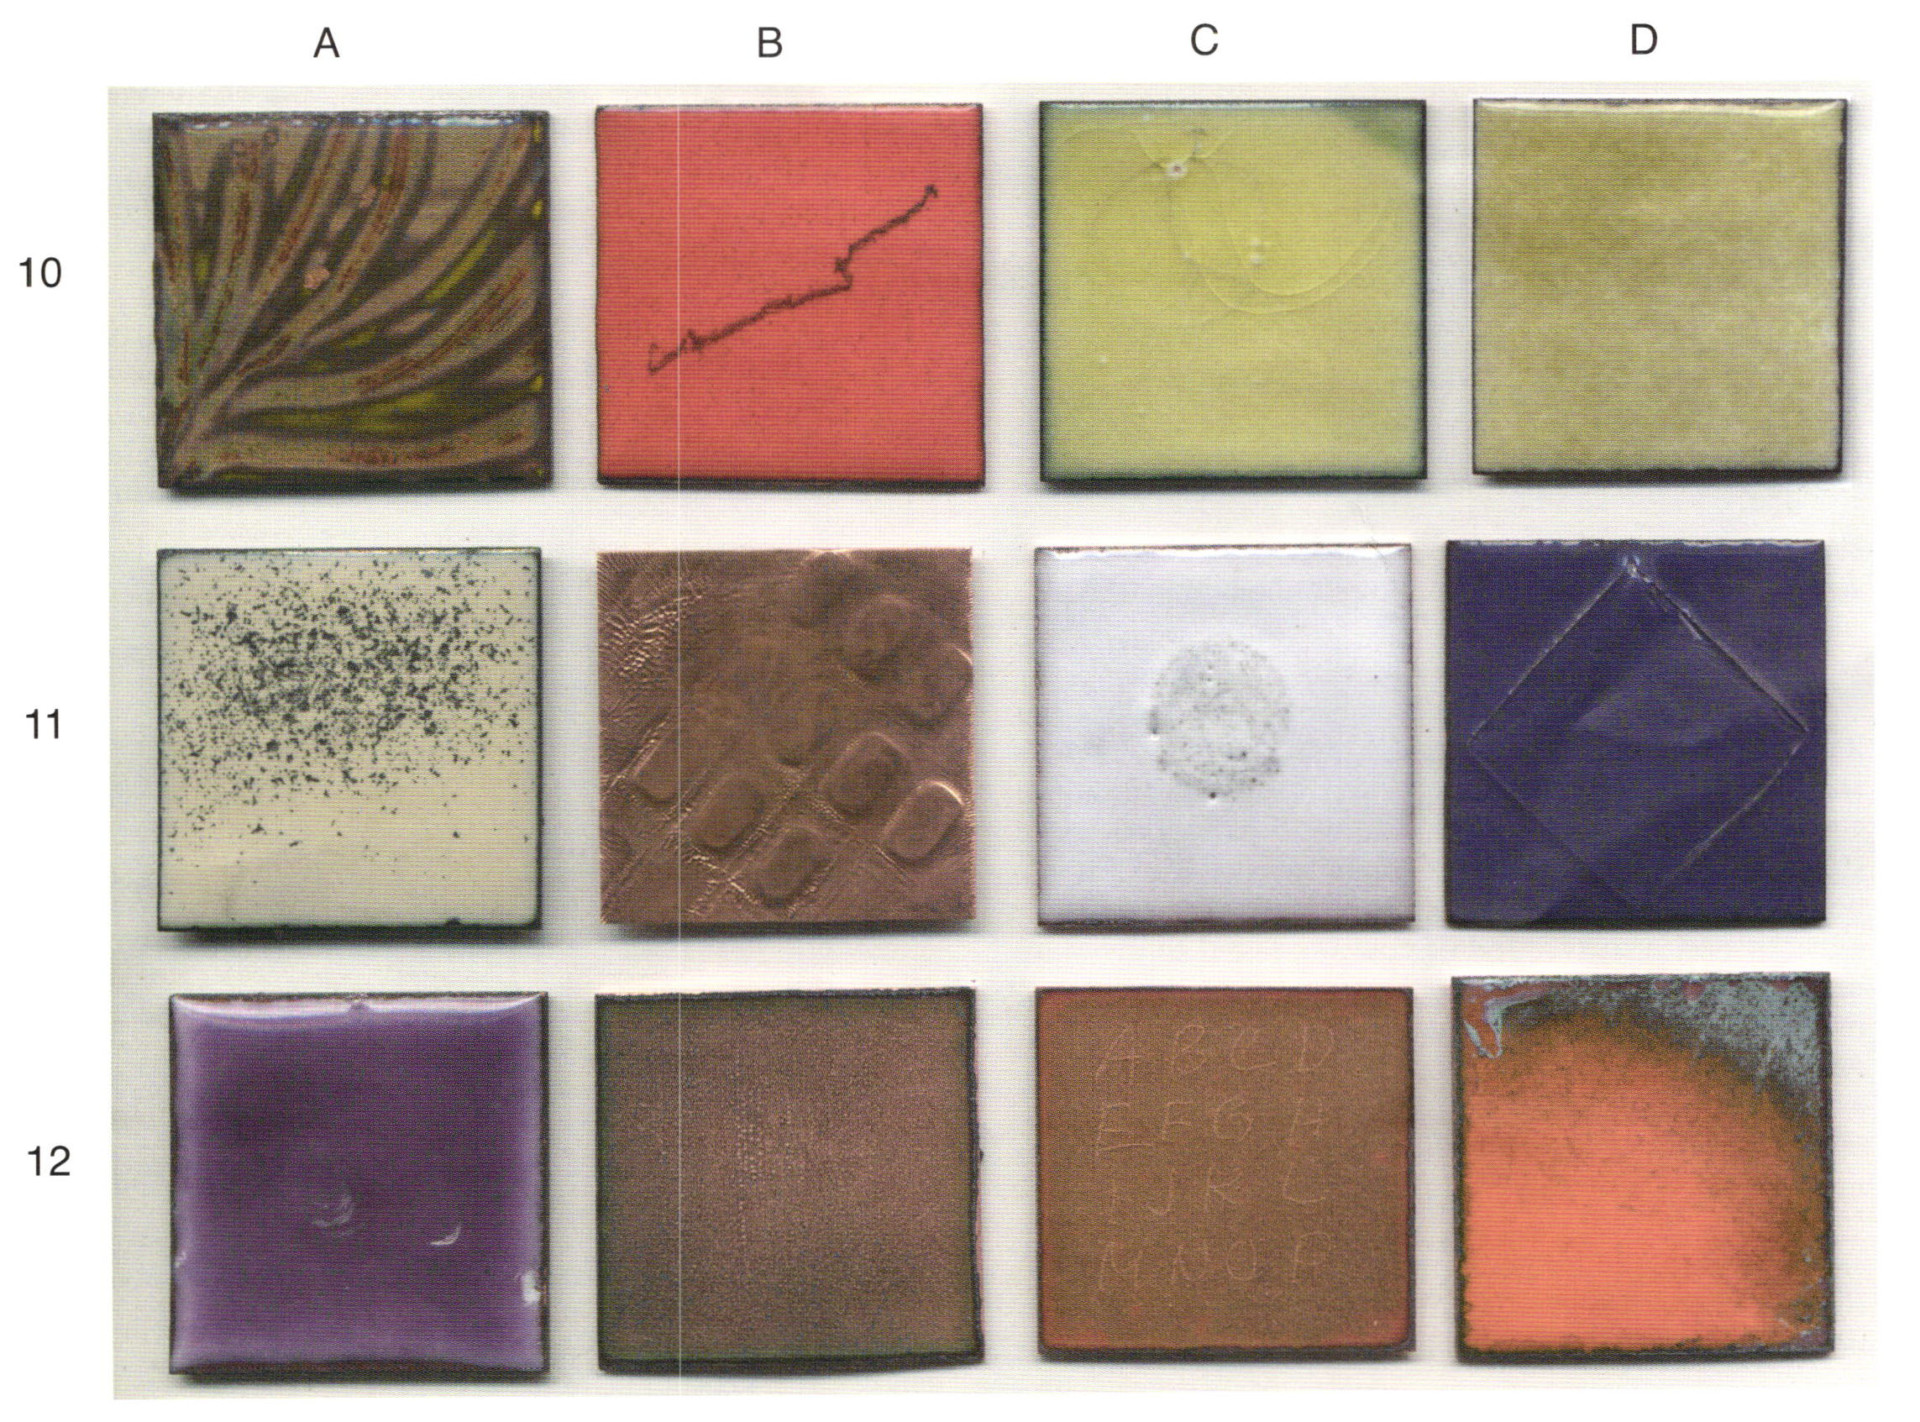
10-B. This exaggerated example illustrates that a stoned enamel surface can become marked by a piece of metal (copper). Metals when agitation against the stoned surface transfers metal to that surface. When the piece was fired the mark became a visual indication that carelessness had occurred. Or, it could also have been a deliberate technique, or 'art mark'.
10-C. A transparent yellow green was fired on white. Circular cracks occurred in the transparent coating. This commonly occurs for two reasons. No, or not the right counter enamel and/or age when the cover coating is excessive. In this case, it was both. Surface dirt got into the cracks and left its visual influence when refired. The transparent coat pulled to itself as it softened on refire, pulling some undercoat white up, and thus created an air bubble circled in white. A new crack now radiates from the air bubble. Repair is problematic.
10-D. A transparent olive green was fired on white. That firing was for two minutes at 1450°F. The transparent sifting was on the thin side, hardly enough to cover. This created a mottled appearance to the olive green, unlike the consistent coat of yellow green seen in example 10-C. Had the firing been longer, there would have been pull or break through.
11-A. This overt sample of fire scale begs the point. Fire scale floats on the hot air from firing. It can pop from the piece or the stilt before going into the fire. It can land on the piece in the fire or it can pop from the stilt upon coming out of the fire and stick to the enamel before the enamel passes through softness to hardness. Attached fire scale particles on the enamel do not occur when the stilts and firing racks are clean before a piece is placed on the stilt going into the fire. Keep your kiln area and stilts clean.
11-B. Copper left in the acid too long. The basket it was resting on in the acid bath left a pattern. Error or technique?
11-C. This is the problem that is assumed to come out of nowhere. Especially for those who use a Carborundum stone, corundum, when stoning or have carbonated drinks in their studio. 1030 opaque white was sifted; onto that material a drop of water from a rinsed Mountain Dew can was placed in the center. The dry piece received the standard firing. A mass of bubbles occurred. Nothing can be done to repair this chemical occurrence, except that of de-enameling and starting over. The carbon dioxide will continue to cause bubbling with each firing and in fact becomes worse, regardless of the many ways one attempts the repair.
11-D. Float glass was fused onto a coat of opaque purple enamel that had already been fired and counter enameled. The coefficients of expansion did not agree and the float glass cracked off because of its lower expansion factor. However, consider the potential - Dorothy Sturm fused glass to her enamel wall pieces with a high degree of success. The reason being, it was a lower firing than what is considered normal. Consider both potentials.
12-A. This is the back side of a piece fired on a three-point trivet. Trowel marks appear in the surface because the enamel was still soft when an attempt was made to remove it from the stilt. Removal was then forced by dropping it flat. Where it was resting on the stilt and attached by the glass, chips occurred. Had the stilt been clean, free of enamel, had the edges of the piece been filed obliquely, there would not have been so much damage and the work needed for repair would have been lessened.
12-B. The clear coat of clear was deliberately forced to crack. It was then left unattended for several weeks before refiring. The longer one waits to refire this type of damage, the greater the ghosts.
12-C. On a clean piece of copper, the alphabet was written with a 'lead pencil,' then covered with a clear enamel and fired. The pencil marks are clearly visible as a row of bubbles. Fault or no fault?
12-D. A cadmium/selenium colored enamel was sifted onto a very thin coat of opaque white, from thick to thin, and received a standard firing of two minutes at 1450°F. Note that where the orange enamel was ever-so-thin, that it still darkened the same as it would if applied directly on copper.
Thirty percent of the examples for part three are already on the desk. Cause and effect abound like weeds. No one can stop evolution because it is a work in progress.
Related articles:
Related Articles

Novorit: Colorful Imagery

The Enamelware of Tibor Kopocs

How to Make a Frame for Enamel Pieces

Etching Options for Champleve


The All-In-One Jewelry Making Solution At Your Fingertips
When you join the Ganoksin community, you get the tools you need to take your work to the next level.
