
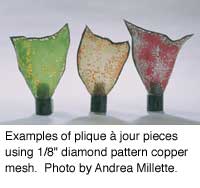
Copper Mesh Plique a Jour
Interested in illuminating my work and using experimental techniques, I came across copper mesh. There are many kinds of mesh, but only a few are easily obtained without buying in bulk from industrial suppliers. I have been using the 'Impressions' mesh, from American Art Clay Co., with transparent enamels for making plique a jour pieces. The mesh can be purchased from a local craft store or online. There are three varieties available, ranging from dense cloth like mesh , to 1/8 to 1/4 inches diamond shaped expanded mesh.
4 Minute Read
Interested in illuminating my work and using experimental techniques, I came across copper mesh. There are many kinds of mesh, but only a few are easily obtained without buying in bulk from industrial suppliers. I have been using the 'Impressions' mesh, from American Art Clay Co., with transparent enamels for making plique a jour pieces.
The mesh can be purchased from a local craft store or online. There are three varieties available, ranging from dense cloth like mesh , to 1/8″ to 1/4″ diamond shaped expanded mesh.

Preparing the Mesh
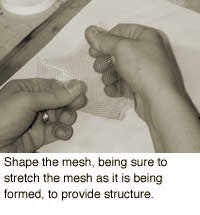
Before you begin working, you will want to protect your finger tips using tape, to prevent cuts and abrasions. I use Guard-Tex, which can be purchased from many jewelry tool and supply companies. Using scissors, cut out a shape. You will then STRETCH and bend the mesh into a three-dimensional shape. Stretching is important because it helps prevent the form from collapsing and sticking to the mica when fired in the kiln. Next, classify the enamels by sifting. I recommend using 80 mesh as your leading color and 150 or 325 mesh as your additional fill in colors.
Leading Enamel Color
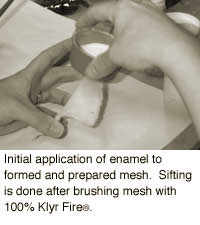
I use a soft 1/2″ paint brush with 100% Klyr Fire. Brush it onto the mesh, trying to cover all the openings. Sift on the enamel (80 mesh) so that the mesh is completely covered. Place it onto a piece of mica, supported by a firing rack, and set aside to dry on top of your kiln or under a heat lamp. Fire between 1400 degrees F and 1450 degrees F for about 15 seconds. Repeat with the same color, making sure the cells on the outer edge are filled in. These can be problem areas later. Your second firing will be for 20 to 25 seconds.
Additional Enamel Colors
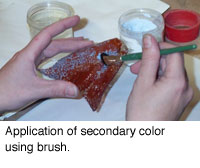
You will now add an additional color to the remaining open cells. Have a cup of water and a cup of Klyr Fire (full strength) within reach. Use the wet pack application. Dip your brush into the Klyr Fire, BLOT, dip into the enamel (150 or 325 mesh), then wipe over the open cells. If it is too wet it will glob onto the back of the piece. If this happens, brush off excess enamel from the back. Continue with this until there is enamel in all of the open cells. If you are having difficulty in some areas, brush on Klyr Fire and sift using the 1/2″ sifter. Use your water to clean the brush when necessary. Set aside to dry, but not completely. When it is a pasty consistency, you will remove the excess using nothing else but your finger. The excess enamel can be scraped onto the side of its jar so as to not waste.

Any enamel remaining on your finger should be wiped onto a 100% cotton cloth (a T-shirt is ideal, not terrycloth). Continue doing this until the color is only within the open cells. Apply this process if and where necessary on the back of the piece. This can be a little messy, but I have found that this works best because the mesh is such a thin gauge. An important thing to remember at this point is that UNDERFIRING IS THE KEY. Fire the piece for about 30 - 40 seconds. You will repeat the additional color process two or more times as needed. More colors can now be added in the same manner. Continue this application until all the cells are full.
At this point your piece may be losing it's shapeor starting to collapse. If this is the case, you will need to reshape. Use two pair of tweezers, and push it back into shape immediately after taking it out of the kiln. This can be done each time a layer of enamel is applied, if necessary. For additional adjustments, extra firings should be done for 15 - 20 seconds. If a crack or fracture occurs, apply transparent Hard Clear (2040) to the BACK of the piece and fire. If mica gets stuck on the piece, use a dremmel tool or flexible shaft with a diamond bit and gently grind it off, dip into Armor Etch for a minute or two to clean, then fire. You are now ready for the final firing. This should be done for about 35 seconds, allowing the enamel to fuse to a smooth and shiny surface.
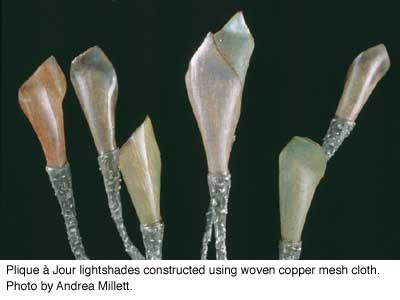
Copper Mesh Cloth
This mesh is a little more forgiving. It should be treated as if it were copper foil. It will need to be pickled, unless you apply enamel to both sides simultaneously and fire. The cloth can be bent, folded, crinkled, and embossed. If you are using transparents, make sure to remove the fines. The colors can be applied by wet packing or by sifting. Fire on mica at 1450 degrees F for about 30 seconds so it is a light glowing orange when taken out of the kiln. Because the weave is dense, you will notice your colors appear darker than what you might expect. This being the case, use a coat of clear enamel as your counter. I recommend test firing samples using different colors on the front and back of the cloth. Reshaping can be done, but be careful not to mark up your surface.
In working with the copper mesh, I have found that there are endless possibilities. It can be incorporated into designs of different mediums, or it can stand alone. The meshes can be found in various gauges, weaves, opening sizes and shapes, as well as in gold, silver, stainless steel, aluminum and brass. Aside from woven wire meshes, there are perforated metals with various patterns and openings that can be used. Play and experiment with making your own mesh. Looking through knitting and weaving books, along with chainmail patterns, can assist you in this task.
Related Articles

How to Make a Plique a Jour Fairy
Plique-a-Jour Russian Soldering Method

The Enamelware of Leila Tai

The Goldsmiths: Studio & Shop


The All-In-One Jewelry Making Solution At Your Fingertips
When you join the Ganoksin community, you get the tools you need to take your work to the next level.
