
Mesh Plique a Jour Technique
4 Minute Read
While reading in GoM #4 , Volume 23 of August 2004 the interesting article by Benny Alba about Alana Clearlake, I felt encouraged to show my own works. I have always been passionate about the transparencies that can be obtained with the very difficult technique of plique de jour.
Difficulty is not an obstacle in my search; on the contrary. Due to this fact I thought about making lamps since the light is indispensable for the success of the technique.
I could attain my project twice: the first time in 1993. I have just returned from Switzerland wherein I had the opportunity to visit Fribourgis Christ the King Church. In that place I fell in love with Theodore Stravinsky's glasses - he was Igor's (the musician) father.
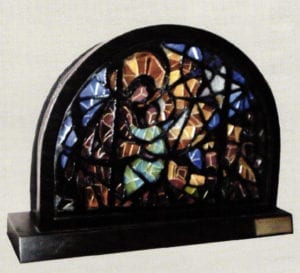
To pay homage to him and the beloved country where I was born, I started this very hard work with only one verbal explanation given by a friend of mine. Here is a copy of one of them: "Three Magicians" (photo1, left top). Labor was so arduous that I felt disappointed sometimes, since the work was 18 x 13 cms copper pierced made. Some of the holes were excessively large and in addition I did not have the appropriate enamel. There were always craters and I had to take it to kiln 14 times.
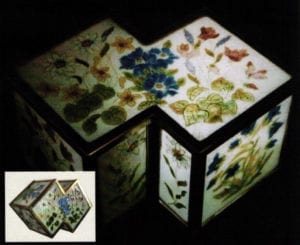
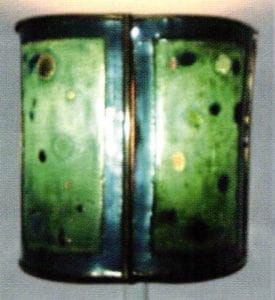
Several years after- in 1996 - I made my "Flowers of Light" (photo 2 and 3, left bottom and inset), also an homage to Switzerland, since the theme are flowers of the Alps. It measures 17 cm width, 12 cm depth and 5 cm height. This was another hard work! I must confess that I had to do it at least three times because some of the facets were broken or did not come out well. I started here to sink the piece in nitric acid.
I was satisfied with these two experiences but I have always dreamed about the possibility of making not rigid pieces. I wanted to add movement.
When I read for the first time in GoM #2, Volume 21, April 2002 the article by Jaime Frechette about mesh plique de jour I was enchanted, and started to experiment, first in small ornamental objects to which I made folds as if I was working with cloth material. I always liked to look at them through the light for the fascination that trans-parent colors have on me. I followed my research up to the moment when I made some lamps wherein the technique is widely seen.
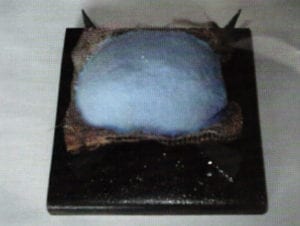
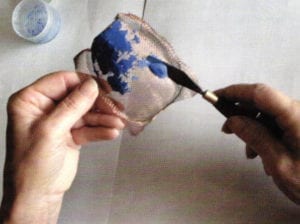
After I made several tests with hollow mesh as petals to form a flower, I realized that I could not cut the mesh because it was difficult to place it in the trivet and take it to kiln; there was a mark left where it rested and it easily got deformed. So I tried to cut a rectangle that I work with my fingers till it takes the shape of a petal and leave the remainder angles. With humid but thick enamel to which I add some drops of adhesive, I cover it with the help of a spatula and sift it immediately to reinforce the enamel coat before it dries out. I make this by sections to diminish the falloff humid enamel (photo 7). Afterwards I turned the petal and did the same thing on the other side, which needs less quantity of enamel. And, at last, in that same face which is the internal part of my petal, I reinforce the borders with a paintbrush to obtain a better finish and at the same time, a higher resistance to the borders. Now, it is ready to kiln with only the angles without enamel resting on the trivet (photo 8).
Of course I always have to retouch the holes that I can not avoid and that take place during the kiln, but this second or third step, that is also necessary in some occasions so not to deform the piece since it already has a consistent structure. Nevertheless, the structure can be modified as you wish when it is just out of kiln, in case you want to hollow or smooth the petal - in my case - because I am working with flowers.

Making new experiments I realized that if I fold a little bit the mesh all around the contour of the petal, it could better contain the borders enamel and these remain thicker and in addition more resistant (photo 9). Since that moment, this is the method I use.
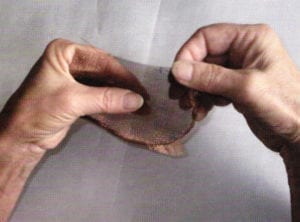
When the holes are already retouched, 1 or 2 times- according to the exigency and perfectionism of each one - we proceed to re cut the remaining mesh trying that the minimum possible wire remains at sight. And to polish up the work, I introduce the borders in nitric acid with water (50/50E") only for a few minutes and with a minimum quantity of liquid so that it slightly touches the enamel, since this turns lightly opaque when in contact with the acid. For this reason I introduce small sections and watch constantly till the cut mesh points disappear. Then I turn the piece in the liquid till all borders are free. (photo 10).
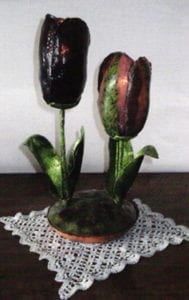
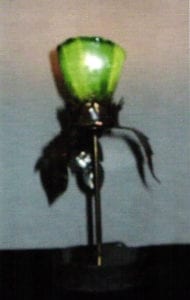
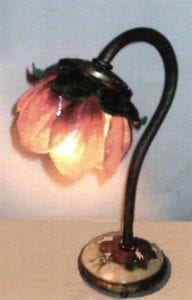
Now yes, my petal is ready to form the flower and assemble the lamp. Campanula (photo 11) and Tulips of Light (photo 12).
It is not easy, not quick, on the contrary! But,don't you think it is worthy?
If you have any questions for Myrtha Moro, contact her via e-mail at: myrthamoro@fullzero.com.ar.
Related Articles

One-Piece Die Cutting

Application of Hot Smithing Process to Non-Ferrous Metals

Dirk Van Erp: Arts & Crafts Coppersmith

A Book Review August 2009


The All-In-One Jewelry Making Solution At Your Fingertips
When you join the Ganoksin community, you get the tools you need to take your work to the next level.
