
The Art of Doublée Making
13 Minute Read
Historically, a wide range of techniques has been used to clad or coat silver or base metals with gold. These processes are based on efforts to balance three factors: cost, physical properties and appearance. Rolled gold or gold-filled stock is a widely used commercial form of clad material.
The Art of Doublée Making
Doublée is a German word of French origin that is applied to rolled gold or gold-filled material. In this article the term will be used to differentiate between handmade and commercially produced sheet. Doublée is distinctly different than commercial material and can be produced in a wide range of thicknesses and alloys which may not be commercially available. Doublée is far less perfect and its size is limited by the workshop facilities available. Because of this freedom, numerous design options are available.
For a number of years I have been interested in gilding and gold overlay techniques. Prior to 1978 I made extensive use of fire gilding (mercury amalgam gilding) in my work. In 1979 I studied under Klaus Ullrich at the Fachhochschule für Gestaltung in Pforzheim, West Germany, an experience that sparked my interest in doublée making. During the 1960s Ullrich had made extensive use of 18-, 22- and 24-karat golds in his work, but as gold prices rose he began using doublée to maintain a pure gold appearance at a more reasonable cost. During a visit to his workshop I watched as he fused a 0.3mm 24-karat gold sheet to a 1.0mm sterling silver sheet. The material was heated with a large propane/air torch. Air was supplied by a foot bellows. The material was rolled to size. The shape of the sheet was controlled by directional rolling. The final rolling pass was done with paper imprinting to decrease surface gloss.
In the industry the fusing procedure is similar to the way in which mokume-gane is made. An example I saw in Pforzheim was a sheet of gold 10.0cm x 30.0cm x 1.0mm thick. The gold was scrupulously cleaned and placed over an equally clean slab of sterling, 10.0cm x 30.0cm x 10.0cm thick. The gold alloy most often used is 14-karat with slightly more silver than copper. Two steel plates (10.0cm x 30.0cm x 2.0cm thick) were placed over and under the gold and silver. The stack was wrapped in brass foil to exclude oxygen. It was put in a gas kiln (a controllable atmosphere, probably reducing) for six or more hours until it reached the correct temperature. It was taken out and placed under a drop press for bonding. The bonded slab was unwrapped and rolled out or stamped into various forms.

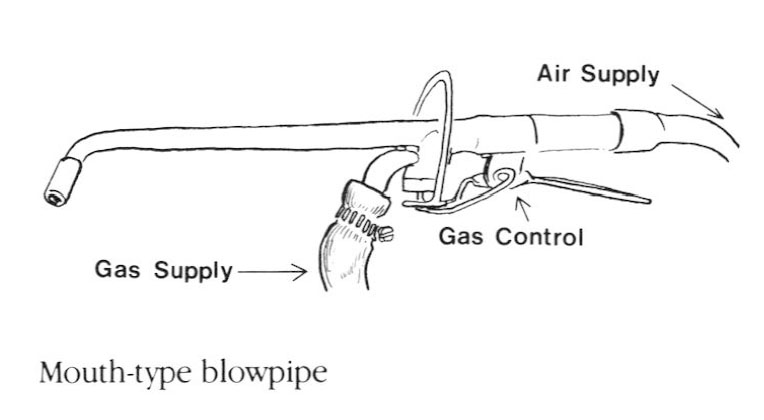
In 1980 I returned to Canada and established my own workshop. I began to experiment with fused metals to obtain the color of 24-karat gold and the strength of sterling at a reasonable cost. The first problem I encountered was the selection of a suitable torch. My first experiments indicated that acetylene was too hot and propane/air was too oxidizing. Eventually I settled on a mouth-type blowpipe and propane gas. This provided excellent control, and by combining this torch with a charcoal soldering block, a reducing atmosphere could be maintained. The blowpipe I use costs about $15.00 and is available from several European tool companies (see Suppliers). I sawed off the tip from a Bernz-O-Matic-type, small propane torch kit and clamped a rubber hose to the brass tube that was left to supply the blowpipe with gas. The air is blown into a second tube. The most difficult part of using a blowpipe is that the flow of air must never stop. This means that, like a horn player, one must breathe in while a reservoir of air held in the cheek supplies the torch. This is replenished as one breathes in and so the flame is never interrupted. Facility with this is best accomplished by practicing with one of the old-fashioned smaller blowpipes used with an alcohol lamp. The amount of heat produced is directly related to the air supply so the process is very direct and controlled. It can be done slowly enough to ensure that the metals bond without simply alloying. Alternatively, one can use bellows or learn to work with a sharper, hotter flame. A natural gas/air torch would work quite well.
Materials also have a strong influence on the system. While various gold alloys may be used, 24-karat gold offers the best probability of success. Its melting point is so far above that of sterling that it does not alloy easily. When alloying takes place during fusing, it is usually on the surface of the gold sheet and can be scraped or sanded off to restore a gold surface. Due to the extreme softness of 24-karat gold, however, the doublée is readily liable to damage. Even a fingernail can scratch a rolled-paper finish. Therefore, a 24-karat doublée surface should be protected from abrasion by surrounding walls and by function. Unsuitable for rings or bracelets, it is best for pins, earrings and small sculpture. Burnishing the surface effectively prevents further damage. Of course, a hard gold alloy may be used for the doublée material in order to create a harder surface.
The gold may be fused to fine silver or sterling. Sterling works well, but oxidation may present a problem that does not occur with fine silver. Conversely, fine silver is too soft for any load-bearing part of a construction. Gold may also be fused to copper, but this is extremely difficult because the copper-gold alloy formed melts at a relatively low temperature and spreads very rapidly through the gold. It is possible to use this effect with copper to create areas of varying alloy content (rose gold to red gold) on the copper surface and then bring out their colors by suitable chemical treatment.

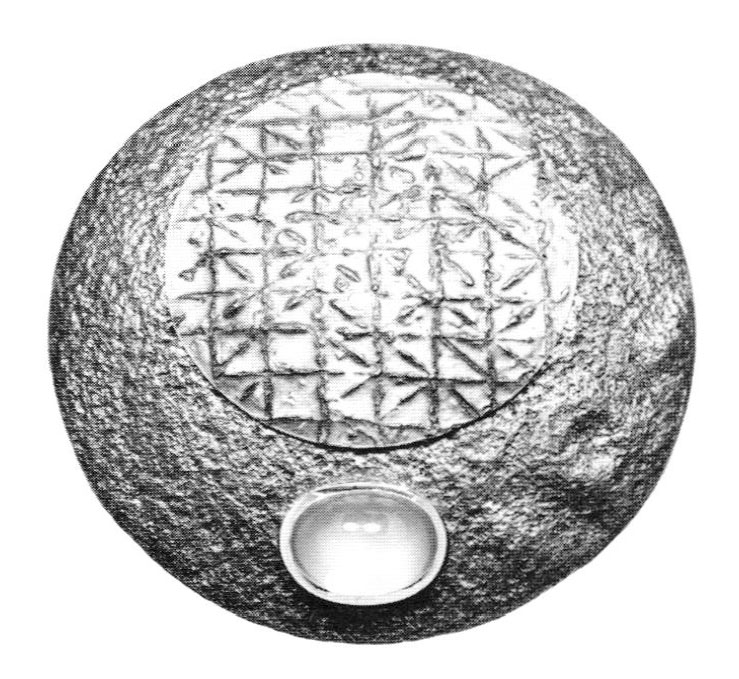
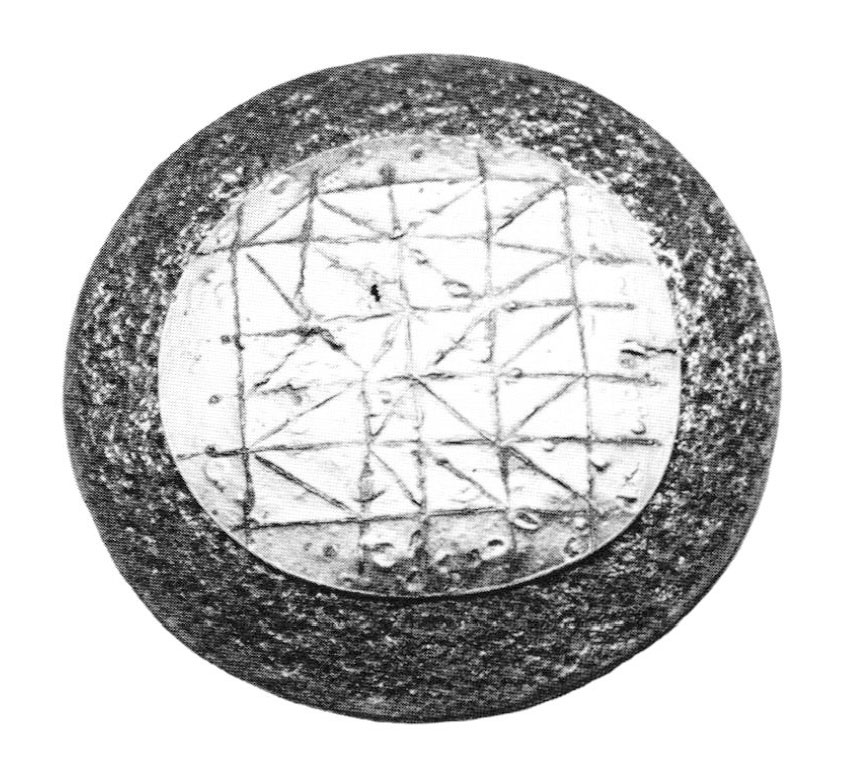
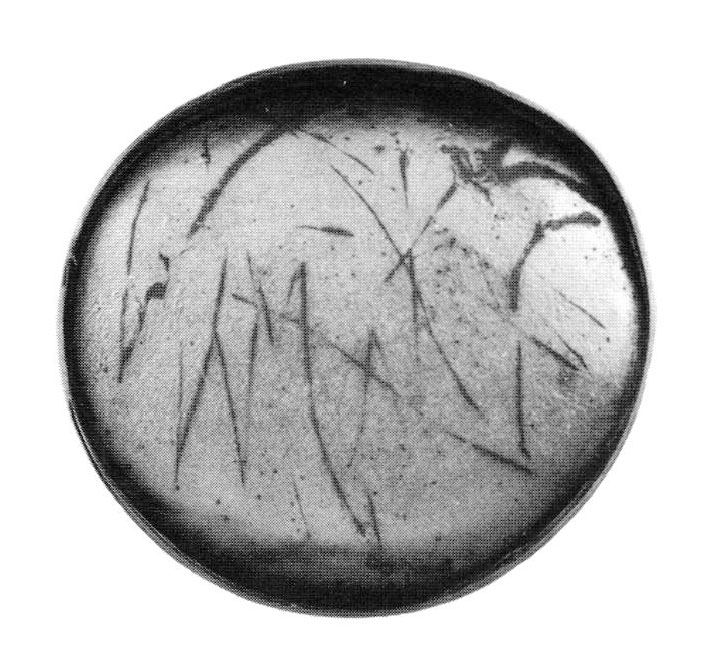
My first efforts used 0.3mm gold sheet fused to 1.0mm sterling sheet. Fusion was conducted using a soldering flux. With more experience, I began using 0.1 mm gold sheet and 1.5 to 2.0mm silver. These later experiments were done without flux, relying on the reducing atmosphere of the torch and charcoal block. At first the process was treated as a way to obtain a plain gold surface. It soon became apparent that it would be possible to engrave through the surface to expose the silver and develop graphic patterns. Patterns could be engraved in the surface before rolling. Line width could be manipulated by rolling. Line width, texture and relief can also be modified by re-fusing. One may thus use the metal as one uses drawing media and paper.
The following details the doublée process on a studio scale:
- Roll the gold to a thickness in the range of 0.3mm to 0.1mm on clean rollers. Anneal the gold when it shows signs of curling and increase the pressure in small increments to avoid rippling of the sheet. Keep it as flat as possible. If it is not completely flat, leave it curved rather than damage the smooth rolled surface by hammering. Hammer marks may cause air to be trapped in the texture while fusing. If necessary the sheet can be flattened hot while fusing.
- The silver used should be at least 1.0mm thick. Thicker silver will give greater surface area of gold at any given finished thickness. The thinner the layer of gold, the greater the degree to which the silver alloy approaches its surface. With very thin layers the gold becomes paler and greenish. A thickness of less than 0.1mm gold may cause alloying through while fusing or loss of color intensity on the final piece. With very thin gold layers, oxidation can take place leading to a spotty or speckled effect after rolling.
- The silver is cut to the required blank shape for fusing. Rounded or oval shapes are best for rolling without stress. The final material may be cut to any shape and soldered into fabrications. If you are working with freeform shapes with re-entrant angles, tearing of the blank is almost certain to occur while rolling unless great care is taken.
- The silver blank is placed on the gold sheet and the gold cut out around it, leaving the gold about 1.5 - 2.0mm larger than the silver. This prevents any silver alloy formed from crawling onto the top surface of the gold sheet.
- Both gold and silver are now cleaned on their contact surfaces. A medium or fine emery wheel on a flexible shaft works well. The thicker silver sheet may be cleaned by scraping, but the gold sheet will tend to curl up. Place the cleaned surfaces together, but do not touch them with your fingers.
- There are two ways to proceed. You may fuse the sheets together "freehand" or fix the sheets in position and then fuse them together. To align the sheets, take a piece of leather or folded paper towel and put the gold side down on the leather. Pass the material through a rolling mill with light pressure. This forces the gold to form itself around the sides of the silver blank and fixes it in position. It also prevents the gold from sliding off when fusing and ensures good contact between the gold and silver sheets. It also tends to prevent oxidation of the contact surfaces. There are potential problems with this second procedure. It may cause air to be trapped under the gold sheet if the sides fuse first. More importantly, you cannot see the temperature or surface texture of the silver as it heats. This conceals the "flash" of silver alloy that seals the gold to the silver. Overheating will cause the silver alloy to come through the gold sheet. Until you have considerable practice, it is easier and more controllable to fuse the flat gold to the silver and not to bother forming the gold over it.
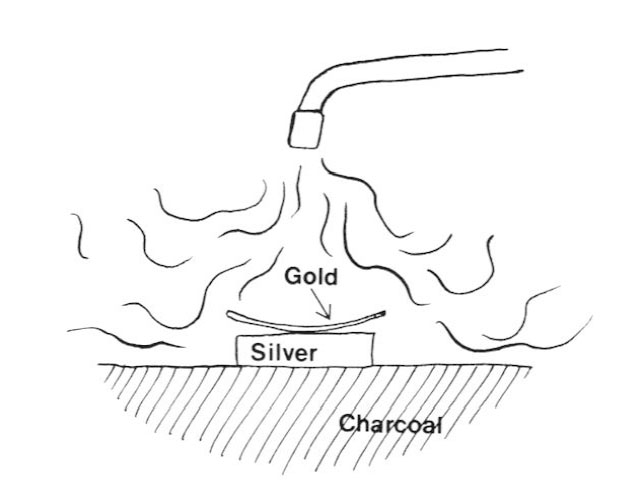
- Fusing is done on a flat charcoal block with at least 2.0mm of charcoal on each side of the blank. As the charcoal burns it uses up oxygen and helps maintain a reducing atmosphere. The gold sheet is placed on the silver (clean sides in contact). A very soft, gas-rich flame is used, which envelopes the metal and charcoal. This flame is maintained and the temperature is slowly raised until the silver begins to near its melting point. If one is using gold pressed over silver, care must be exercised at this point as the silver surface is mostly hidden from view and the silver alloy may unexpectedly appear through the gold. If you have placed the gold sheet on the silver it may be advantageous to have it domed slightly so that the centers of the sheets contact each other. If a reducing atmosphere has been maintained, the centers fuse first and the fused area moves outwards to the edges. This technique helps eliminate air bubbles trapped under the gold. The moment that fusing has taken place, heating should stop.
- The doublée slug is quenched and checked for gaps at the edges. If any exist, it may be re-fused to seal them. If bubbles show on the gold, they may be burnished down with a fingernail. If larger areas have not fused or there are large bubbles, they must be pricked through with a fine point, flattened and re-fused to the point that silver alloy is noticed at the prick mark.
- Excess gold is cut off the slug and saved. The sides are filed smooth and sanded. Any indentations may become the origin of a crack while rolling. Because of the high temperature of the process, the silver grain structure is enlarged and every care must be taken to avoid damage to the sheet during rolling. After filing and sanding, the back edge is also beveled slightly to help avoid cracking.
- The slug may then be rolled directly, if a plain gold surface is desired.
- Alternately, mount the slug on a pitch stick or engraver's ball for engraving, drilling, etc. Silver filings may also be fused to the gold surface for a dusted effect.
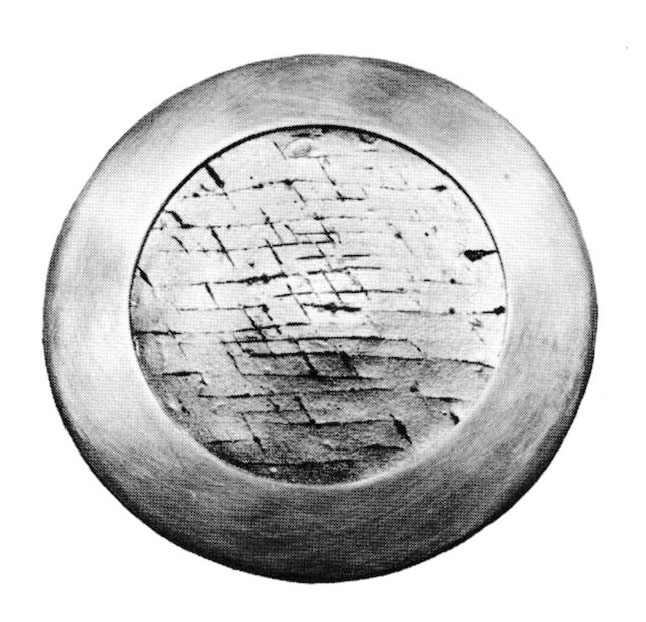
- At this point the slug is engraved. Lines will widen in the directions in which most rolling takes place and this should be planned for. A fine-pointed center punch, which pricks the gold surface, will produce dots of silver on the final piece. On thinner gold, heavily scribed lines will show up later.
- The slug is removed from the pitch, cleaned and rolled. When rolling, increase the pressure in small increments and maintain the shape of the piece by changing the direction of rolling. At every pass the edges should be examined for cracks. If even a tiny crack appears, it should be filed back just past the origin of the crack and the metal annealed. If a larger crack occurs, it can be hard soldered. This will show on the gold front as a line. The sheet should be annealed about every three passes through the mill. It is better to be too careful than to lose a sheet to cracks. If you hear it "tinkling", then it definitely needs annealing.
- When the sheet is the correct thickness (I typically use 0.5mm), you can print the surface with a texture such as cloth, papers of different types and so on. You may also leave it shiny from the rolling mill and burnish the surface to protect against damage.
- The material may be cut up and soldered into constructions.
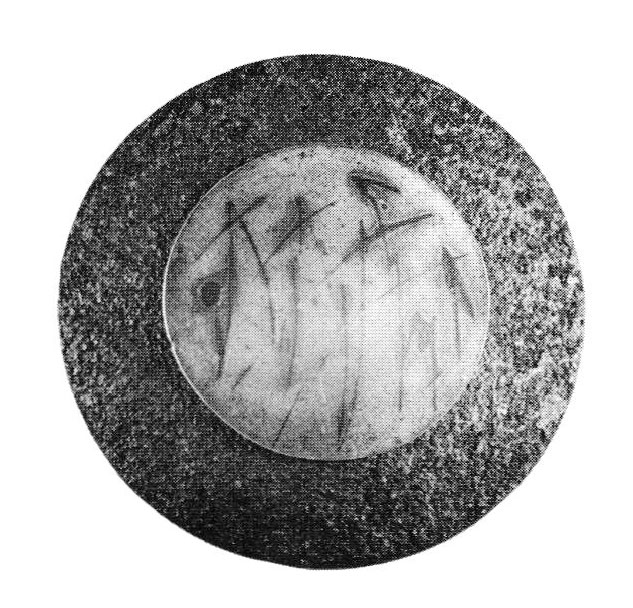
- At this point (or earlier) you can widen lines or cause them to bubble by careful refusing. This provides the possibility for further esthetic choices. If the doublée sheet is domed and then brought near the fusing point, the gold-covered areas will sag, leaving the silver lines as raised relief areas. This can provide agreeable height variations in the work, as the relief can be quite high. Careful re-fusing of thin gold will bring some silver through the gold, allowing for the development of reds and oranges when oxidizing the doublée surface.
- The finished piece may be colored with liver of sulfur and ammonia. Begin by pouring some ammonia into a small container (household clear ammonia is best) and paint the ammonia on the metal. Keep the metal surface moist. A tiny amount of weak liver of sulfur solution is introduced to the ammonia and this is painted on the same way. The color develops slowly, first oranges, reds and so on. If the color is unsatisfactory, anneal, pickle and start over. It is also possible to heat the doublée surface until the oxidation begins to disappear and then plunge it into liver of sulfur solution which can produce a "solarized" look on the areas around the exposed silver. Exposed silver areas will turn black, as is usual with liver of sulfur. The surfaces could be waxed slightly or otherwise sealed. I leave my surfaces unsealed. There does not seem to be much of a problem with color fading. One silver piece I have oxidized yellow/purple/red is still unchanged after eight years without protection. This could vary with the surrounding atmosphere. As a final touch lines may be emphasized on a paper rolled finish by lightly burnishing them.
The doublée process is one of several types of fusion that can be applied to numerous combinations of materials. It provides a method to produce a wide range of surface colors and textures in a reasonably controlled manner. It should be applicable to a wide range of forms, scale and design.
Suppliers
- Karl Fischer, Postfach 567, D-7530 Pforzheim, W. Germany (catalog in English with prices)
- J. Schmatlz, Museumstrasse 4, D-7530 Pforzheim, W. Germany (catalog in German without prices)
Charles Lewton-Brain is an MFA candidate at SUNY, New Paltz, after having owned his own business and taught in Canada for several years.
Related Articles
Precious Metal Refining
Small Scale Double Making Procedures

Lois Betteridge: Stretching Material Limits

Depletion Gilding Notes


The All-In-One Jewelry Making Solution At Your Fingertips
When you join the Ganoksin community, you get the tools you need to take your work to the next level.
