
Unconventional Enameling Projects
5 Minute Read
I am a self-taught enamellist. Having never heard of enameling, I began in the mid-70s with enamels and copper shapes that the local children's crafts program was throwing away. One trip to the mall, the purchase of a small table-top kiln, and a quick trip to the library started a continuing effort to master the various ways to use glass on metal. Of course, as we all know, there is no end to the ways enamel can be used on metal! My exploration has continued for the past 30+ years and has led to this latest experiment.
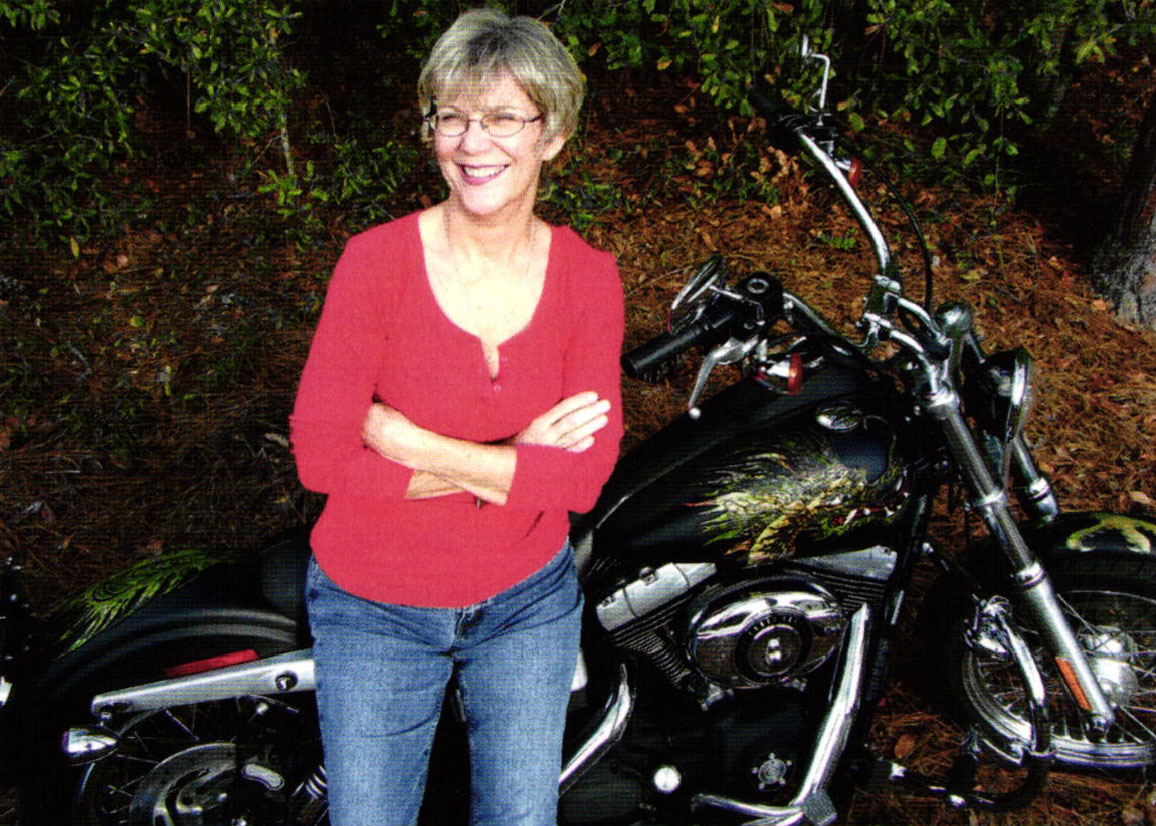 I started riding motorcycles after my last grandchild started school full-time and I bought my 2007 1600cc, 6-speed Harley-Davidson Street Bob for my 55th birthday last year. Wanting to personalize the bike, but not having the money to have a custom paint job, I decided to do what I believe to be the first full-scale custom enamel for a motorcycle.
Having been born in the year of the Chinese Water Dragon, and a dragon collector for decades, the idea of a dragon seemed obvious. Then came the months of designing during the day and dreaming of modifications during the night.
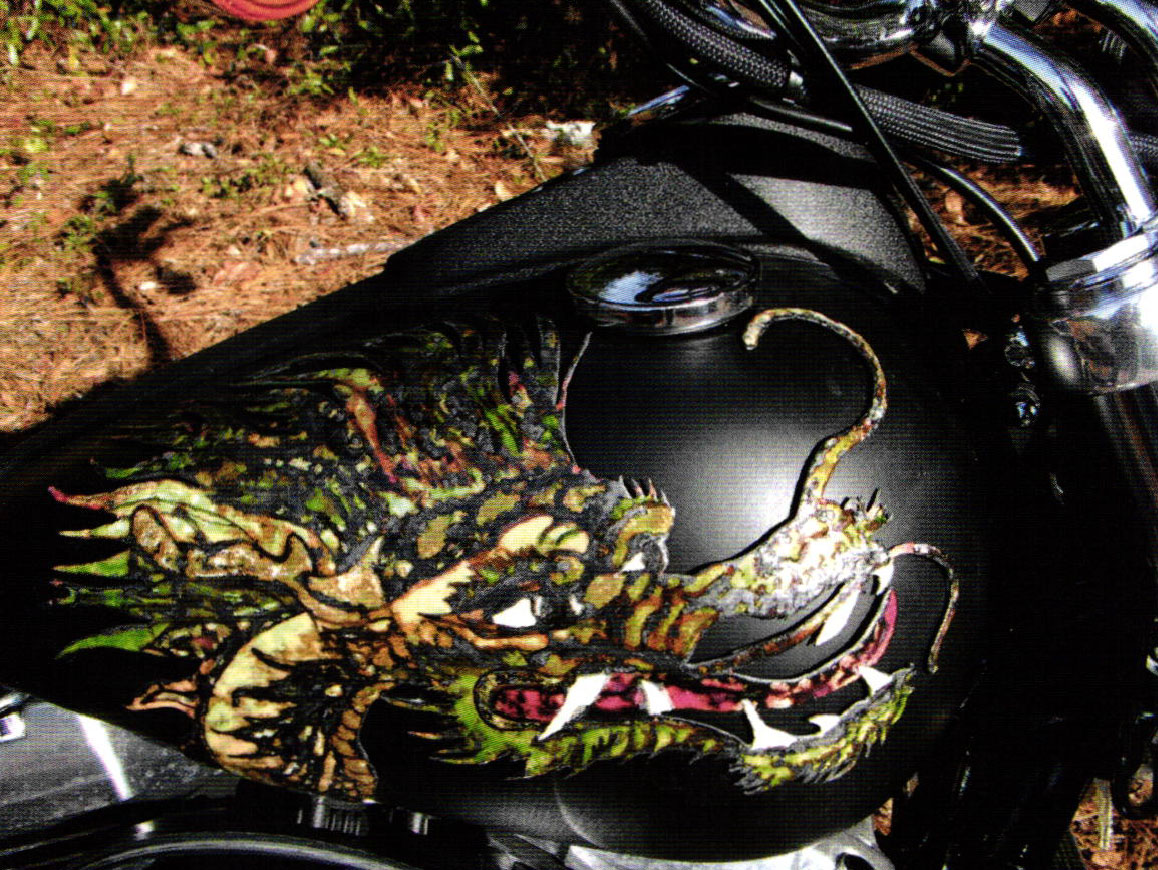
I awoke one night, and without my glasses or a light, picked up my sketch book and drew a fairly rough design. I refined the design to accommodate the surfaces I planned to cover and began making patterns. Next, figure out how to follow the extreme curves of the gas tank and the more moderate curves of the front and rear fenders-which as anticipated, presented their own problem of hyper-expansion in our hot Florida sun with the subsequent crazing of the enamel. I found this development quite satisfying as the expected crazing actually increased the light refraction and character of the pieces.
 I started with a 26 inch square of 16 gauge copper, laid out and transferred the design, and did the rough cut-out of the three pieces with metal shears. Next came the time and blade-consuming process of doing the detailed cutting with a jeweler's saw. After each piece was cut out) I filed all the edges down to a thin edge and stoned them smooth. This done on all three pieces, I annealed them and polished all top surfaces to provide a good light-reflective surface under the enamel and cleaned the backs of each piece.
Then, I began the initial rough fitting of each piece. I covered the gas tank and fenders with self-adhesive foam strips I had salvaged from a construction job I'm working on. All the pieces required brute force bending which provided indications of the areas that were most promising for stretching and shaping for the proper fit.
I used a small sandbag on the floor with my antique, handmade wooden mallets. I love metal pounding as it's such a good emotional outlet and just plain fun! Eventually, the dragon's head began to fit more and more closely to the fuel tank's tight curves. At some point, I decided it was "close enough" and put the first coat of medium-fusing white for the counter enamel and a medium fusing flux for the base coat on the top surface. This was fired at approximately 1500 degrees Fahrenheit until the flux was nearly clear.
I then added some fine silver foil in various locations and covered that with the initial color coat of enamel, all of which are medium fusing. Continuing with a second coat of colors, I then tried a re-fit on the gas tank. It needed some pressure and enamel cracking to regain the correct curves. This was no problem, as there were many coats of enamel and fine silver foil applications to come.
 I had realized during the design process that I wanted to achieve a less-than-"jewel" appearance for these pieces as the motorcycle is matte black and while my usual forms of enameling are indeed jewel-like, that effect didn't seem to fit the bike or my feelings while riding. I needed this project to represent my feelings while on the motorcycle. Hence, the burnt-out enamel, which exactly matches the Harley's paint and represents how I feel when I'm riding-unconventional, unexpected, and slightly untamed.
I intentionally over-fired these pieces to achieve maximum burn-out of the edges and of the sgraffitto design, which I later outlined with fine-line black to refine the design, while leaving the rest of the project glossy. I am truly pleased with the results!
I cleaned all the pieces after repeating the process on the tail and the three-toed claw (representing Japan where two of my five grandchildren were born). I attached the pieces with a clear double-sided sticky silicon tape from Wal-Mart. It has a permanent set-up time of about 24 hours with a tight bond in four hours. I wrapped the pieces down with a medical gauze that stretches and sticks to itself, but wouldn't stick to or mar the motorcycle's paint and chrome during the cure period. This provided a slight elevation from the bike surface so a cleanly tight fit was unnecessary. It also provides flexibility for parts expansion from heat and flexing while riding.
The bike won "Best in Class" and "1st Place" in a juried motorcycle show in Milwaukee, WI during the Harley-Davidson 105th Anniversary Celebration in August 2008.

I have continued to enter the bike in various shows to educate people about enameling. I have made a simple storyboard of the steps required to produce the artwork they are looking at. Only three people of the several hundred who have seen it actually knew what they were looking at and wanted to discuss the process in depth. Now with the storyboard, many people want to know more and seem genuinely surprised and excited by the fact that it is NOT PAINT and that I'll allow them to touch it because it won't scratch like paint! I suppose education is the key to making this art form more readily recognizable and valuable in it's many forms beyond the beautiful and most well-known enameled jewelry.
Related Articles

Teaching Enameling at the International Enamel Studio

2009 Exhibition of Enamel Art Work

Terry Gay Puckett: Retrospective Exhibition

Enamels in Medieval Galleries


The All-In-One Jewelry Making Solution At Your Fingertips
When you join the Ganoksin community, you get the tools you need to take your work to the next level.
