
Chromatec: Producing Photographic Images on Refractory Metals
7 Minute Read
In response to Marilyn Shaw's article "Photographic Images on Refractory Metals" (Metalsmith, Summer '84, page 32), we have researched the possibilities of a safer alternative of producing photographic images (chromatec). The health hazards of the previous process (using xylene) deterred us from using the Kodak Photo Resist, KPR.
Through our research we have discovered a new application for an existing graphic imaging system. This system, known as Chromatec, has proven to be considerably safer. Chromatec eliminates the need for respirators, goggles and gloves. Until now, Chromatec's primary use has been in the commercial design field. It is our hope that this new application of Chromatec will assist metalsmiths in producing anodized images without exposure to harmful substances.
Chromatec: A New Way of Producing Photographic Images on Refractory Metals
Chromatec allows the artist to make his own instant transfer material (similar to the commercially available press type). Essentially, the Chromatec works in a similar manner to the KPR in masking the metal. One of the major advantages of working with Chromatec is that a darkroom is not necessary in order to create the resist. Upon completion, the Chromatec transfer is burnished onto the titanium or niobium. The piece is then submerged into the electrolytic solution for anodizing. The transfer prevents the electrical current from contacting the masked areas of the metal. In order to produce several photographs on one piece of metal using the KPR method, it is necessary to prepare the metal for each image.
This multistep process requires a darkroom and safety gear, due to the light-sensitive and toxic materials. With Chromatec, one simply has to mask the area with the transfer, anodize the metal, remove the transfer (nail polish remover works well) and reapply another transfer image with a burnisher. (For detailed coloring procedures, refer to Marilyn Shaw's article cited above.)
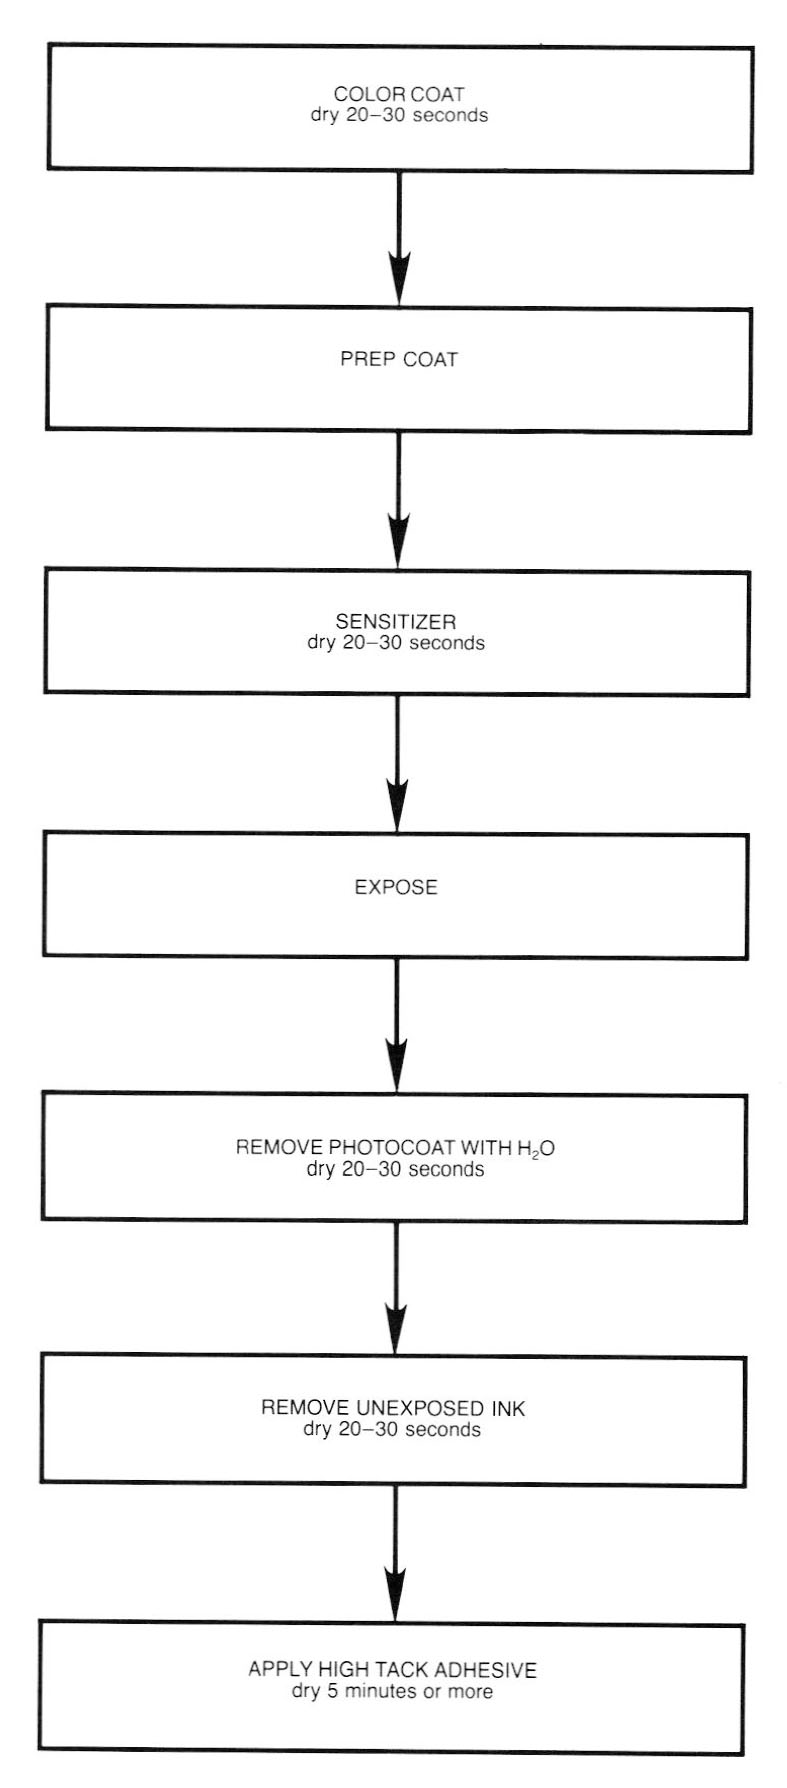
Color Coating
Chromaslick sheets have a special release coating on one side. Place this side face up (tape will not stick to the special release side). Clamp the Chromaslick sheet to the processor unit (see illustration). Squirt ¼" bead of chromatic ink across the top of the sheet. Note: color of ink is unimportant so long as it is visible on the metal. Remove the ink coating rod from the tube assembly and dry with a paper towel. Proceed to draw the ink down with one stroke (do not rotate the coating rod). Immediately dry the ink with a hair dryer for 20 to 30 seconds.
Photosensitizing
Lightly sprinkle the prep-coat powder onto the inked surface. Gently rub the prep-coat powder on the surface with a small piece of process strip (see Materials). Be careful to cover all areas of the inked surface; otherwise the photocoat will not adhere, Remove any excess powder with a hair dryer. The next step is to mix the photocoat and sensitizer. Mix 10 parts photocoat to 1 part sensitizer. Mix thoroughly and place in an opaque bottle. Note: once mixed, there is a shelf life of 3 to 4 weeks, at room temperature. Place ¼" bead of prepared photocoat along top of Chromaslick. Remove photocoat rod from tube assembly and dry with a paper towel. Again draw the rod down over the Chromaslick (do not rotate the photocoat rod), Dry with hair dryer 20 to 30 seconds on high setting.
Exposure
We used the Nu-arc exposure unit, however, several other units are available (see Materials). Remove the Chromaslick sheet from the processor unit and place in the light exposure unit with the prepared side up. Place your negative on the coated Chromaslick so that the image reads opposite of the actual image desired. Exposure time will vary depending on the negatives used (we found 30 to 45 seconds worked well). We recommend testing different exposure times. There will be a very faint image after exposing the Chromaslick, which becomes more visible during the developing stage.
Developing
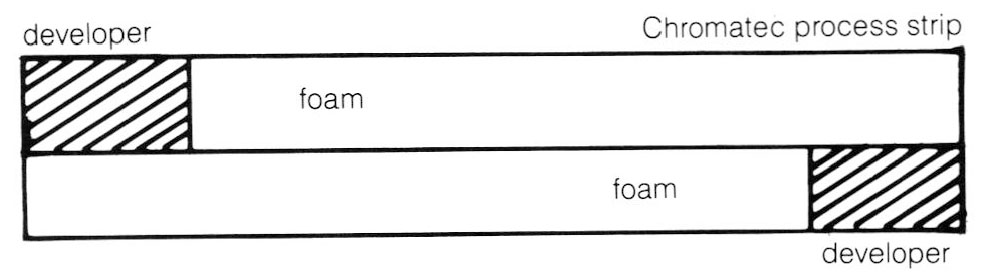
The next step is to loosen and remove unexposed photocoat from the inked surface. To do this, place the Chromaslick on the water developing unit and use a water-soaked household paint roller to remove the photocoat. Repeat several times. Remove the Chromaslick from the developer unit and place on the processor unit. Lightly blot the sheet with paper towel to remove excess water. Use a hair dryer to make sure the surface is thoroughly dry. Removing the unexposed ink is the most critical stage in the Chromatec process. There is a danger of removing the image altogether if done improperly. Take a fresh process strip and cut it to the same size at the Chromaslick sheet. The process strip consists of 2 foam sides. Squirt the developer or the top side along the edge (see diagram). On the underside squirt the developer on the opposite edge. With either wet edge of the process strip facing down draw towards you, using moderate pressure and speed. As soon as it has reached the bottom of the Chromaslick, flip and return the strip to the top using the fresh side of the foam and pull down. Immediately dry with the hair dryer; otherwise the developer will begin to eat away the image. Continue to remove the unexposed ink using the developer and process strips until only the image remains.
Adhesive
Chromatec offers both low-lack and high-tack adhesives. For our purposes, high-tack adhesive works best in adhering to the metal. Remove adhesive coating rod and wipe dry with a paper towel. Place ¼" bead of adhesive along the top of the Chromaslick and draw down (do not rotate the adhesive rod). Dry with the hair dryer for at least five minutes. Note: be sure to allow sufficient drying time: climate will have some effect on drying. If the prepared transfer sheets are not used right away, store the sheets between wax paper (sheets may be stored in a dust-free place up to one week).
Negatives
There are a variety of ways to create negatives. One possibility is to draw on prepared acetate with maximum density black ink. Another alternative is to photocopy images (found images, actual photographs or drawings) on to 3M transparency film for plain paper copiers. This eliminates the need for a darkroom. If the image does not have a half-tone dot screen, the resulting anodized image will be in the form of solid shapes (somewhat like a photogram).
However, an illusion of depth can be created through the actual coloring. Unlike the silver-sensitive photographic process, Chromatec is unable to produce gradating tones. In order to achieve a tonal range, one must start with a half-tone negative. This half-tone negative can be in the form of either high-contrast ortho films or photostats. As a guideline, we recommend a halftone of 20 to 60 lines per centimeter screen. Another advantage of using the Chromatec transfers is that it may be applied to three-dimensional forms. This allows the artist more versatility in designing. Furthermore, Chromatec transfers are not limited to one-of-a-kind pieces. The negative can be used countless times to create the same image.

Materials
- Chromaslick sheets: a base sheet upon which the transfer is made (a 9 x 12 sheet costs approximately $2.00)
- Cleaner for metal: nail polish remover, acetone, ammonia or rubbing alcohol
- Ink
- Prep coat powder: Enables the photocoat to adhere to the ink
- Photocoat Sensitizes inked sheet
- Sensitizer to receive image
- Process strips: special foam strips
- Developer; removes excess ink
- High-tack adhesive: adhesive material that allows image to adhere to the metal
- Processor Unit: clamping unit which holds Chromaslick on a foam pad, used to prepare all coatings
- Water developing unit: washing area to remove sensitizer after exposure—can be made with a board with clamp on top, to hold Chromaslick sheet, with a water catch unit at the bottom
- Newsprint roll: dispensed from processor unit to absorb excess coatings
- Household paint roller
- Solvent tube assembly with 3 coating rods: storage unit for coating rods and clamps, three tubes containing developer water, developer
- Handheld hair dryer:
- Chromatec exposure unit, Nu-arc plate maker, Quartz halogen, Black light fluorescent. Use any of these exposure units to expose Chromaslick surface to negative
For more information and an instruction manual, contact: Chromatec Scientific Corporation, 336 Crossen Ave., Elk Grove Village, IL 60007. Telephone: 800-323-9752 or 312-640-7746.
A special thanks to Vicki Schwaeger for all her help and encouragement.
Julie Horwitz received a B.F.A. in 1984 from the Rochester Institute of Technology, with a major in fine art photography. She is currently producing wearable art and jewelry under the title NEUE.
Anne McGregor will receive her B.F.A. from Rochester Institute of Technology in 1985 with a major in graphic design. She is a freelance graphic designer and jeweler.
Related Articles

Champleve – Photo Etching with PnP Paper

Goldsmithing: Etching on Metal

Etching Options for Champleve
Metal Salt Etching, Resists and Resist Removal


The All-In-One Jewelry Making Solution At Your Fingertips
When you join the Ganoksin community, you get the tools you need to take your work to the next level.
