
Etching Options for Champleve
I have found through may research on metal etching that there is a plethora of information out there. I hope by compiling it and offering it to you, you will be better able to choose the best option for your champleve needs. There are of course means other than etching to prepare a surface for champleve enameling, namely piercing and soldering, forming with a hydraulic press, stamping or engraving. This article however will deal only with the etching options..
19 Minute Read
I have found through may research on metal etching that there is a plethora of information out there. I hope by compiling it and offering it to you, you will be better able to choose the best option for your champleve needs.
There are of course means other than etching to prepare a surface for champleve enameling, namely piercing and soldering, forming with a hydraulic press, stamping or engraving. This article however will deal only with the etching options. And only with those materials suited to relief etching (where the resist is applied along the design lines and these lines remain raised after etching) rather than intaglio etching (where the entire surface is covered with resist and the design lines are scratched away and subsequently eaten away by the etching process).
Design Transfer
In order to etch the design of your choice, you must first somehow transfer that design, in the form of a resist, to your metal. The following are all etchant resistant (to some extent) and will adhere to the metal.
1. Graphing tape, hole reinforcements, Contact paper, dots and labels, vinyl letters (stick-backed things you find at a stationery store) will all work quite well as a resist if the mordant isn't violently strong and you do not need to etch too deeply. If you apply these to clean metal and burnish them down, they will hold better. Contact paper or its equivalent can be burnished in a solid sheet and then areas can be cut away with an Exacto knife where you wish the metal to be bitten. With the exception of the contact paper, these stick on shapes are fast and easy to apply. The limitation is that your design must pretty much consist of straight lines and circles. Scotch makes a blue masking tape called Long-Mask TM that works very well for the back of the pieces.
2. Lacquer-based spray paint (e.g. Krylon Interior/Exterior paint) will also work as a resist. You can spray it through a stencil of your own making; a commercial stencil available at craft supply stores; or through or around a found object such as a leaf, a doily or some lace. Make sure the stencil is firmly in place, then spray it and let it dry. Repeat this for better coverage and resistance. Spray paint also works very well for the back of the piece where you just need to protect the metal and not transfer a design. Fingernail polish is also serviceable for protecting the backs and edges. Graphic Chemical and Ink Co. (see list of suppliers) sells a nontoxic resist for the same purpose called Z*Acryl that can be removed with household ammonia.
3. Lacquer and paint pens are easy to draw with and some hold up quite well through the etching process. I have had limited success with Sharpie pens, but they are OK for a quick, shallow etch. Sharpie makes an 'industrial' pen that protects longer than the ones found in stationery stores. The very best pens, in my opinion, are what I call 'paint pens'. The ones I use are Speedball pens called 'Painters' - opaque paint markers that come in two different point sizes. If the lines are wide enough, e.g. 1/32″ for a 1/32″ etch, it will hold up for the entire etching process.
4. Asphaltum, a dirty word to some of us, is the classic acid resist for relief etching. It is messy and takes a long time to dry - but it remains a good option in some circumstances, such as the need to etch a 3-D piece or for silk screening a production run. Mixing liquid asphaltum with beeswax and rosin makes it less brittle and better able to adhere to the metal 1 . It can be painted onto clean metal with paint brushes or squeegeed through a photo silk screen. I find that a few seconds in a 300 degree F kiln or under a heat lamp will close up the pinholes, speed up drying and make it less sticky to work with. Make sure you watch your piece closely or you will soon have a black puddle with no recognizable design left! Rio Grande sells a nifty set up called the Rio Master Etch-Press TM System that allows you to 'burn' your silk screen and print through it all on the same unit. The print size is 3-9/16″ x 5-9/16″. Rio Grande also sells another liquid resist (Rio Etch Resist) for silk screening which is not asphaltum, but which, I understand, works quite well, especially if it is heated in a 200 degree F oven for 10 minutes to set it after screening.
5. And now we come to my 'fave', PnP Blue. This is a toner transfer sheet used by amateur circuit board printers and works extremely well for champleve etching. It is very simple to use - all you need to do is draw your design and technology does the rest! Because it is clean and requires no drying time, it is particularly suited to class situations. PnP Blue is a resist bonded to a sheet of polyester. You transfer your design to the PnP with a copy machine or a laser printer. What could be simpler? The PnP toner design is then ironed onto your metal with a household iron 2 . The toner acts as the 'glue' attaching the resist design to the metal. The back and edges should be covered with some other resist. The limitations of this method are that only flat pieces of metal can be used, and it is time consuming for large runs. There is another toner transfer material on the market manufactured by DynaArt, but I have found it much more difficult to work with. You might wish to investigate it yourself. If your needs are for high volume production, you may wish to look into pre-sensitized copper available from Kepro Circuit Systems Inc. and other suppliers. Basically, this is copper pre-coated with a material that will accept your art work through a photo developing procedure. Materials are also available for sensitizing the metal yourself. I find it hard to want to bother , when PnP Blue is so much simpler and needs no sophisticated equipment.
Mordants
Now that your etching resist is duly attached to your metal, it is time to actually etch it. For this you will need a mordant, also known as an etchant - the liquid that eats away the unwanted metal parts in your design. The metal you are etching and the characteristics of the etch you want will determine the type of mordant you will choose. I was hoping I would find a 'magic bullet' etchant, one that was non-toxic, fast and easy to dispose of. I read all the material I could find about mordants used commercially and, alas, there was no magic bullet. Some of the commercial etchants for copper or silver I felt were too dangerous in a studio setting so I didn't even try them: sulfuric acid mixed with 50% hydrogen peroxide; chromic acid mixed with sulfuric acid; ethylene glycol; and alkaline cyanide mixed with hydrogen peroxide. Following are the mordants I did try:
1. Nitric Acid . Nitric acid, diluted with two parts water to one part nitric 3 , will quickly etch both copper and silver. The problem is, it is potentially quite toxic to you and wreaks havoc on your resist. You need to supervise this etch constantly and brush away the bubbles that form so that they won't block the etching action. Because of the violent action of nitric, the etched lines are often jagged. Use this acid with all the safety equipment you can: rubber gloves, apron, goggles, and heavy duty ventilation. Keep some baking soda handy to neutralize spills. Used nitric acid is a hazardous waste - consult with your local waste authority about proper disposal.
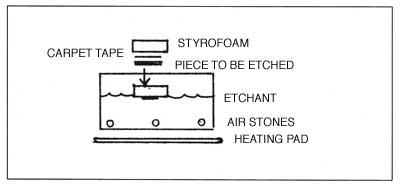
2. Ferric Chloride . This is the mordant I am most familiar with. Though it is messy, it is much less toxic than nitric acid and gives a nice, even, albeit slower, etch. It will work on copper or brass, but not on silver. (See Ferric Nitrate listed below for a similar etchant for silver.) I find that a slightly diluted FeCl 3 solution works as well as, or better than, the full strength stuff. Three cups of 42 degree F Baume Ferric Chloride mixed with one cup of water is recommended. As ferric chloride etches, it can leave a layer of sediment on the exposed copper, which acts as a barrier to further etching. To counteract this, I etch my pieces upside down - stuck to a piece of styrofoam with carpet tape. The whole kit and caboodle can be removed from the bath to rinse it off, which you should do often, and then returned to float in the vat of ferric chloride. The etching rate can be enhanced in three ways: by agitation, aeration, and heat. One of the simplest ways to achieve the first two is to use an aquarium pump and 'bubble wands'. The latter are a type of air stone for fish tanks that look like thin tubes of turquoise styrofoam. (Air stones made from glass particles work for a while, but then the glue that holds them together breaks down and they crumble.) Attach the bubble wands to the bottom of your container with electrical tape so that the bubbles pretty uniformly cover the entire area. I have used a homemade spray etching machine, which definitely speeds up etching time, but I have not been able to control the etch sufficiently - parts of the piece etch all the way through before others are etched enough! Depending on the shape and material of your container, heat can be applied with fish tank heaters, a heating pad, a hot plate, a heat lamp, or even a Luxo type lamp. Watch the temperature very closely. You don't want to go over 175 degrees F, or your PnP resist will fail to resist and asphaltum will be long gone. Heating will cut your etching time almost in half, but be forewarned that it also produces harmful fumes and weakens your resist. Proper ventilation is important, and mandatory if you are heating this solution.
Protective clothing is a very good idea. Spilled ferric chloride may not kill you, but it will ruin your clothes 4 and turn your skin orange. If the solution shows signs of slowing down, it is possible to 'pump it up' a bit by adding small amounts of hydrochloric acid and/or ferric chloride crystals. After etching, it is necessary to remove the ferric chloride residue before it dries onto your piece. If it dries on, not even dynamite will get it off! Soak it in household ammonia or a very mild hydrochloric pickle. Spent ferric chloride needs to be treated as a hazardous waste.
3. Ferric Nitrate . When ferric nitrate crystals are mixed 55% by weight in water, the solution works on silver very much like ferric chloride works on copper; slowly and evenly. I used the same bubble and floating technique and was happy with the results. Ferric nitrate is classified as 'mildly toxic', but it is always wise to ventilate and wear protective clothing. Investigate proper disposal.
4. Sodium Persulfate . This mordant is often used by etchers of circuit boards. It comes in crystal form, and needs to be mixed with water 24 hours before using. After mixing, it has a short usable life - about two weeks. The advantage of this mordant is that it remains clear (this becomes most important when you drop your piece to the bottom of the etching vat!) and does not stain your clothing. The etch rate is comparable to that of ferric chloride and it has the same hazard rating. However, sodium persulfate has only about 1/2 the copper holding capacity of ferric chloride, and so it will take twice as much of the former to etch the same amount of copper. It works better heated to around 100 - 110 degrees F. Use the same health and safety precautions you would with ferric chloride. Investigate proper disposal.
5. Ammonium Hydroxide . This mordant needs to be heated to 120 - 130 degrees F and agitated. This results in ammonia fumes that need to be carefully ventilated. After seven hours in this bath, there was no visible etching action on my copper test. Apparently, there needs to be some ingredients added that I do not know about. I don't feel this is a worthwhile etchant for the studio.
6. Cupric Chloride . The cupric chloride and water solution needs the addition of hydrochloric acid to maintain steady etch rates. When heated to 125 degrees F and 'bubbleated', the etch rate is faster than ferric chloride, but, probably due to the heat, the resist is more aggressively attacked and design lines more easily etched away. I was anxious to try this etchant because I read that it can be regenerated, making disposal and buying of new material unnecessary. For small amounts, cupric chloride regeneration begins by passing air through the used solution until the color changes back to a bright emerald green. This can be done with the same fish tank setup used for the etching process. In addition, the density of the solution must be checked with a hydrometer and periodically adjusted by adding water. Also, the hydrochloric acid level needs to be kept constant and to test that, a titration setup is necessary. If you do a lot of etching and have the time and ability to perform fairly simple scientific procedures, this etchant could prove worth investigating.
7. Electro-etching Solutions . I have great hopes for this etching option. It is basically the reverse of plating - you are removing metal rather than adding metal to your piece. The process is the same: you need a source of DC power, an anode and a cathode and an electrolytic solution for the electricity to pass through. The particulars, however, are different. That is, you use different voltages, temperatures and electrolytes - and it is very hard to find any written information about it! I tried the following electrolytes: salt water, Sparex, a dilute sulfuric (one part sulfuric to twenty parts water) for copper and dilute nitric for silver (one part nitric to twenty parts water). I have not tried it but I heard tell that gold chloride is the electrolyte of choice for etching gold. As this process is the reverse of plating, your piece is the anode rather than the cathode, and the cathode can be either a piece of the same metal, or stainless steel. I had hoped, particularly in the case of silver, that the metal removed from the piece would plate nicely on the silver cathode, so that reclaiming it would be a cinch. No such luck; it seems to just float around in the electrolyte. But the real beauty of this technique is that the resist lines are not undercut! I have never seen such a straight sided etch with any other etching process - even with commercially sprayed ferric chloride.
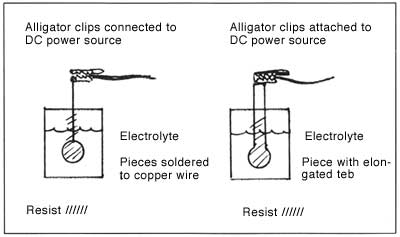
This means that even very thin lines will not disappear as you etch. I guess the major drawbacks to electro-etching are that it is not easy to do multiple pieces at one time and that you need to have some extra equipment, namely a source of DC power: dry cell batteries, a car battery, a transformer or a rectifier, and an electrical connection to your piece. I used a plating rectifier set at 1.5 volts and my pieces were done in 2-3 hours. At this point, I only know of two ways to attach the pieces to the DC power source. If you don't want to waste any metal, then you would cut your piece to the exact size of your design and soft solder a copper wire to the back (before applying any resist there) and attach an alligator clip to the wire outside of the solution. The back side of the piece and lower part of the wire that will be in the electrolyte need to be painted with a resist or they will etch away. If you don't mind wasting some metal, you can leave a tab at one end of the piece that will remain bare of resist and be attached to the power source with an alligator clip outside of the solution. (See illustrations.)
Obviously, if the alligator clips were in the solution, they would not last very long. It seems wise to pickle and glass brush the metal after soldering to clean off any oxides (PnP will hold up under this abuse, but don't try this with asphaltum). The jury is still out on whether the electrolyte should be heated and/or agitated. I know this is important for plating, and so is probably also important for electro-etching. However, my experiments were done at room temperature, some with, and some without an air stone. I am impressed enough with electro-etching that I intend to continue my research and perhaps will write another article for Glass on Metal with more particulars.
| Initial Cost | Continuing Cost | Speed of Etch | Hazard | Ease of Operation | |
| Cupric Chloride | 4 | 1 | 5 | 4 | 4 |
| Ammonium Hydroxide | 1 | 3 | 7 | 5 | 5 |
| Ferric Nitrate | 5 | 6 | 6 | 1 | 2 |
| Sodium Persulfate | 2 | 4 | 3 | 2 | 1 |
| Ferric Chloride | 3 | 5 | 4 | 3 | 3 |
| Electro-etch H 2 SO 4 & HNO | 7 | 2 | 2 | 6 | 6 |
| Nitric Acid | 6 | 7 | 1 | 7 | 7 |
| Table showing crude and subjective comparisons between the different etchants. 1 = 'good', i.e. least expensive, least toxic, fastest working. 7 = 'bad', i.e. most expensive, most toxic, slowest working. |
Conclusions & General Statements
If you should ask me my advice after considering all this information, I would suggest that if you were doing single pieces, you use PnP Blue for a resist, touch up with paint pens, and electro-etch your pieces. If you don't have electro-etch equipment, use ferric chloride (or ferric nitrate) with or without the fish tank setup. I prefer using bubbles but no heat, it is slower but safer, and less likely to over-etch. If the air temperature is cold, a heating pad is a gentle source of heat. Regardless of the etching setup you choose, you need to check your piece often and rinse it off under running water. Brush off any sediment with a soft paint brush. This will speed up the etching process and allow you to remove your work before it has etched too much.
Whatever chemicals you use, you need to have and read the Material Safety Data Sheet first. It will explain the dangers in using and storing the material and list safety precautions and emergency measures. If you are doing big production runs, you might want to investigate pre-sensitized metal and/or photo image transferring methods (see suppliers list). Using cupric chloride and regenerating it would save money and be kinder on the environment for large volume etchers. It might be the case however, that you would be better off finding a commercial etcher for big production runs on copper. You can find them listed in the yellow pages under 'photo etching', 'chemical milling', 'metal etching', or 'photochemical etching'.
This is what I have done for my production line of champleve. Chemical millers use a sophisticated process to laminate a photo sensitive film onto the copper, then expose and develop the film with your designs and run it through a spray etcher. It is fast and keeps the mess out of your studio. For further information, please read through the footnotes, supply sources and bibliography listed below.
Footnotes
1. A recipe for asphaltum 'plus': six parts by volume of liquid asphaltum to three parts melted beeswax to one part melted rosin. Melt the beeswax and rosin in a double boiler. Mix all ingredients together and thin with turpentine and rubbing alcohol.
2. Specific directions usually come with PnP. See also Glass on Metal, August 1996, pp. 60+.
3. I am sure you will remember to 'add acid to water, just like you oughter'. DO NOT ADD WATER TO ACID.
4. Oxalic acid found at drugstores is the only thing I know of that will remove ferric chloride stains from clothes.
Suppliers
Acu-Line Corp. , 462 N. 35th, Seattle, WA 98103, (206) 634-1618. Chemical machining of copper.
Bovano of Cheshire , 830 S. Main St., Cheshire, CT 06410, (203) 272-3208 or 800 847-3192. Chemical milling of copper. $150-$250 for first run, subsequent runs less expensive.
DyanArt Designs , 4707 140th Ave. N., Ste. 212, Clearwater, FL 33762, (813) 524-1500. TTS transfer paper (an alternate to PnP), wave action etching machine, sodium persulfate.
Enamelwork Supply Co. , 1022 NE 68th St., Seattle, WA 98115, (206) 525-9271 or 800 596-3257. PnP Blue with detailed instructions.
David H. Fell & Co., Inc. , 6009 Bandini Blvd., City of Commerce, CA 90040, (213) 722-9992 or 800 822-1996. Pre-etched pattern sheet available in sterling, fine silver, gold and copper. They will do custom etching to a depth of .006 - .008″ (too shallow for champleve).
Graphic Chemical & Ink Co. , 728 North Yale Ave., Villa Park, IL 60181, (630) 832-6004 or 800 465-7382. Pre-sensitized copper, etching tank, asphaltum, rosin, Z*Acryl nontoxic resist, hydrochloric acid, nitric acid, ferric chloride, material for silk screens, rubber gloves, goggles, photo etching supplies.
Kepro Circuit Systems Inc. , 630 Axminister Dr., Fenton, MO 63026, 800 325-3878 or (314) 343-1630. Etching machines, screen printing supplies, photosensitized copper, sodium persulfate, ferric chloride, sulfuric acid, hydrochloric acid, stainless steel electrodes. Very helpful sales people and a 'fax on demand' service for MSDS's and instructions.
La Grande Industrial Supply , 2620 SW First, Portland, OR 97207, (503) 224-5800. Safety supplies.
Radio Shack , located in just about every town in US. 42 degree Baume Ferric Chloride with a dash of hydrochloric acid sold under the name 'PCB Etchant'.
Rio Grande , 7500 Bluewater Road NW, Albuquerque, NM 87121, (505) 839-3300 or 800 545-6566. Asphaltum, etching resist, copper mordant, silver mordant, Rio Master Etch-Press System, rectifiers, copper and silver and stainless steel electrodes, protective clothing.
Thompson Enamel , P.O. Box 310, Newport, KY 40172, (859) 291-3800 or 800 545-2776. Asphaltum, PnP paper.
GC Thorsen , 1801 Morgan St., Rockford, IL 61102, (815) 968-9029. Etchant heater, photo resist supplies, industrial Sharpie pens, drafting tape.
Bibliography
Alford, William. "Screen Printing PC Boards." Electronics Now , September 1993. Instructions for making a screen to transfer a resist to metal.
Clark, Nancy, et al. Ventilation: A Practical Guide . New York, Center for Occupational Hazards, Inc., 1984. Practical help for safely ventilating your studio.
Coombs, Clyde. Printed Circuit Handbook . New York, McGraw Hill, 1996. Complete descriptions of imaging (getting the resist onto the metal), and the science involved in the different etching systems.
Eisler, Paul. The Technique of Printed Circuits . New York, Academic Press, 1959. Explanation of the variables affecting ferric chloride; discussion of screen printing.
Fastag, Miriam. "Experimental Techniques for Acid Etching." Glass on Metal , October 1994. Accounts of some less traditional acid resists used in a class in Mexico.
Hiscox, Gardner (ed.). Henley's 20th Century Book of 10,000 Formulas . W. Henley Publishing Co., 1942. Lists of formulas for everything from etching acids to maple syrup - very interesting.
Kasten, Stephen. E lectronic Prototype Construction . Indianapolis, Prototype Construction, 1983. Instructions for photosensitizing metal; information on using ferric chloride and cupric chloride as etchants and how to regenerate the latter; simple instructions for building an air bubbler etching tank; directions for building a screen printing setup.
Lewis Sr., Richard J. Sax's Dangerous Properties of Industrial Materials, 9th Ed . New York, Van Nostrand Reinhold, 1996. Lists of all the known dangers of acids, solvents, etc., so that we can better understand how to use and store them safely.
Lewis, Tony. "Make Your Own Etching Tank." Radio-Electronics , December 1989. Step by step instructions for building a vertical etching tank, incorporating an air bubbler and heater.
Nishioka, Alan. "Iron-On PC Board Patterns." Electronics Now , September 1993. Instructions for using PnP.
Rossol, Monona. The Artist's Complete Health and Safety Guide, 2nd Edition . New York, Allworth Press, 1994. Suggestions for dealing safely with all the potentially dangerous materials used in the studio.
Schwed, Antonia and Katharine Wood. "Champleve Enameling." Glass on Metal , October 1990. Explanation of the use of asphaltum resist and ferric chloride mordant.
Strosahl, J.P., J.L. Strosahl and C. Shaffer. A Manual of Cloisonne and Champleve Enameling , Rev. Ed. Seattle, Self Published, 1996. Chapters of silk screening asphaltum.
Wood, Katharine with Paul Silverman. "A Revolutionary New Blockout Technique for Etching Metal." Glass on Metal , August 1996. Instructions for using PnP Blue.
Related Articles
Copper, Brass and Bronze Advanced Etching

Champleve – Photo Etching with PnP Paper

Champleve Enamelwork with Ferric Chloride

Easy Etching Step by Step


The All-In-One Jewelry Making Solution At Your Fingertips
When you join the Ganoksin community, you get the tools you need to take your work to the next level.
