
Transparency Making for Photoetching
32 Minute Read
This article, "Transparency Making for Photoetching", is the first of two parts written by Allan Liu and Carol Webb. Check out the second part of this article series "Photoetching for the Studio Jeweler."
Photoetching is a radical departure from the traditional direct scratch-through method of etching so well-known to the jeweler. It is an indirect process in which a high-density, high-contrast transparency—carrying the image whose likeness is to be etched—is used as a matrix. The metal plate to be etched is first sensitized to react to the effect of light. Then the transparency containing the image is placed on the plate and the pair exposed to bright light in much the same manner as photographic paper is exposed through a negative to produce a print. Where light penetrates the transparency, the sensitized coating underneath hardens or polymerizes to form an acid resist. Where light is blocked by the high-density image on the transparency, the coating fails to harden and so becomes liable to attack by the etchant.

The simple, straightforward process is easy to learn. Although still relatively new among studio jewelers, photoetching has found rapid popularity. The unfortunate result is that a single look has come to dominate it, reflecting not so much a reluctance to experiment as a lack of knowledge to do so. In no metalsmithing or jewelry craft journal have we seen any detailed information on the real heart of the photoetching process—production of the transparency used as a matrix for the etching. After all, an etching can only be as good as the transparency from which it is derived; its appearance is determined by the nature and quality of that transparency.
Yet too many jewelers give up the crucial step of transparency-making to technicians trained in the photoengraving or graphic arts industries, believing the task too difficult and expensive. Nothing could be further from the truth. The materials are readily available in small quantities at low cost, and the knowledge and equipment needed to use them properly is no more than that possessed by most photo hobbyists.
Cameras
First, some comments about the equipment. When talking about photography one is inevitably asked to recommend a particular camera, as though that instrument lies at the heart of the photographic process. This simply is not true. Indeed, it's quite possible to dispense with a camera altogether and produce an impression by placing an object directly on a piece of film. But if one elects to use a camera, nothing fancy or particularly expensive is required. Any camera will do, just so that it can produce a black-and-white negative.
Because our interest is limited to wearable jewelry, we use the 35mm format. Its 1 x 1½ inch image size is ample for this purpose. This has saved us the expense of acquiring a photographic enlarger. All our transparencies can be made with an inexpensive photographic contact printing frame.
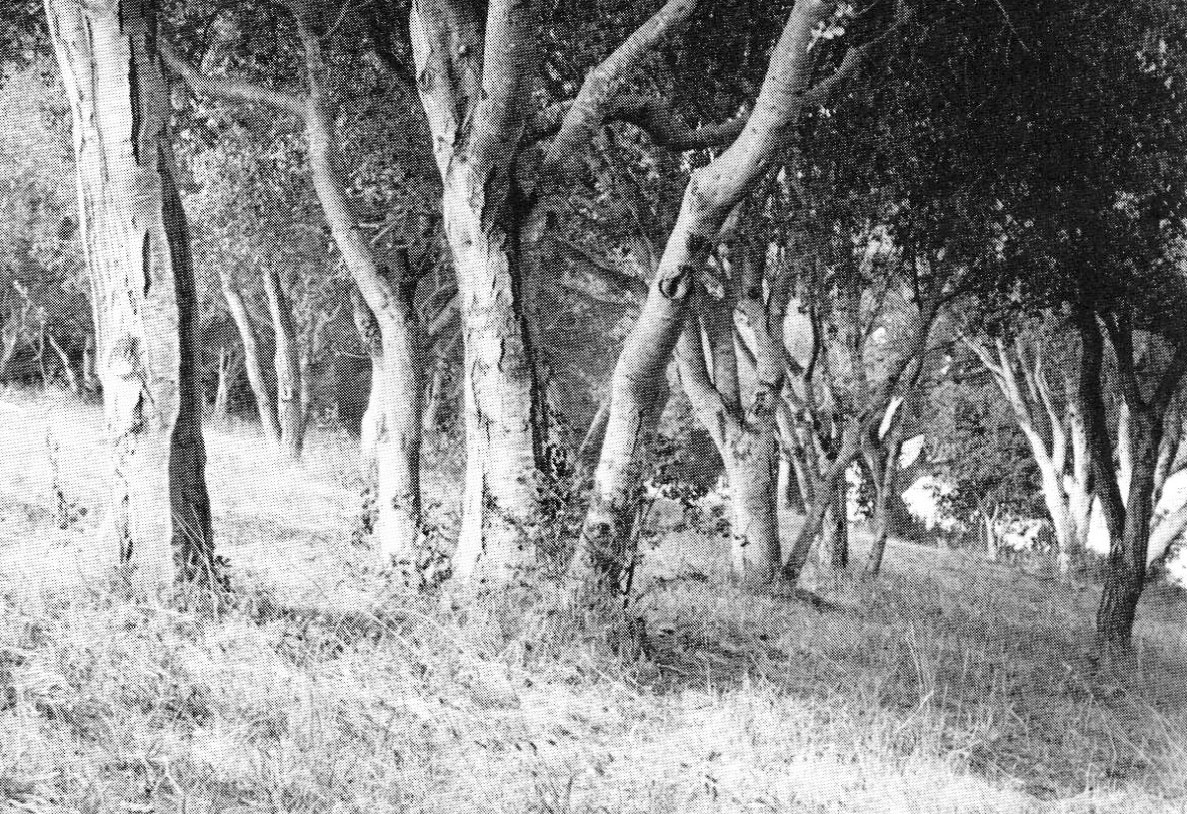
This scene of trees in the forest was taken on an overcast day. Illuminated by soft skylight its muted range of tones should not be too difficult to capture in an etching transparency.
For those who wish to purchase a 35mm camera, we recommend the type called the SLR or single-lens reflex because such a camera offers two features of real value to the jeweler: accuracy of through-the-lens viewing and lens interchangeability. These features are important because, with an accessory bellows unit or a close-focusing macro lens in place of its normal lens, the 35mm SLR is particularly adaptable for taking life-size close-ups of rings and other small pieces of jewelry.
Being the most popular of 35mm cameras, SLRs are available in bewildering profusion. For our purposes, however, we've found that the least expensive SLRs produce results virtually indistinguishable from the most costly. While this is not to say that all cameras are the same, their most significant difference lies in durability. Professional SLRs show their greater cost in more robust construction and in shutters built to withstand heavy daily use. Their lenses are usually heftier and may be somewhat sharper and crisper, but this advantage, noticeable only after high magnification, is usually unnecessary for jewelers.
Instead, we suggest the choice be made from the low-cost cameras aimed at the neophyte. Offering similar features, these are made by all the leading manufacturers and are often sold as loss leaders to familiarize the novice with that manufacturer's line of cameras and lenses. With their solid state electronics automation, these cameras are simple to operate and relatively trouble-free.
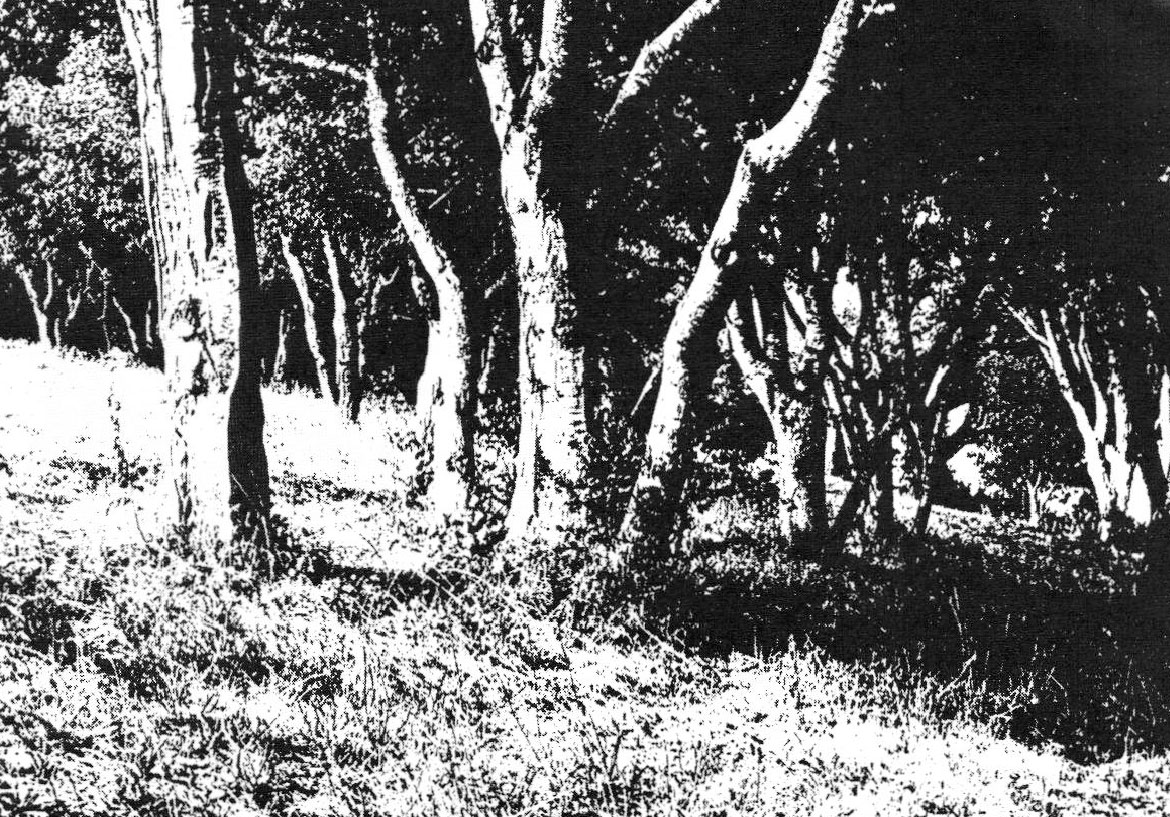
Yet this etching transparency from the camera negative gives us a distorted rendition of the scene. It was printed on Kodalith Ortho film and processed in regular Kodalith developer using continuous agitation during development. This method of development is the one usually recommended with Kodalith, but it typically produces the harsh, stark results we see here.
All the photo illustrations accompanying this article were taken with just such a camera, the Nikon EM, but comparable cameras by other manufacturers produce essentially identical results. Cameras like it are discounted across the country for prices ranging from $100 to $140, which includes the normal lens. Since it's customary to discount all consumer photographic equipment, you can shop around for the best price.
Films
Because the photoetching process begins with a transparency, it might be assumed that the camera negative, itself a transparency, could be used directly on the sensitized metal plate. Or, if the tones need to be reversed, that a continuous-tone positive transparency made from the camera negative could be used. Unfortunately, neither is really suitable for photoetching. The reason lies in the all-or-nothing nature of the etching process itself. Whether the metal plate will etch depends upon whether the photo-sensitive coating on it hardens, polymerizes, into an effective resist. And whether the coating hardens depends on whether light strikes it. This in turn depends on the effectiveness of the transparency which acts to shield and control the light. In other words only those areas of the transparency that we want etched are opaque. In all other areas it remains truly a transparency.
The range of densities needed, then, in an etching transparency is limited to just two: dense black (opaque) and clear. But a continuous-tone transparency such as a camera negative contains a range of tones from the nearly clear to the nearly opaque. A normally exposed and processed camera negative contains no truly opaque areas because such densities are not needed in making photographic prints. Its range of subtle intermediate tones, so necessary for a rich, sparkling print, would be wasted. Indeed, they would be a liability in photoetching. Some of these midtones would be dense enough to shield the photosensitive coating from the hardening effect of light, but others would not. Predicting which areas of the image would be effectively opaque and which would be effectively clear would be a difficult task. To avoid such uncertainty the camera negative can be printed onto a special-purpose graphic arts film, and processed in a companion high-contrast developer. This procedure eliminates the unnecessary midtones and produces the kind of high-contrast, high-density transparency needed for the etching process.
There are many suitable graphic arts films and developers on the market. The words "lith" or "litho" frequently appear in their names. For our work we use Kodak's Kodalith line of graphic arts films and developers because they are excellent products and widely available. Kodalith film comes in a wide assortment of sizes, base types and thicknesses, and spectral sensitivities. We use Kodalith Ortho Film 2556 Type 3 (Estar Base). It's commonly available in the four-by-five inch size packaged 50 sheets per box. For our use we cut each sheet down to 1 x 1½. inches or smaller. Kodalith Ortho film isn't sensitive to red light, which makes it easy to handle in the dark room, and the toughness of its plastic Estar support base makes it particularly suited for repeated use as an etching transparency. Kodak also markets a 35mm version in a roll 100 feet long. While its 35mm size is convenient, this version of Kodalith has an acetate support base less robust than Estar; and, sadly, its tendency to curl hinders its use in still development.
Kodalith developer also comes in a confusing assortment. Kodak markets a half-dozen variations. But three of them are aimed at the high volume use and so need not concern us. The remaining three-regular or ordinary Kodalith, Kodalith Super RT and Kodalith Fine Line-each produces a distinctive look to the etching transparency. Regular or ordinary Kodalith is the most active of the three. It produces the least amount of detail, eliminating midtones and giving the etching transparency a stark, rather harsh look. In its treatment of shadow areas Kodalith Super RT is similar to regular Kodalith, but it produces softer, more detailed highlights. Images processed in Super RT show the characteristic graphic starkness of regular Kodalith in the shadows but retain the soft delicacy of the continuous tone transparency in the highlights. It produces an unusual—and not necessarily useful—hybrid effect.
For maximum overall detail Kodalith Fine Line is the developer we use. When used for still development, its ability to render fine detail is unsurpassed. Unlike regular Kodalith, which drops out most intermediate tones, Fine Line accentuates even the slightest tonal gradients and builds them up into dense etchable lines and dots. Indeed, it's so effective that it can even dig out a textural dot pattern in an area of little detail. This is especially true when the image has been recorded on a high speed camera negative film and processed in a high acutance developer. Because this combination produces grainy images that can be reproduced without a halftone screen, it's often exploited in the print media. We see this "random dot" look in some large scale advertisements. The jeweler who works on a larger scale would no doubt find this textural dot pattern useful for etching.
Each of the three Kodalith developers discussed here is marketed in powder form in two foil packets, one packet marked Part A and the other Part B. Each part is mixed and stored separately to produce one gallon of stock solution. But because few jewelers will consume a gallon of each solution even in a year's time, most of the developer will oxidize in storage and be wasted. To conserve, we've begun the practice of dissolving only small quantities of the developer powders. This is not a practice sanctioned by Kodak because when only small amounts of developer are mixed, the chemical ingredients may not be dissolved in their proper proportions. This danger can be minimized by shaking each foil packet thoroughly before use.
We've found that mixing up three fluid ounces of each stock solution is sufficient to process about a dozen pieces of Kodalith film 1 x 1½ inches in size or smaller. To save us the trouble of weighing out each portion of powder, we've converted weight quantities into the more convenient volume quantities. With regular Kodalith developer we pour out a measure of 13 cubic centimeters or milliliters (for our purpose we use these units interchangeably) of Part A powder into a small plastic photographic darkroom graduate. This powder is stirred in turn into about two fluid ounces of warm (100″F) water, and then more water is added to make three ounces of stock solution. Likewise, 13cc or ml of Part B powder is measured out and warm water added to make three fluid ounces of stock solution. To obtain accuracy it's important to rap the bottom of the measuring graduate smartly against the top of the table about two dozen times. This causes the powder to settle so that repeatable measuring accuracy is maintained. In all three Kodalith developers the Part A powder is light and fluffy. If not made to settle down in the measuring graduate, the proportion of Part A powder in the working solution of developer would be deficient. The Part B powders are heavier and less finely ground. They settle down easily and present no problem in volume measurement. For Kodalith Fine Line the proper proportion for making three fluid ounces of each stock solution is 11cc of Part A powder and 6cc of Part B powder. For Kodalith Super RT the measurement is 14cc of Part A powder and 11cc of Part B powder.
Developing and Printing
Making etching transparencies is similar to making photographic prints. In summarizing the procedures here some details important to the novice may be omitted. To avoid confusion, we suggest that those who've never before handled light sensitive materials spend at least one session in a darkroom. For those without access to a darkroom we recommend reading one of the many books available on black and white darkroom practice. (See the Bibliography at the end of this article.)
Begin the darkroom session by mixing a working solution of your chosen Kodalith developer. Pour a small quantity of stock solution A into a measuring graduate. Then pour an equal quantity of stock solution B into the graduate. Once the two stock solutions are mixed together, they oxidize rapidly. Fine Line developer in particular should be used within 10 minutes or so. This same time limit holds true for the other two developers when using the technique of still development. For that technique to work effectively the stock solutions must also be freshly prepared.
The temperature of the working solution of developer can range from about 68°F to 72°F, but it should not be colder than 68°F or it slows the chemical reactions of the developer. For such small etching transparencies, 7cc of each stock solution are needed, which are then poured into an ordinary six-inch ceramic kitchen saucer. Usually, development takes place in a tray, but trays sold for the purpose are all too large. Any flat, smooth-bottom glass, plastic or ceramic household container will suffice. 14cc of working solution makes a depth of about ⅛ inch in the saucer, which just covers the surface of the film during development. Discard the working solution of developer after processing just one piece of film to insure that the developer is always fresh. Developer exhausts rapidly during development, changing from an essentially colorless liquid to a yellow amber color.
The final task before turning off the white light is to substitute a red safelight for the usual amber or yellow green safelight used in photographic printing. Kodalith Ortho film is sensitive to the usual safelight colors used with photographic papers, but it's not affected by red light. A 7½ watt red utility bulb available in most hardware stores works well as a safelight if kept at least five feet above the development area. With the white light out and the red safelight on, open the package of Kodalith film and cut one sheet down to the size needed. One side of the film, called the base side, is shiny and dark maroon in color, while the other, the emulsion side, is dull and grayish beige in color. The emulsion side is coated with the light-sensitive silver halide salts. It is the side against which the 35mm camera negative is placed and the side through which the exposure to white light is made. The 35mm camera negative film likewise has a base (shiny) and emulsion (dull) side. The two films are sandwiched together in a photographic contact printing frame so that the emulsion of one is against the emulsion side of the other.
Printing frames come in two styles. The first and older is a wooden frame resembling a small window or picture frame on one side of which is a sheet of glass. On the other side is a hinged folding back which can be removed. The second kind of printing frame is just a stiff padded metal plate over which a sheet of heavy plate glass has been hinged at one end. The second style is preferable because it is front or top loading and so easier to use. Both frames are available in most photo equipment stores, but it's just as easy to make one. Take a piece of heavy plywood and tape a piece of plate glass to one end to form a hinged glass-wood sandwich. Open the hinged plate glass and place a half-dozen or so sheets of newsprint or comparable soft paper on the plywood to serve as a cushion. Then tape a piece of smooth surfaced red or black construction paper over the cushion. A dark colored paper is necessary to prevent the exposure light from penetrating to the white newsprint cushion and bouncing back up through the base of the Kodalith film.
To print, open the printing frame and place the two pieces of film down on the dark construction paper. The Kodalith film should be on the bottom right next to the construction paper. The camera negative should be on top of the Kodalith film, and the emulsion sides of the two films should be touching.
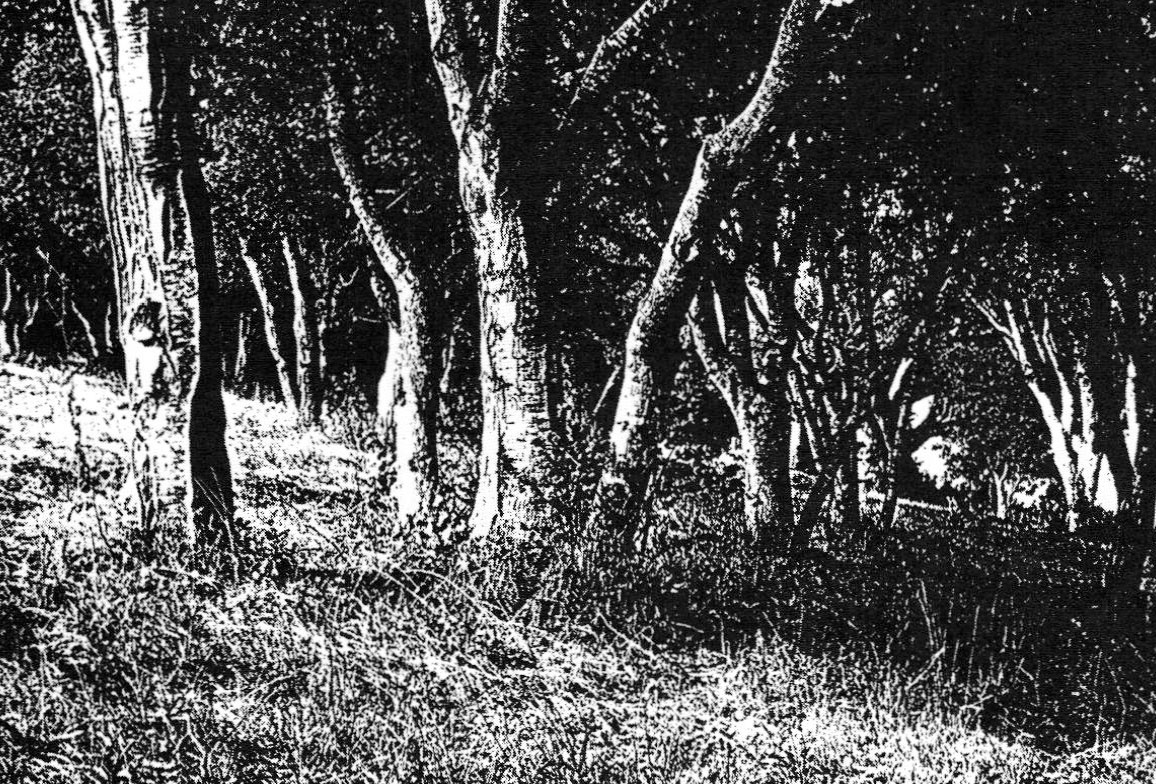
This is another etching transparency from the same forest scene, but it contains much greater detail. We made it in the same manner as we made the prior one, but with a significant difference: we used the technique of still development.
Now close the plate glass and check to be sure the weight of the glass holds the pair of films in tight contact. If not, place weights on the edges of the glass. If tight contact is not maintained during exposure, the image printed onto the Kodalith film will be fuzzy. A 15 watt white light bulb should be placed four to five feet above the printing frame. To expose the Kodalith film turn on the bulb for about four to five seconds. Then open the printing frame and remove the Kodalith film for processing.
To begin processing, place the Kodalith film in the kitchen saucer filled with a working solution of one of the Kodalith developers. Check to be sure the film is emulsion side up in the saucer. Then rock the saucer gently so that the surface of the film is covered with developer. Continue gently agitating the film, and after about one minute and 45 seconds to two minutes and 15 seconds of development time an image begins to appear. First, the shadow or dark areas of the scene become visible, then the midtones and highlights. The transparency will be fully developed in 2½ to 3½ minutes, depending on printing exposure time and the overall density of the camera negative. Now carefully remove the transparency with your fingers or with photographic print tongs, noting the wet emulsion is very soft and easily scratched.
To stop development, place the transparency in a tray holding about a pint of dilute acetic acid, a one to three percent solution. The acetic acid stops development instantly and neutralizes the basic pH of the developer. After about 30 seconds, transfer the transparency to a tray or other container holding at least a pint of photographic fixing solution whose primary ingredient, ammonium or sodium thiosulfate (photographic hypo), dissolves the unexposed and undeveloped silver halide compounds remaining in the emulsion. This action occurs visibly as the milky, whitish areas of the film begin to clear. If this weren't done, these uncleared areas would darken upon exposure to light and obliterate the image.
To achieve even more detail we changed from using regular Kodalith developer to Kodalith Fine Line developer. Used with the technique of still development, Fine Line is formulated to give maximum possible detail.
After remaining in the fixing bath for twice the clearing time, the transparency is transferred to a running water bath. After washing for about 15 minutes, the transparency is hung up to dry in a dust-free place. The acetic acid stop bath should be discarded at the end of the darkroom session, but the fixing bath can be saved and used over and over again. When Kodalith film requires longer than three minutes to clear, the fixing bath is exhausted and should be discarded.
After the transparency has cleared in the fixing bath, the white light can be turned on to examine the results. If the image on the transparency is neither too dark nor too light, it is a usable etching transparency. If, on the other hand, the transparency is too dark, reduce your printing exposure time; if the transparency seems too light, increase it. These guidelines are rather vague, but in truth it's difficult to be more precise because there's no single correct printing exposure time. It's a matter of personal taste and intention. In fact, Kodalith is capable of giving at least three different interpretations of the same camera negative. The reason is that the camera negative produces a range of tones or densities, but Kodalith is capable of recording only a narrow band of these densities. Thus, you can select which narrow range of tones you wish to record by varying the exposure time. In doing so, you can get different interpretations of the image and control which areas of the image you wish to etch.
Alternative Developing Methods
So far it appears that the use of Kodalith sacrifices detail in two of the three major areas of the image. But this is not altogether true. With the technique of still development, the same transparency can achieve near maximum detail in all three major image areas.
Thus far in our discussion of printing procedures we've specified continuous agitation during development. In still development the Kodalith film is slipped into the developer emulsion side up and agitated continuously for the first 45 seconds. Then it is pushed to the bottom of the saucer to lie there absolutely still for the remaining two minutes of development. As mentioned earlier nothing happens until a minute and 45 seconds or so into development. Then the dark or shadow areas of the image appear. Since these were the least dense areas of the camera negative, they held back very little of the printing exposure light. Consequently, on the Kodalith transparency these areas develop first and darken fastest. But in so doing they exhaust the Kodalith developer more quickly than do the mid-value or highlight areas. As the developer becomes exhausted, its activity slows down. Moreover, bromine and other byproducts are released from the emulsion in the shadow areas, further inhibiting development. Thus, while the shadow areas are the first to develop, they are also the first to stop developing. But this is true only if the Kodalith film is left undisturbed. If agitation continues, then fresh developer is brought to bear against the shadow areas, and they will continue to darken. Without agitation, development in the shadow areas is virtually stopped while continuing in the mid-value and highlight regions. Still development, then, permits a kind of compensating effect whereby detail can be retained in all three major areas of our image.
We should point out, however, that still development makes a noticeable difference only when printing from continuous-tone materials. When printing from high-contrast negatives or positives, we get the same result whether we use still development or continuous agitation. Nor does it seem to matter which Kodalith developer is chosen. But variations can still be brought about by changing printing exposure times. This caveat aside, we believe that use of the technique of still development would be an important first step in breaking out of the familiar style that has come to characterize much of photoetching—namely, the semisilhouetted image lacking in detail so often produced by continuous agitation development. Still development builds detail in all areas of the etching transparency; and it works with any of the Kodalith developers discussed here. But, as mentioned earlier, for maximum detail use Kodalith Fine Line developer.
Yet even Fine Line may not give sufficient detail, particularly in the densest highlight areas recorded on the camera negative. For more detail, a controlled fogging procedure that photographers call pseudosolarization, or the Sabattier Effect after its 19th-century discoverer, can be used along with still development. If, during still development, you briefly turn on a low intensity white light just after the shadow areas of the image have appeared, you will not appreciably affect these areas because they have already been chemically reduced to metallic silver. But you will affect the mid-value and highlight areas because they haven't been reduced and remain as light-sensitive silver halide salts. Upon exposure to white light the mid-value areas darken, yet retain most of the detail imprinted during the initial printing exposure. On the other hand, the highlight areas, being the densest areas on the camera negative, held back most of the printing exposure light and so allowed little detail to be imprinted onto the etching transparency. Thus, upon exposure to white light during development these highlight areas of the etching transparency will also darken, but as little detail was imprinted in the initial exposure, they will darken overall and appear as though enveloped in a heavy fog—hence the term "fogging exposure."
Sometimes a partial reversal of tones in the highlight areas gives the appearance of both a negative and a positive. This partial reversal of tones has come to be recognized as the solarized look. Achieving this look is difficult, however, for it depends largely on the highlight areas having just the right density gradient. We seldom try for the solarized look, content to use the technique outlined here as a controlled fogging procedure to tone down highlight areas. When white light is used during development, its intensity and duration, as well as the point in development at which it is turned on, all affect the final result. This procedure therefore requires considerable experimentation to be effective.
If, instead of trying to increase detail, you want to lessen or obliterate it, use the technique of masking. A mask can be produced by drastic underexposure of our Kodalith positive. This results in a very weak positive transparency in which only the shadow or dark areas of the scene register as an image. If this weak positive is then taped onto the camera negative and the pair used as a kind of negative from which to make our etching transparency, a final image is produced whose highlight and mid-value areas are reproduced normally but whose shadow areas are rendered lighter and with more detail. The weak positive has acted like a mask in the shadow or dark areas of the scene to hold back light during the printing exposure. The effect can be varied by increasing or decreasing the density of the weak positive. Indeed, you can even increase the density to the point where the positive image overpowers the negative image to give us reversed tones in the shadows. Another useful effect occurs when the weak positive is taped to the camera negative so that the images are slightly offset. This yields a bas-relief effect on the etching transparency.
Kodalith Ortho film's insensitivity to red light also permits masking. Detail in the camera negative can be lessened or eliminated merely by painting the offending area with a red dye. Use of a red dye on parts of the camera negative is the equivalent of exposing those areas through a red rather than a white light. And since Kodalith Ortho film is not affected by red light, this is the same as not using any light at all.
A red dye is manufactured for the purpose. It's called Crocein Scarlet by Kodak and new coccine or neo-coccine by others. But any artist's red dye will serve, including common household food coloring. A few drops of food coloring in two or three milliliters of water is sufficient. A drop of a wetting agent such as Kodak's Photo Flo should be added to the solution to break down the surface tension of the water. This promotes penetration of the dye into the film's surface.
The dye or food coloring is applied to the emulsion side of the camera negative with a small artist's or photographer's spotting brush. Whether detail will be lightened or completely eliminated depends on the amount of dye used. To lighten, dilute the dye or food coloring to a pinkish color. To obliterate, keep the color a medium to dark red. If too much color is applied or a mistake is made, soak the camera negative overnight in a water bath to which a few drops of household hypochlorite bleach have been added. This will usually clear the film of all traces of the dye.
Of course, red dye can be applied to a high-contrast positive or negative as easily as to a camera negative. But its use may not be necessary. By now it should be apparent that the mere act of printing a camera negative onto a high-contrast film such as Kodalith drops out some detail. And more detail can be eliminated by printing the resulting high-contrast transparency onto another piece of Kodalith film and so on. Sometimes just printing through several generations this way is sufficient to lessen overall detail and give the desired effect.
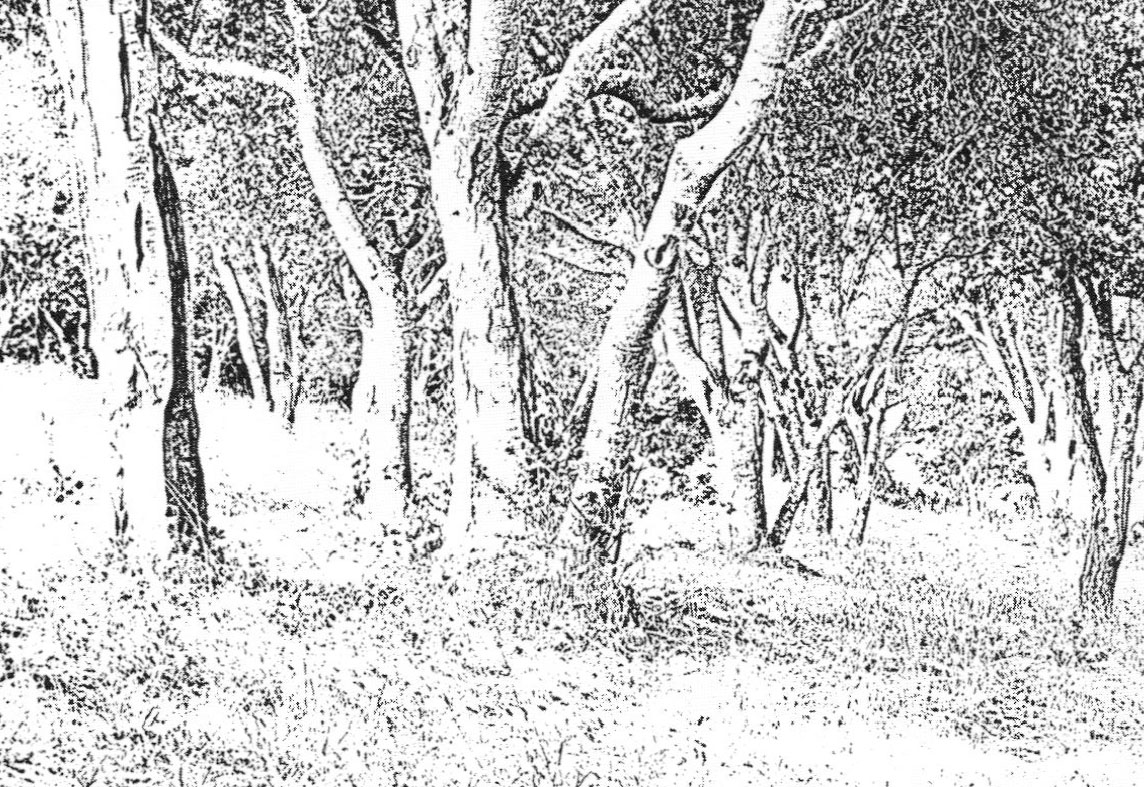
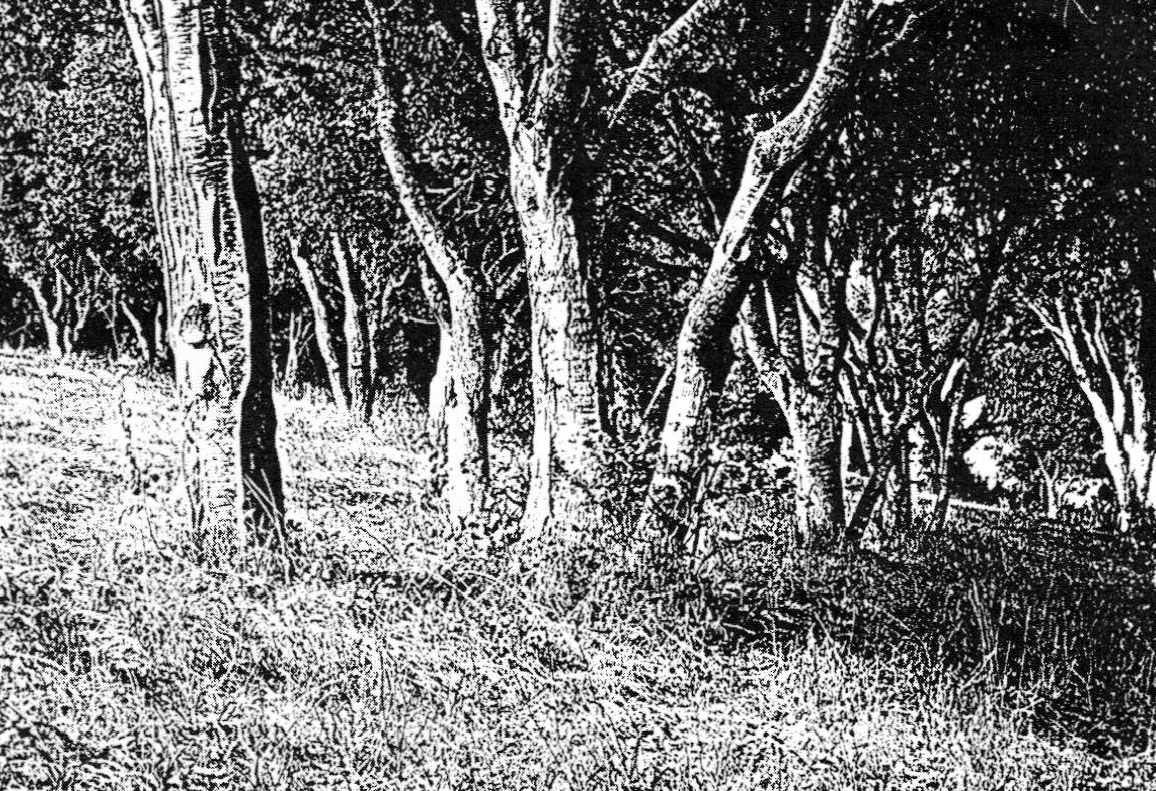
This is a high-contrast negative made from an etching transparency. Because the tonal values in the scene are predominately dark, we decided to reverse them to give us more light areas than dark ones. This reduces the amount of etched area and lightens the mood of the scene without losing the sense of the image. We dropped out even more detail by printing from an etching transparency that had been somewhat underexposed.
To eliminate detail in specific areas, it's usually more effective to use red dye. Indeed, when working with a high-contrast transparency rather than a camera negative, an even stronger material, called photographer's opaque, is available. As its name implies, it's a very dense, water-based paintlike substance which can be obtained in either red or black. It's applied with a spotting brush in much the same manner as red dye. And a household substitute that works well enough is the familiar black marker pen with instant drying ink used for writing on glass and other nonporous surfaces. One of these fine-point black markers can fill in areas on high-contrast negatives that would otherwise print as unwanted detail. But don't use marker pens or photographer's opaque on a camera negative because the continuous tones of the camera negative are better handled with red dye, which is more subtle and controllable in lessening detail. It can be blended into an area without leaving traces of its use. Photographer's opaque or marker pens, on the other hand, would be more apparent on the smooth tones of the camera negative. These materials work best on the limited tones of high-contrast films.
Dye, marker pens and photographer's opaque all lessen or eliminate detail by adding density to the negative. The greater the density, the less the detail printed through onto the positive. But sometimes it's simpler to eliminate detail by removing it directly from the positive. Since the image is composed of metallic silver, it can be chemically dissolved in whole or in part. This is just what takes place when a photographic reducer is applied. Actually, the so-called reducer works not through chemical reduction, but through chemical oxidation by combining with the metallic silver to change it into a soluble silver salt.
One of the oldest and certainly the most popular of these products is called Farmer's Reducer after its 19th-century inventor. Farmer's Reducer is a dilute solution of two chemicals commonly used in photography: sodium thiosulfate (photographer's hypo) and potassium ferricyanide.
The ferricyanide combines with the metallic silver in the image to produce a silver salt that is soluble in thiosulfate. Kodak markets Farmer's Reducer in handy quart-size packets, but it's just as easy to make from scratch. Using volume measure, make up two stock solutions: one of 2070 potassium ferricyanide, and the other of 40% sodium thiosulfate. To 12 parts of water add two parts of the thiosulfate stock solution, then one part of the ferricyanide stock solution. For local reduction use a cotton swab or spotting brush to apply this working solution to the emulsion side of the transparency. For overall reduction submerge the entire transparency in the reducer.

The diluted working solution of Farmer's Reducer should be a pale lemon yellow color. Its color will gradually fade over time. If it fades quickly—say five to 10 minutes—the mixture is a very strong one that should be used with caution. Properly mixed, the reducer's lemon yellow color should fade almost imperceptibly. The working solution will be most effective during the first 15 minutes of its preparation. For the next half hour it will be slower and softer working, and after about an hour's time it will have lost its efficacy and should be discarded. A stronger working solution can be prepared by using less water—say eight to 10 parts. The more diluted the solution, while slower in action, the easier it is to control.
When using a brush to apply Farmer's Reducer, be careful not to get it on the metal ferrule. The ferricyanide reacts with ferrous metals to produce a stain that can mar the transparency. A few drops of fingernail polish at the juncture of brush and ferrule will seal the area and block the corrosive action of the ferricyanide.
While we limit our use of Farmer's Reducer to high contrast transparencies, we could easily use it on camera negatives that have been overexposed or overdeveloped. Of course, we run a serious risk here. Once metallic silver has been removed, it cannot readily be put back. But if over reduction should occur, all is not lost. If not too much metallic silver has been dissolved away, some density can be restored through photographic intensification.
There are a number of intensifiers available. Most of them are of the bleach-redevelopment type. One that is popular and commonly used is called chromium intensifier, a solution of potassium bichromate (or dichromate) to which a small amount of hydrochloric acid has been added. Applied to the emulsion side of a transparency, the solution bleaches away the image. Upon redevelopment in a photographic paper developer, the image returns, though stronger than before the intensification procedure. The bichromate has reacted chemically with the metallic silver of the image, leaving a deposit of metallic chromium which strengthens the image. As with Farmer's Reducer, Kodak packages the necessary chemicals to make small quantities of chromium intensifier. But unlike Farmer's Reducer we've found chromium and the other intensifiers to be less predictable in their results and thus less useful.
Though we remain partial to Farmer's Reducer, we've found that common household hypochlorite bleaches such as Chlorox or Purex have a similar reducing action. Used full strength or diluted one-part bleach to one. part water, they will dissolve the silver-based image quickly and completely. They do so, not by making the metallic silver image chemically soluble, but by dissolving the entire emulsion layer from its support base. This drastic physical action leaves a depression on the surface of the transparency where the bleach has been applied. This is not troublesome in making contact prints, but it could become noticeable in enlargements. As with Farmer's Reducer the degree of dilution controls the rate of reduction. Greater dilution slows the bleaching action; less dilution increases it. A working solution prepared from one-part bleach to four- or five-parts water makes an excellent all-around reducer. A cautionary note: use disposable cotton swabs or a synthetic-haired brush to apply the bleach, which is hard on natural bristles.
Creating Images without a Camera
So far we've assumed that all our images have been camera-derived, but this doesn't have to be. For those inclined to drawing it's possible to make an etching transparency by hand. One can draw directly onto a sheet of clear acetate with pen and ink or an opaque marker. One can also treat this handmade transparency as a kind of negative and print it onto a piece of Kodalith film to reverse the tonal relationships. It's also possible to create abstract designs by applying fingerpaints or other translucent media to clear acetate. The technique of marbling, used by bookbinders and other paper artists to create abstract patterns, is another useful craft. Once the design is created, it is transferred by photographic means to the metal plate. These and similar techniques can achieve a fluid, often amorphous look that's unique to the photoetching process and difficult to duplicate in the traditional scratch-through method of etching.
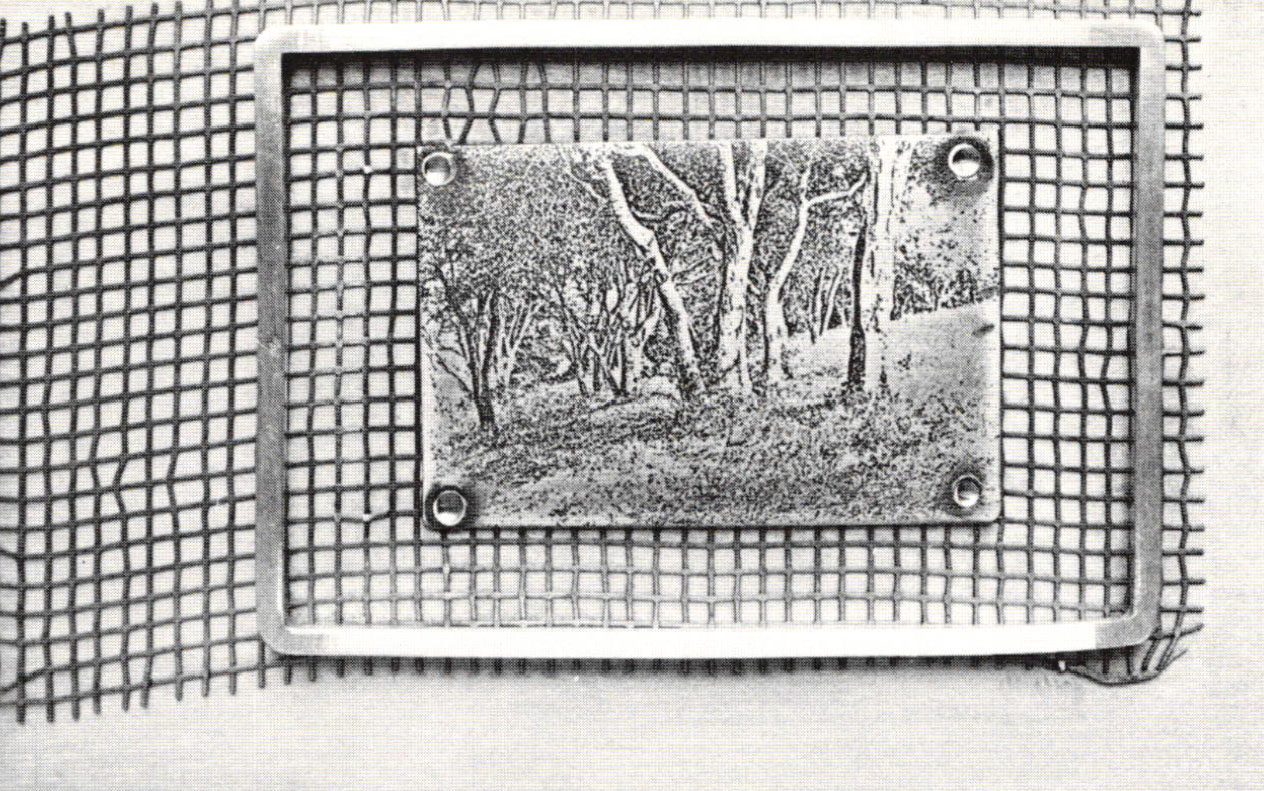
Here we have etched the image, now laterally reversed, in ferric chloride on a piece of copper 1 x 1½ inches in size and darkened with liver of sulfur. The etching is riveted to a sheet of nickel silver separated by a brass screen and framed by a raised sterling silver bezel.
Found objects are another source of patterns and designs. A solid object placed on a sheet of light-sensitive material and exposed from above creates a silhouette known as a photogram. For etching purposes it would be more useful to employ a translucent object in this manner. Thus, tree leaves, insect wings and the like can all be placed on a sheet of film in a printing frame and exposed to create a tracing of their structures much like an x ray. Any common translucent household materials, like tissue paper or fabrics, can be substituted as well. Moreover, where appropriate, rubbings on thin paper can be taken from textured solid objects and printed through onto Kodalith film. The materials and techniques that can be employed are limited only by one's imagination.
Although we've said that for making small, jewelry-sized etchings a photographic enlarger is not necessary, it remains nonetheless a handy instrument to have. It can serve as a useful production tool for the jeweler. Changing the scale of a drawing, for instance, is often a tedious chore using i grid system. But after photographing the drawing we can easily enlarge the image to any size needed. And if we have access to an enlarger designed to accept a camera negative bigger than the size we normally use—for instance, a 4 x 5 enlarger for 35mm film—we can also reduce the image. For reductions an enlarger with a long bellows, say six inches or more, is needed. The reason is that the enlarging lens must be further separated from the negative for reductions than for enlargements. Enlargers designed to handle bigger film sizes require longer focal length lenses to adequately cover the larger formats, and longer focal length lenses require longer bellows. Hence, these larger format enlargers with their longer bellows are particularly suited for making reductions. Indeed, for those who prefer to work from hand-derived images an investment in a prograde enlarger can be more fruitful than an investment in a camera. Drawings and other translucent materials can be easily fitted in the bigger negative holders of these enlargers. These materials can then be treated like negatives and their images projected directly onto Kodalith film. Used in this manner such an enlarger would serve in place of a camera.
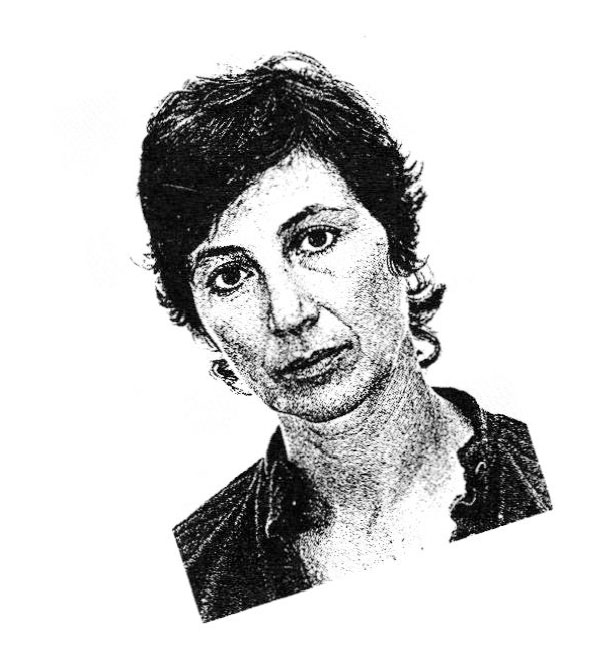
A custom jeweler, Carol Webb owns and operates The Metalworks in Capitola, CA. Allan Liu is a photographer associated with The Metalworks
Related Articles

Chromatec: Producing Photographic Images on Refractory Metals

The Seven Korean Metalsmiths

Photoetching Metal Using Photocopy Transfer

Damascus and Pattern Welding


The All-In-One Jewelry Making Solution At Your Fingertips
When you join the Ganoksin community, you get the tools you need to take your work to the next level.
