
Photographic Images on Refractory Metals
16 Minute Read
The following article explains photo techniques used to transfer images onto refractory metals. These findings were developed during my graduate studies at California State University, Long Beach, California.
Traditionally photo resists have been used as a masking agent in the chemical etching of metals. While working with the electrolytic coloration of refractory metals, I became frustrated with the lack of control I had over the images which were produced through masking areas with tape, nail polish and so on. With the initial problem of producing colored lettering on titanium, I thought of using photo resists as a masking agent, and it has since proven to be an effective way to produce virtually any image that can be transferred to a negative.
Although I have used Kodak Thin Film Resist (KTFR) for its ability to reproduce fine detail, other photo resists on the market will work in a similar manner. The descriptions of how to work with the photo resist liquid is kept brief. (More detailed information can be found in two excellent articles in the Fall and Summer 83 issues of Metalsmith, "Photoetching for the Studio Jeweler.")
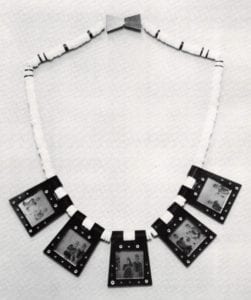
Photo Resist Description
First the KTFR resist is applied to the metal in a liquid form which becomes a light-sensitive emulsion when it dries. This coated surface is then exposed by contact printing just like a piece of photographic film, and the exposed piece developed. The resist was left in the areas where the surface was exposed to light. Areas which the light did not strike were free of the resist.
After the resist is developed, it is used as a mask in electrolytic coloring of titanium or columbium. The resist prevents the electrolyte from contacting the surface of the metal, Thus the exposed areas of the metal can be colored at a particular voltage, and once the resist is removed, the areas previously covered can be colored at a lower voltage. This produces a bicolored image on the refractory metal. The following article describes the processes used to produce successful results with KTFR resist. They were derived from guidelines in Kodak publications and through many experiments.
Safety Precautions
Since resist chemicals all contain xylene, an oily, colorless, toxic, flammable liquid, several safety procedures should be followed when using it. First, it should be kept away from heat and flame. Second, since it may be narcotic if inhaled in high concentrations, a chemical respirator with organic vapor cartridges to filter the chemicals should be worn when working with the resist, developer or thinner. The darkroom should also have an exhaust fan. As a further precaution, the dish used to develop the coated plates should have a cover to contain the fumes. Finally, because the resist chemicals are also harmful to the skin, heavy-duty neoprene gloves and safety glasses should be worn when working with the chemicals.
Cleaning Metal
The first cleaning step is very important. If not done properly, the resist will peel off during acid etching. The metal is initially sanded to remove oxides and scratches, then scrubbed with a small amount of water and cleanser and finally cleaned with detergent and ammonia, The metal is clean only when a continuous sheet of water can be maintained on its surface, indicating the absence of grease.
To completely clean the metal, it can also be electro-cleaned by being attached to the negative terminal of a D. C. generator and immersed in electro-cleaning solution. A stainless steel sheet is also attached to the positive terminal of the generator and immersed in the solution. The D. C. generator is turned on for a few seconds at 10 volts, after which the piece is removed and rinsed in water. To avoid transferring body oils to the metal, it should be handled by the edges only. It is then dried by compressed air or a blow-dryer and wrapped in paper until it is coated with resist at a later time.
Coating Metal with Resist
At this point, the photo resist work is done in a darkroom Photo resists are sensitive to ultraviolet radiation and will be fogged by sunlight or normal red safelights. A yellow bug light was the only light source I used as a safelight when working with the KTFR resist.
The cleaned pieces of metal are coated with a diluted mixture of KTFR—one part KTFR and two parts KMER (Kodak Metal Etch Resist) thinner. The metal is first brushed clear of dust particles with a photographic blower dust brush. The metal plate is held by the edges and a small amount of KTFR mixture poured on the plate. When the plate is rocked, the liquid resist spreads over the plate. The excess liquid is then poured off one corner, back into the bottle of diluted resist, leaving only a very thin coating of resist on the metal plate. Each plate is then either hung or propped up vertically over paper towels to be air dried for 10 to 15 minutes in the darkroom. The lowest edge of each plate collects a thicker coating of resist, Since this edge is not exposed to the same degree as the rest of the plate, the plate should be larger than is actually necessary and cut down later.
Prebaking
After the coated plates are air dried, they are baked to remove any residual solvents in the resist coating. The prebaking operation is done by placing the coated plates on a wire-mesh screen over a Salton hot tray. The hot tray emits no light, but provides the correct amount of heat. The plates are in the darkroom for 20 minutes. After cooling, they are carefully wrapped to protect the resist from scratching and stored in a light-proof box to avoid exposure to sunlight, which would expose and ruin the resist.
Exposing
The exposure time for the coated plates depends on several factors: "The coating thickness, the retention of solvents within the resist layer, the nature of the surface upon which the resist is coated, and the spectral output of the exposing source." All of these factors make experimentation necessary to determine the correct exposure time.
The exposure light source I used at California State University was a Nu-Arc Plate Maker equipped with a xenon light source. After experimentation I found that exposure times of 20 to 30 seconds were adequate. Other sources of ultraviolet light could have also been used, such as a black light.
Before each piece was exposed, it was dusted with a photographer's dust brush, The negative used was also brushed to remove dust particles. The glass on the Plate Maker was also cleaned before every exposure. The coated plate is then placed on the Plate Maker with the resist-coated side facing up. The negative is then placed on top of the plate with its emulsion side facing down. The glass is lowered and the vacuum turned on. The vacuum frame is then turned over to face the xenon light. The desired exposure time is set and the light turned on. After the plate is exposed, it is carefully stored in a light-proof box.
Negatives
Several types of negatives can be used on the project pieces. The simplest type, used as a negative for lettering, is made with rub-down lettering (press type) on frosted Mylar. For other images, high-contrast, normal black-and-white negatives can be used. The high contrast is needed to properly expose the KTFR resist. Only very dense black areas of a negative will prevent the exposure light from exposing the resist. Gray areas of a negative will partially or fully expose the resist and usually produce an unclear image. lf the negatives do not have enough contrast, they can be reexposed on Kodalith film which produces high-contrast images by eliminating gray areas in the original image. Many of the negatives used in my project were derived from my own black-and-white negatives. The high-contrast Kodalith negatives were then used to expose the photo-resist-coated plates.
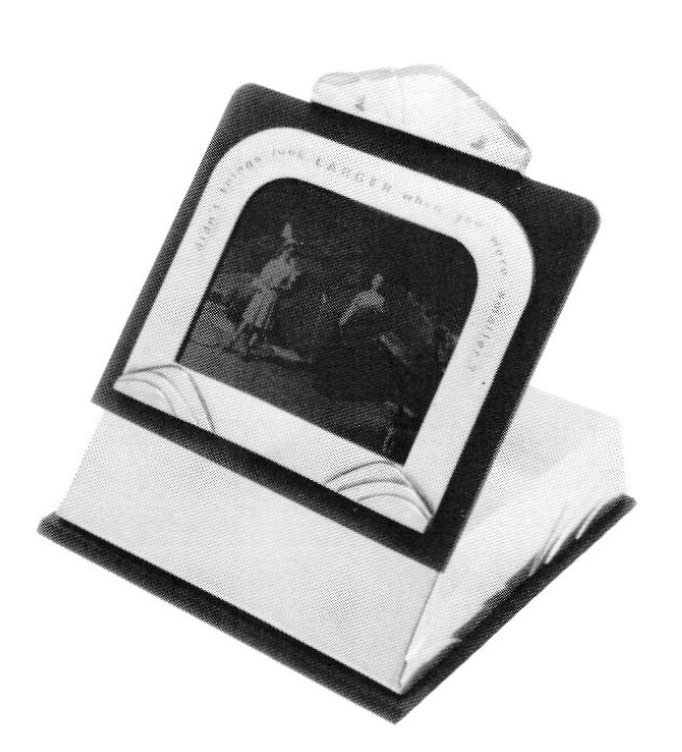
A third type of negative is a halftone negative which can reproduce an original photograph with a continuous range of tones. On the halftone negative the tones of the original photograph are broken up into a series of small dots which are small enough to be merged by the human eye at a normal viewing distance, creating the illusion of a continuous tone. The dots are produced by projecting a continuous-tone negative through a screen with a pattern of gridded lines or a screen of vignette dots. When the light passes through the screen it breaks up the image into a series of dots. The dots on the film vary in size depending on the amount of light passing through the original continuous-tone negative. The halftones used on all of my pieces were made by a commercial graphic arts company with an 85-line-per-centimeter screen. However, the halftone used on the piece entitled Me and My Brother was made with a 120-line-per-centimeter screen.
Developing
The developer used for KTFR is KMER (Kodak Metal Etch Resist developer). It is extremely noxious and a respirator mask and heavy-duty gloves should be worn at all times when working with it. The developer, actually a solvent, dissolves the KTFR photo resist in areas where it is not hardened by exposure to ultraviolet light.
A covered glass dish is used to develop the exposed plates. About ½ inch of KMER developer is poured into the dish. The exposed plate is then placed in the developer with the coated side up. The cover is replaced on the dish and it is then gently rocked for three minutes. The plate is then removed and placed in a dish of water. The unexposed resist is removed by the water and the image appears at this time. Because the developer tends to soften all the resist, the image is very fragile. As a result, extreme care must be taken when handling the plate after development.
After this step, the plate can be exposed to normal light without affecting the image. It is then air dried. The developer should be stored in a separate container from unused developer and can be reused four to six times before being discarded.
Postbaking
Postbaking the developed plate helps the resist to adhere to the metal during acid etching. After development, the plate is placed on a wire-mesh screen above a Salton hot tray and left on it for 15 minutes. The resist should then be hard and ready to be colored electrolytically.
Coloring of Refractory Metals
When the photo resist is applied to the refractory metals, titanium or columbium, it is not intended to be an acid resist for etching. Instead, the photo resist is used as a mask for electrolytic coloring of the metals. The photographic image is developed through coloring of the metals rather than acid etching the image.
Titanium and columbium can be colored by the formation of oxides on the surface of the metal. The thickness of this oxide determines the color seen by the human eye. It is an effect created by an optical phenomenon known as interference, meaning that no dyes have been used to produce the colors. Interference is simply the combination of waves of light which in turn produce different colors visible to the human eye. These oxide layers can be formed by heating the metal or by electrical current.
The electrical coloring of titanium and columbium is achieved with a D. C. generator capable of producing voltage from zero to approximately 100 volts. Since this voltage is strong enough to kill the operator, strict safety procedures must be followed (discussed later in this section). The metal to be colored is attached to the positive terminal or anode, and another piece of stainless steel or titanium is attached to the negative terminal or cathode. Both pieces of metal are suspended, without touching each other, in a liquid capable of transferring current. The liquid or electrolyte I used was tap water with a few spoonfuls of ammonium sulfate fertilizer. The liquid is contained in a nonconductive material such as plastic or glass.
When the generator is turned on and voltage transmitted to the metal, oxygen is formed at the positive side or anode. The oxygen combines with the metal of the anode and forms an oxide film layer on the metal anode. The thickness of this oxide film increases with higher voltage, therefore, different colors are produced by different voltages. For instance, titanium subjected to 20 volts will produce a purple color, while 50 volts will produce a light green color.
Once an area of a piece of titanium or columbium has been colored at a specific voltage, it can be immersed again in the electrolyte and subjected to a lower voltage. The first color produced by the higher voltage will remain unchanged and a second color will be produced (on previously uncolored areas) by the lower voltage.
To achieve several colors on one piece of metal, the highest voltage colors must be created first. The areas that are to be colored with a lower voltage must be masked from contact with the electrolyte. Masking can be easily done by using plastic tape or by painting the metal with a non-water-soluble liquid such as nail polish. Both of these methods are effective but limited. For more detailed designs, photo resist can be used as a masking agent.
The previously described process for coloring is used when the titanium and columbium were coated with a photoresist image. To insure good contact on the entire piece of metal, a rectangular, adjustable armature of titanium sheet is built. The piece to be colored is then clipped to this armature with plastic-coated spring-clips which gives metal to metal contact down both sides of the piece of metal. The armature is then hung in a five-gallon plastic bucket from plastic rods. A titanium cathode is similarly suspended in the other side of the bucket. The cathode is attached to the negative terminal by an alligator clip lead, and the armature holding the piece to be colored is attached by another alligator clip lead to the positive terminal.
The generator is then turned on and the voltage slowly increased to the highest voltage needed to color the metal. It is kept at this setting for only a few seconds, then turned off and unplugged. The metal is then removed and checked for the desired color. The exposed areas of the metal should be uniformly colored while the areas of metal covered by resist remain uncolored.
The piece is then removed from the armature and soaked in paint thinner which removes the photo resist and exposes the uncolored portion of the metal. The metal is then washed in water and detergent to remove the paint thinner.
The final coloring step is the oxidation of the areas of metal previously covered with photo resist. The piece of metal is again clipped to the armature and immersed in the electrolytic solution. The power leads are again attached, and the generator plugged into the wall socket. The current is turned on and slowly raised to the desired voltage, lower than the first voltage so as not to destroy the first color. When the piece is removed, it now has a two-color image. The metal is rinsed and dried with a blow-dryer. The colored titanium or columbium pieces can then be cut, shaped and attached to other materials to form various finished pieces.
Additional Safety Precautions
While using the D. C. generator, many safety procedures were followed. These are especially important because the voltage produced by the generator is strong enough to kill the operator: Rubber gloves and rubbersoled shoes are worn when operating the generator; the work piece electrolytic bath and wires are never touched while the power is on; as an added safety precaution, the generator is also unplugged before anything is removed from the solution; the work is always done on a wooden, rather than metal, table; and the work area is kept neat and free of pieces of metal or water which could conduct electricity. All these precautions must be checked repeatedly while coloring many pieces of metal.
Conclusions
The most important considerations in using photo resists are cleanliness and safety. If the plate has not been sufficiently cleaned, the photo image can be ruined. It is even worth the effort to sand the plate with emery paper, using cleanser and electro-cleaning it. Also, after the metal is coated, it must be kept free of dust particles, which will otherwise be certain to appear on the finished piece. Do follow strict safety precautions when using the photo-resist chemicals and the D. C. generator.
The application of photo resists on refractory metals provides a way to control the images obtained on these metals. But one drawback to this technique is the health hazards involved with the photoresist chemicals and the power supply. Perhaps other resists are less harmful than KTFR, but this area needs further investigation. Also, the equipment and darkroom facilities available to me as a student made some of my work easier. For instance, now that I no longer have access to that equipment, I am investigating using a black light source instead of the Xenon Plate Maker. All of which is to say that the individual studio jeweler will need to invest time and money to set up the proper equipment and work environment, which could even include a darkroom to produce transparencies.
I hope the information I obtained while experimenting with this process will be of value to others. But more to the point, I hope this technique to master but a more creative way to express ideas on metal.
Related Article:
Chromatec: Producing Photographic Images on Refractory Metals
Bibliography
- Dalley, Terence, ed. The Complete Guide to Illustration and Design Techniques and Materials, Secaucus, N. J.: Chartwell Books, 1981.
- Eastman Kodak Company. Characteristics of Kodak Photo Resists. Rochester, N. Y.: Kodak, 1978
- ____________. Kodak Photosensitive Resist Products for Photofabrication, Rochester, N. Y.: Kodak, 1978
- ____________. Photofabrication Methods with Kodak Photo Resists. Rochester, N. Y.: Kodak, 1979.
- Hall, Joseph. "Properties and Uses of Titanium, Zirconium, Hafnium, Niobium (Columbium), and Tantalum for the Artist-Metalsmith." Research paper published as part of a group of papers in Metalsmith Papers, Clinton, Ohio: Society of North American Goldsmiths, 1979.
- Lahue,Kalton D., ed. Creative Darkroom Techniques. Lost Angeles: Petersen Publishing Co., 1973.
- Ward, James Brent. "The Colouring and Working of the Refractory Metals Titanium, Niobium, and Tantalum for Jewellery and Applied Application." Report 34/1. London: The Worshipful Company of Goldsmiths, [n. d.].
- Weiss, Linda. "Questions and Answers."
- Metalsmith, 2, Winter, 1981-82, 53.
Notes
- Eastman Kodak Company, Photofabrication Methods with Kodak Photo Resists (Rochester, N. Y.: Kodak, 1979), pp. 2-19; Eastman Kodak Company, Kodak Photosensitive Resist Products for Photofabrication (Rochester, N. Y.: Kodak, 1978), pp. 2-15.
- Eastman Kodak Company, Photofabrication Methods, p. 12.
- Eastman Kodak Company, Characteristics of Kodak Photo Resists (Rochester, N. Y.: Kodak, 1978), [n. p.].
- Eastman Kodak Company, Photofabrication Methods, p. 17.
- Kitk Kitkpatrick, "Devious Litho Derivation Effect," Creative Darkroom Techniques, ed. Kalton C. Lahue (Los Angeles: Petersen Publishing Co., 1973), pp. 30-32.
- Terence Dalley, ed. The Complete Guide to Illustration and Design Techniques and Materials (Secaucus, N. J.: Chartwell Books, 1981), pp. 194-96.
- James Brent Ward, "The Colouring and Working of the Refractory Metals Titanium, Niobium, and Tantalum for Jewellery and Applied Application," Report No. 34/1 (London: The Worshipful Company of Goldsmiths, [n. d.]. p. 1.
- Joseph F. Hall, "Properties and Uses of Titanium, Zirconium, Hafnium, Niobium (Columbium), and Tantalum for the Artist-Metalsmith," a research paper published as part of a group of papers in Metalsmith Papers (Clinton, Ohio: Society of North American Goldsmiths, 1979), p. 64.
- Ward, "The Colouring and Working of the Refractory Metals," p. 2.
- Linda Weiss, "Questions and Answers," Metalsmith, 2 (Winter, 1981-82), p. 53.
Related Articles
Copper, Brass and Bronze Advanced Etching
Metal Salt Etching, Resists and Resist Removal

Damascus and Pattern Welding

Chromatec: Producing Photographic Images on Refractory Metals


The All-In-One Jewelry Making Solution At Your Fingertips
When you join the Ganoksin community, you get the tools you need to take your work to the next level.
