
Photoetching Metal Using Photocopy Transfer
Photoetching metal is simple AND FUN! Etching can be used for printing processes, as an artifact of art, or for roller print embellishment. It involves a mordant (acid) to etch an image onto metal and a resist to repel the mordant. A resist can take many forms: plastic, vinyl, marking pens, duct tape, nail polish, etc. As long as it resists the mordant, the procedure will work. This technique creates high resolution images, and intricate surrounding textures that give your pieces an organic quality. With current photocopier, digital imaging and laser printer technologies you have more design flexibility. You can add text, reverse images, and control contrast. The photoetching process we describe below essentially uses the same techniques that printmakers employ. Except we use brass, copper, bronze and silver instead of zinc as printmakers do. This process also gives you the options of soldering and making cold connections.
15 Minute Read
 Photoetching metal is simple AND FUN! Etching can be used for printing processes, as an artifact of art, or for roller print embellishment. It involves a mordant (acid) to etch an image onto metal and a resist to repel the mordant. A resist can take many forms: plastic, vinyl, marking pens, duct tape, nail polish, etc. As long as it resists the mordant, the procedure will work. This technique creates high resolution images, and intricate surrounding textures that give your pieces an organic quality.
With current photocopier, digital imaging and laser printer technologies you have more design flexibility. You can add text, reverse images, and control contrast. The photoetching process we describe below essentially uses the same techniques that printmakers employ. Except we use brass, copper, bronze and silver instead of zinc as printmakers do. This process also gives you the options of soldering and making cold connections.
Here's a helpful rundown of where to shop for all the tools, materials, and supplies you'll need to do this process successfully:
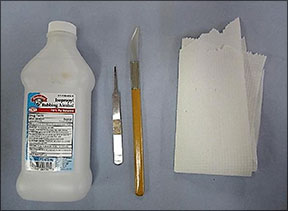
What You'll Need
| Rubbermaid Tub | small, the size of a shoe box with a tight-fitting lid |
| Ferric Chloride | for bronze, copper and brass |
| Ferric Nitrate | for silver |
| Duct Tape | Grey duct tape1 |
| Two-Sided Tape | Scotch Two-Sided Tape2 |
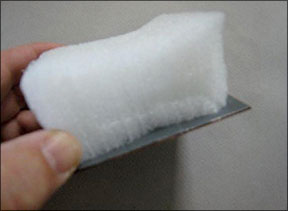
| Styrofoam | you can salvage any old piece for this project, as long as it's straight and clean |
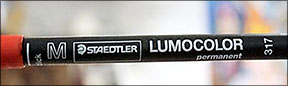
| Red Staedtler Ink Pen | See notes3 |
| Aquarium Air Pump | Should have a completely flat bottom to adhere to the side of the bin. Any cheap model will do, just make sure it's UL-listed! |
| Sheet Metal ≥ 20 gauge | you can use brass, copper, bronze or silver |
| Iron | the appliance, not the metal |
| 3M Overhead Transparency Film | for laser printers and laser photocopiers |
| Paper Towels | See notes4 |
| Tweezers | |
| Curved Burnisher or Spoon | Any curved burnisher will work, but the thicker the better. |
| Isopropyl Rubbing Alcohol | |
| 3M Scotch-Brite Pads | |
| Penny Brite | See notes5 |
| Electric Pancake Griddle | you can also salvage a used one if you've got a good local thrift shop! |
| Baking Soda | |
| Safety Glasses | |
| Rubber Gloves | it's always better to err on the industrial side with these! |
| Household Ammonia | |
| Metal File | flat or half-round (this Grobet one is perfect) |
| Sink with running water | recommended for rinsing |
| Extra rinse container | recommended for 3 pieces or more |
| Heat-proof Surface for cooling | anvil/metal block is best |
| Distilled Water | only needed for diluting Ferric acid in crystal form |
Notes
- Gorilla Tape is the strongest duct tape, but it's difficult to remove from the back plate. Removal of very strong duct tape can cause hidden acid to splash out. Grey duct tape is easy to pull in one motion away from the metal and is temporary. Gorilla Tape is too strong.
- Scotch two-sided tape is just fine. Again, you are adhering the metal to the styrofoam. It adheres very well and is easy to remove.
- After many tests of red Sharpies and other pens, I found that a Red Staedtler Ink Pen will stand up to mordants the best, due to its chemical makeup. Ballpoint pen tips won't allow the ink to pass onto the metal steadily enough to create a good mark on the metal. Also available from MisterArt.com.
- Absorbency isn't a requirement for the paper towel you want to use. It's not there to soak up liquid. The paper towel on the griddle for the metal to sit on is only to protect the griddle from scratches. After the toner has adhered, you want something thin for the iron to do its job.
- Penny Brite is formulated specifically for cleaning copper and is also good for brass. After rinsing the etched material, Penny Brite's exclusive formula of citric acid really is the best cleaner and worth the investment.
Materials Safety Warning
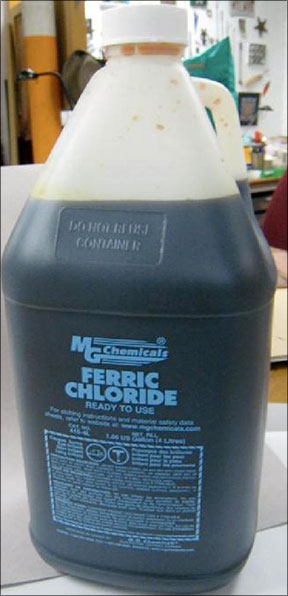 Nitric or Hydrochloric Acid etches quickly but is very hazardous. Ferric Chloride and Ferric Nitrate etch more slowly and safely. Ferric Chloride and Ferric Nitrate are the preferred mordant options. Ferric Chloride works best with copper, brass and bronze. For silver, use Ferric Nitrate.
While safer than Nitric, these chemicals are still considered hazardous, so close attention to the process is important. Included in this outline are safety measures you should follow.
Ferric Chloride is available:
- Premixed and ready-to-use, or
- In crystals (requires dilution)
Ferric Nitrate is only available in crystals.
Dilution for crystals is 1 part crystal to 3 parts distilled water.
As with any hazardous chemical, Ferric solutions require careful handling. Anyone responsible for the procurement, use or disposal of these products should familiarize him/herself and others handling them with the appropriate safety and handling precautions. This information is available in the Material Safety Data Sheets (MSDS):
- Ferric Chloride - http://www.labchem.com/tools/msds/msds/LC14380.pdf
- Ferric Nitrate - https://beta-static.fishersci.com/content/dam/fishersci/en_US/documents/programs/education/regulatory-documents/sds/chemicals/chemicals-f/S25319A.pdf
Ferric Nitrate and Ferric Chloride are corrosive. Avoid contact with eyes, skin and clothing, and do not inhale their vapors. These solutions can decompose at temperatures above 100°C (212 F) to yield toxic nitric oxide gas.
Use good quality safety glasses and a pair of well-fitting disposable gloves.
Ventilation is an important consideration. Work outside is ideal, but if you cannot work outside a kitchen or work room with an open window will suffice.
Photo Transfer Process
Step 1 - Metal Prep
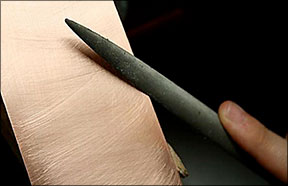 Begin with a piece of copper or brass no larger than 3 x 3 inches and a minimum of 20 gauge. File any corners or rough edges until they are smooth. Clean your metal with Scotch-Brite and cleanser or Penny Brite until water runs off your metal in a sheet. If you see the water beading, then clean again. Scrubbing with Scotch-Brite will serve to give the metal a "tooth" which will help the toner to adhere. Dry thoroughly with a towel and handle by the edges. For your iron to glide smoothly, you must file the edges of your metal.
Step 2 - Image Selection and Placement
Select your image from a hardcopy or a digital file, and photocopy or print it onto the overhead transparency film using a laser copier or laser printer. Images should be high contrast with visible distinction between dark and light. The grey parts in between can make it difficult for the mordant to bite. Trim your picture so that no film extends over the edges of the metal. It's best that you leave a little extra metal around the edges of the film for easy removal.
Note: Laser Printers vs. Inkjet Printers
Laser printers and photocopiers use the same kind of toner. Inkjet printers use water-soluble ink that will NOT work for this process.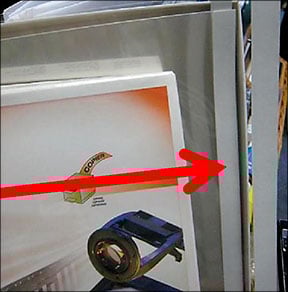
Overhead transparency film
The white strip is removable after photocopying the image. It is meant as a "reader" for most photocopy machines allowing them to sense that paper is in the feeder.
Step 3 - Heat Iron and Griddle
Set your iron to the highest setting (usually linen) and your electric griddle to 250 degrees F. Depending on the kind of iron, you may have to adjust the heat. Overhead transparency film is designed to withstand very high heat, but some irons are too hot. Do some tests first.
Step 4 - Place One Piece of Paper Towel on the Griddle
The paper towel is meant to protect the griddle face, and it also keeps the metal from skating around. Don't worry about the paper burning. If you remember the Ray Bradbury Sci-Fi book Fahrenheit 451 paper doesn't burn until 451 degrees F!
Step 5 - Prepare Your Supplies
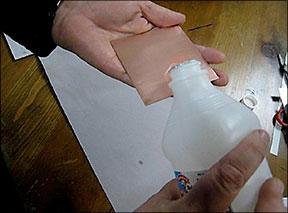
Assemble your burnisher, tweezers, Isopropyl Rubbing Alcohol and paper towel and put them next to you for easy access.
Step 6 - Clean Metal and Image with Alcohol, Place the Image Down
First tear off a small sheet of paper towel and saturate it with the alcohol.
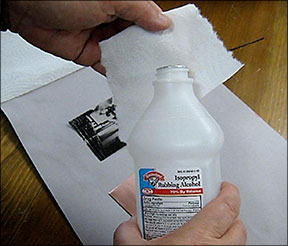
Clean one side of the metal and the TONER-side of the image with the alcohol-saturated towel.
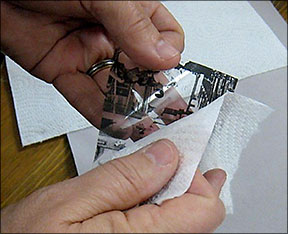
Place the image toner-side down on the metal. IMPORTANT Make sure that when you place the image on the metal that it is still wet. This is THE trick to making the whole process work.
Squeegee out the excess moisture and any air bubbles by sliding your hand across the metal and film. It doesn't need to be dripping wet, but it does need to be wet.
Step 7 - Iron the Transparency Image to Metal
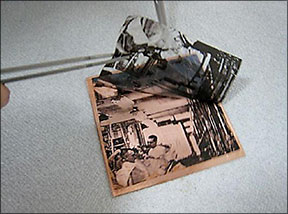
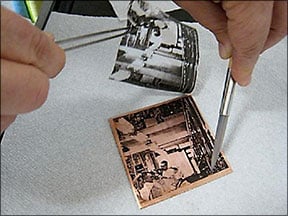
Immediately place the metal film-side up on the already-warmed paper towel on the heated griddle. Immediately place another paper towel over your piece and the iron on top of that. Let the iron sit for about one minute. Carefully iron the piece for about 20 seconds and then lift the iron. Remove the top paper towel. Hold your burnisher in one hand and your tweezers in the other. Carefully lift one corner of the film with the tweezers and see if the image has transferred to the metal. If it hasn't, replace the film and keep heating between the paper towels. Sometimes using the burnisher will help. If it has transferred, remove the film (WHILE HOT) in one smooth stroke.

Burnish your transparency film while it is hot. Begin to check that the toner has transferred to the metal.
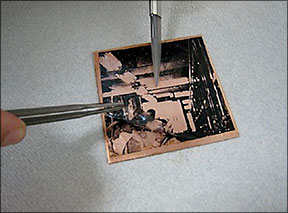
Use your burnisher to stabilize your metal as you complete the removal process.
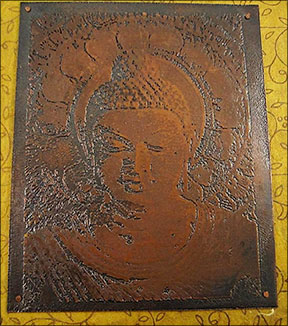
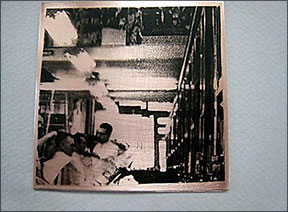
Voila, transfer complete! Small open spots can be touched up with a Red Staedtler pen (see Troubleshooting.) Transfer the metal to a surface that can withstand significant heat. A metal block or anvil works nicely. Once the toner is on the metal, it is very stable. I have sample pieces that have been sitting around for years that are as good as the day I ironed them down.
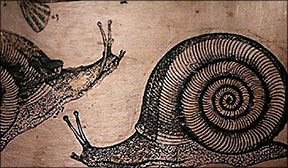
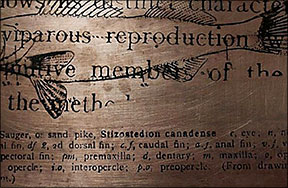
The transfer etch process is good even for delicate line drawings from a photocopy.
Troubleshooting the Photo Transfer
If the image smudges, then the iron is too hot. Try decreasing the temperature. The nice thing about this process is that you can scrub the image off and try again. Transference takes a bit of practice but eventually you will get it to work.
Sometimes the image does not transfer completely. This is where your Red Staedtler pen can help out. You can fill in some areas before the etching process.
Thicker gauge metal needs to be heated for longer at a higher temperature. Larger pieces of metal can work (> 4 x 4 inches) but you must raise the griddle heat and spend more time ironing.
When you first try this process, use a single image of film on each piece. Later you can experiment with multiple images. If the metal cools too much, the image will come off with the film. You can, however, do multiple images in stages.
Silver heats up fast, so watch your temperatures carefully. Remember, hot metal looks just like cold metal.
When the metal is sufficiently heated the toner will transfer. Peel back the acetate while the metal is HOT. DO NOT wait for the metal to cool down or the image will peel off.
In one continuous motion peel away the acetate with tweezers. Keep removing the film.
Touch Ups and Creative Drawing
The amazing and resilient Red Staedtler pen MUST be used for touch ups or free hand drawing. The RED ink has a special formula for resisting mordant. No other color works.
Making an "Interneg" to Include Text
Since photoetching is a "reverse" image process, lettering will be transferred backwards unless you make an interneg. An interneg is a slide with backwards lettering that allows you to transfer the text correctly. You can use one of two methods to make an interneg:
- In Photoshop reverse the lettering in an image and then print it, or
- Photocopy your image onto a sheet of acetate, flip the slide on the photocopy platen and recopy onto another sheet of acetate.
Etching Process
Step 1 - Layout Supplies
Now that you have an image on metal, you are ready to etch. Lay out your mordant, distilled water (for Ferric crystals, only), tub, duct tape, two-sided sticky tape, Styrofoam, safety glasses, rubber gloves, air pump, rinsing container, baking soda and ammonia.
Step 2 - Tape & Styrofoam Preparation
Tape the back of the metal with duct tape. Place two strips of double-sided sticky tape onto the other side of the duct tape. Cut a piece of Styrofoam to fit the size of your metal. Press the Styrofoam onto the pieces of double-sided tape to create a floating pontoon.
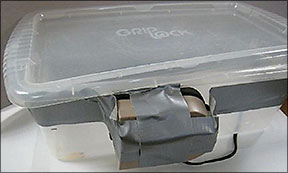
Step 3 - Prepare Etching Tub with Air Pump
Secure the air pump bottom onto the side of your plastic tub with duct tape. Why use an air pump? These cheap pumps are made to gently vibrate for long periods of time. The vibration causes the etched residue to fall to the bottom of the tub and keeps the exposed area of the metal etching continuously. DO NOT cover the air hole on the pump with tape!
Step 4 - Prepare and Pour Ferric Compound, Safety Equipment
Prepare Your Mordant. Ferric Chloride works best with copper, brass and bronze. For silver use Ferric Nitrate.
Ferric Chloride is available:
- remixed and ready-to-use
- In Crystals (dilution required)
Ferric Nitrate is only available in crystals and requires dilution.
Dilution for crystals is 1 part crystals to 3 parts distilled water. After donning your safety glasses and rubber gloves pour the Ferric Nitrate or Ferric Chloride into the tub - about 1/3 full. Try not to create bubbles. A few are okay. This should be performed in a well-ventilated area. Outside would be great but in a kitchen or work room with an open window will suffice.
Step 5 - Insert Piece into Solution, Start Pump, Record Time, Begin Etching
Carefully lower the metal into the solution with the image-side DOWN. The Styrofoam will act like a pontoon and insures that the metal is continuously submerged. On the Styrofoam pontoon, write the time you began the etching. Close the lid and plug in the pump. Etching should take about 45 min to 1.5 hours, depending on the depth of the etch you desire. The longer the piece is submerged, the deeper the etch.
Step 6 - Check, Rinse & Remove
Check the progress of the etching every 30 minutes. Have a separate empty container nearby. Pull the metal out and take it to a sink. Rinse thoroughly with tap water. The small amount of ferric chloride isn't enough to harm the sink. Flush with water and rub your finger along the metal to see how the bite has taken. If you need more time, drop it back into the tub.
Step 7 - Neutralize and Stop the Process
Etch done? Pull your piece out of the etchant, drain well and bring it to the sink. Hold the metal under running tap water or submerge it in clean water and pull the duct tape off while in the water. The water protects you from the acid splashing back. Pull the duct tape off in one motion and everything will come off smoothly.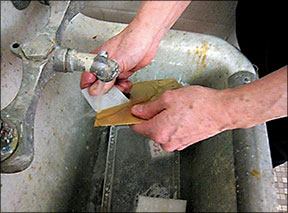
If you are satisfied with your etch fill a container with tap water and about a handful of baking soda. Place your piece back in the container to neutralize the residue on your etched image. Wait until it stops foaming - about a minute. Rinse well with tap water. Refill the tub with a little more tap water. Add about 1/8 cup of ammonia and put the piece back in the tub. This acts as a stop bath for the mordant and completely arrests the etching process.
Clean the metal with the Penny Brite or cleanser and use the Scotch-Brite pad. This will scrub off the last of the toner. Now you are ready to use your etched piece.
Frequently Asked Questions
Q: Why use the photocopy transfer technique?
A: Three reasons:
- Inexpensive. Overhead transparencies are about $25 for 100 sheets.
- Flexible. It doesn't matter which side of the metal you use and it does not take any special equipment. There are other great options on the market such as Press-n-Peel Blue Transfer Film and DuPont ImagON™.
- Easy. It can be done anywhere. You can even use this process at home.
It is important to note, however, that designs which have good contrast produce the best results. Dover Books are a great source for high quality images and present no copyright issues.
Q. What kind of mordant etches what kind of metals?
A. Ferric Chloride etches copper, brass, and bronze. Ferric Nitrate etches silver.
Q. Is the procedure any different with silver than it is with copper?
A. The protocols for etching copper and silver are exactly the same.
Q. What is Penny Brite?
A. Penny Brite is an excellent copper cleaner that is made from citric acid. It leaves no greasy residue behind and is the recommended cleaner for this process.
Penny Brite has been a premium, traditional copper cleaner in American homes since 1947. It is specially formulated to clean copper, stainless steel and brass with instant cleaning action - no rubbing or buffing. Its anti-tarnish formula helps metal maintain its shine longer!
Use Penny Brite on copper and stainless-steel cookware, utensils, stainless-steel sinks, stainless-steel range tops and hoods, ceramics, brass hardware, automotive chrome and marine hardware. You will never find ammonia, chlorine, sulfuric acid or carcinogenic benzene derivatives in Penny Brite Copper Cleaner - no rubber gloves needed!
Q. How do the chemicals arrive?
A. Ferric Chloride can come in crystal form or pre-mixed, ready-to-use. Ferric Nitrate comes in crystal. Lists of suppliers are below.
Q. How do I mix the chemicals?
A. 1 part Ferric crystals are mixed with 3 parts distilled water. Make sure you ALWAYS add the crystals to the water only.
Q. Can I use regular tap water with the Ferric bath?
A. No. The chemicals in tap water vary from city to city. Use distilled water. However you can use tap water to rinse and clean.
Q. How do I dispose of Ferric Chloride Solution?
A. Contact your local Hazardous Waste Disposal Company
As with any hazardous chemical, Ferric solutions require careful handling. Anyone responsible for the procurement, use or disposal of these products should familiarize him/herself and others handling them with the appropriate safety and handling precautions. This information is available in the Material Safety Data Sheet (MSDS)
- Ferric Chloride - http://www.labchem.com/tools/msds/msds/LC14380.pdf
- Ferric Nitrate - https://beta-static.fishersci.com/content/dam/fishersci/en_US/documents/programs/education/regulatory-documents/sds/chemicals/chemicals-f/S25319A.pdf
Ferric Nitrate and Ferric Chloride are corrosive. Avoid contact with eyes, skin and clothing, and do not inhale their vapors. The solution can decompose at temperatures above 100°C (212 F) to yield toxic nitrogen oxide gas.
Q. Where can I purchase Ferric Chloride, Ferric Nitrate and Copper Cleaner?
A. You'll find handy links for all the supplies mentioned in this tutorial in the chart at the top of the page!
Related Articles

Champleve – Photo Etching with PnP Paper

Etching Options for Champleve

The Seven Korean Metalsmiths

Chromatec: Producing Photographic Images on Refractory Metals


The All-In-One Jewelry Making Solution At Your Fingertips
When you join the Ganoksin community, you get the tools you need to take your work to the next level.
