
Champleve Enamelwork with Ferric Chloride
Champleve (shahmp-luh-vay), meaning - raised plane - in French, is the process by which a design is cut, gouged or etched out of metal to create low areas for the enamel. After many layers of enamel have been fired, the piece is stoned and may be re-fired to restore a glossy finish. The unenameled metal areas may be waxed, polished or plated. I cut, clean and etch many pieces at one time, but I fire each piece separately. Each piece requires approximately 8 to 10 firings.
13 Minute Read
This article shows how to create champleve enameled jewelry as excerpts from the book: Enameling with Professionals by Lilyan Bachrach.
Champlevé (shahmp-luh-vay), meaning "raised plane" in French, is the process by which a design is cut, gouged or etched out of metal to create low areas for the enamel. After many layers of enamel have been fired, the piece is stoned and may be re-fired to restore a glossy finish. The unenameled metal areas may be waxed, polished or plated. I cut, clean and etch many pieces at one time, but I fire each piece separately. Each piece requires approximately 8 to 10 firings.
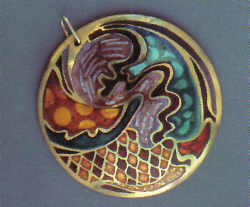 |
| Pendant 2 1/2″ champleve enamel. |
Most of my work is either jewelry or small plaques. My jewelry usually ranges from 1 1/2″ to 2 1/2″ circles or interesting shapes. My plaques range from 4″ to 7″ circles and squares. I do a detailed drawing before I cut or select the copper piece. In my drawing, the lines for the resist, the unenameled metal, are of various widths. None of the resist lines are narrower than 1/32″. Although I do not work out my colors in the drawing, I determine where I want the darks and the lights, where the foils Will go and if and where there will be cloisonné wires. I use Vidalon tracing paper to transfer the drawing to the copper after it has been annealed, cleaned and brushed.
The copper sheets I buy arc 10ga, 12ga and 14ga. I use a 1/0 or 0 blade in a jeweler's saw to cut the copper. The thicker the copper, the deeper the etch can be. A deeper etch allows for more layers of transparents over the opaques. I often dome the piece but not until the etching is completed. When I make a pendant, I have a "neck" as part of the piece. It will be turned back later to become a loop for the chain. The neck eliminates having to frame the enamel or to solder on a jump ring. I usually use 18ga x 30ga fine silver wire.
After the copper shapes arc cut, the pieces arc annealed. I place a number of pieces on a wire mesh trivet into the kiln at 1500F. The copper is fired to a reddish glow and then plunged into cold water. Next is pickling in warm Sparex 2 (follow the directions on the can) to remove any firescale. Then comes the cleaning of the copper. I use Lea Compound C on a hard, stitched, muslin buff on my polishing machine. When the whole piece is buffed, it is rinsed very well With detergent and water. If you do not have a buffing wheel, a good copper cleaner will do; I like Copper-Glo. The piece is rinsed after buffing but additionally wiped with lighter fluid, rinsed again and dried.
I then transfer my design to the metal with carbon paper as a pattern for the Weber's Liquid Etching Ground that I use as a resist. The resist prevents the metal under it from being etched. If in time it thickens, I thin it with mineral spirits. A border of resist is needed around all the edges. For a small piece of jewelry, paint a border about 1/8″ and to 3/16 " for a plaque. The border prevents the edge of the enamel from chipping or getting an underbite during the etching. Use a good, fine pointed brush. It is better to go over the lines several times with thin applications until there is no pink copper showing through than to apply the resist too thickly. Let the resist dry. Then, if you wish, you can sgraffito a design in the dried resist but remember that the resist lines should not be narrower than 1/32 ". If you are a beginner, leave these lines a little wider.
Having removed any resist from the areas that are to be enameled, I let the piece dry overnight before applying Bee's wax, paraffin or candle wax to the back and the edges of the piece. I melt the wax in an old frying pan, keeping the heat low to prevent the wax from smoking. With an old brush that I keep just for waxing, I paint on the wax, being careful not to disturb the resist on the front. The wax will cool and harden fast.
The set-up for the etching is a 14″ x 9″ x 2″ deep Pyrex dish (never metal) for six to eight jewelry pieces. If I am etching fewer pieces, I use a smaller dish. A solution in a large container will etch faster than the same amount of solution in a small container because some surrounding air facilitates the etching. I place a row of triangular glass or plastic rods to support the pieces in the dish. I have had the best results with Ferric Chloride, even though nitric acid will etch the copper faster. Ferric Chloride etches by gravity so the pieces arc placed upside down on the rods. They are supported only on the acid resist border.
The acid solution is poured slowly into the dish until the level of the liquid is just touching the under surface of the piece. That side has the design. The biting action of the solution takes place on the surface of the liquid. From time to time, I stir the solution with a pigeon feather, moving it gently over the surface to remove any bubbles. If you cannot find a feather, a wooden stick will do. Any bubbles trapped on the surface of the copper will retard the etching.
The Ferric Chloride is safer because it does not have dangerous fumes and produces no underbite if used properly. I purchase a 5 pound bottle of the purified lumps. The lumps keep better than either the liquid or the powder. Ferric Chloride does not etch silver.
 | |||
| Pendant with tail to be bent into jump ring. | Paint etching ground in narrow border around the edge. | Plastic triangles set up to support piece | Piece set up face down on etching bath |
The solution I use is 13 oz (avoirdupois) Ferric Chloride lumps in two quarts warm water. Put the water in a plastic bucket and add the Ferric lumps. Caution: Always add acid to water. I wear heavy rubber gloves to break up the lumps in the water until they are in solution. Although this acid will not burn your hands like nitric does, it can yellow the skin.
I check the etch occasionally. I have a bowl of water next to the etching dish. Wearing the special rubber gloves, I remove the piece and place it immediately in the bowl of water. Do not allow it to be exposed to the air or a green powder will form, which happens when Ferric solution is exposed to the air. Important: if this green powder is heated in a kiln, it forms chlorine gas, which is extremely dangerous to inhale.
While the piece is under the water, the depth of the etch is checked with a stainless metal tool. If you see a bright spot, rub this spot with the tool. These small, round, bright spots mean that an air bubble has been trapped there. The tool will clean the places on the metal where it may not be etching properly. If any of the acid resist lines are lifting up, the piece is placed in a bowl of water with a little ammonia for a few minutes, then into a bowl of clear water. The piece is dried and resist applied where needed. The resist is allowed to dry and then replaced in the Ferric solution. With the solution I use, the etch takes about eight to ten hours. I usually start it early in the morning to be able to check it throughout the day. I etch several pieces at a time, but if I etch only one piece, the time will be shorter. It is always better to do a long, slow etch to avoid underbite. Underbite is when the sidewall of the etched area becomes uneven.
When the solution turns murky green it is exhausted. Remove the pieces and place them in a bowl of water while you replace the solution. To dispose of the acid solution, I neutralize it with a little ammonia in another container and pour it into a small hole I dig in the corner of my backyard.
To do multiple bites, having different levels, I make the first bite about one third of the total thickness of the metal. The second and third bites together should go down no more than two thirds of the total thickness of the metal if you arc using 10ga or 12ga. If the copper is 14ga. do not etch down more than halfway for total bites because then the metal will be too weak. If I want other shallower etching areas, I scratch away some of the resist when the etching is about halfway done. You can repeat this after another few hours. I use a piece of 18 x 30 flat cloisonné wire to test the depth of the etch. The multiple bites in foil areas will make the foil appear to float.
After the etching is completed, wash each piece in water and soak in ammonia for 10 minutes, then rinse very well. I remove the etching ground with either paint thinner or turpentine. The wax is removed by heating the piece gently in another old, shallow frying pan. Some of the etching ground can be removed with this method also. When all the resist and wax have been removed, the metal is scrubbed with an old toothbrush and a mixture of hot water, detergent and a little ammonia. After being rinsed very well with running water, the work is pickled in warm Sparex 2 solution for 15 minutes, washed well and dried. If I want to dome a piece, I anneal it as before and then use a sandbag followed by a metal mushroom stake and a rawhide mallet.
Next I drill any holes that will be needed. If I have left a neck for a pendant, I turn it back into a loop for a chain. Finally, the piece is rubbed with an 8 " brass brush until the metal is shiny. It is then rinsed well and ready to be enameled. If you are not enameling immediately, wrap the polished metal in paper towels.
I use 80 mesh leaded, mostly medium fusing enamels and some soft fusing enamels. I wash small amounts of enamel, usually enough for a day's work. The enamels are washed about 10 times with tap water and then twice with distilled water. For wet inlaying, I use a 00 or 000 pointed sable brush. With distilled water, I wet inlay all colors thinly to avoid trapping air that will cause pits. In the deeper etched areas, I often use a light opaque under the transparents. To keep the color bright, I use a lighter transparent under a deeper transparent. If I need to lighten a transparent color, I mix flux with it. If you use opaques alone, put them into the narrow areas and use transparents for the larger areas where more light can enter. I generally fire at a little under 1450F to orange peel stage, except for the final firing which is to maturity.
I fire the base coats in two firings, the back first with the front protected with Scalex, a firescale inhibitor. Keep a separate brush for the Scalex. Using a color compatible with the front color scheme, I do three light siftings on the back using Klyr-Fyre diluted 1/3 to 2/3 water. When dry, the piece is fired to orange peel and cooled. The Scalex is washed off. If some of it remains, use a stiff toothbrush, a glass brush or a dental tool to remove the last of it. The piece is pickled in warm Sparex 2 solution for about ten minutes, rinsed and dried. Then I brass brush the front of the piece until shiny and rinse again. On the front, I do two very light siftings of medium fusing flux, spraying between siftings with the Klyr-Fyre solution. A little of the pink copper may show through. Fluxing over the entire front of the piece prevents the buildup of a heavy coat of firescale in the subsequent firings. This coat of flux will be stoned off later where the copper is to be bare.
The deepest and largest areas that are to have foil or cloisonné wires arc set up first. The deepest areas to have only foil receive one or two additional layers and give the foil a floating effect. I cut the foil between tracing paper with small, sharp, pointed scissors. I like the foils cut small or finely minced. Paper punches work well, too. To position the foil, I use a small pointed brush with distilled water that has a drop of Klyr-Fyre. Firescale on the walls of a cell can destroy the edges of silver foil. To prevent that, a thin coat of either a light color, medium fusing, washed opaque or flux is wet packed on the cell walls with water and fired before setting in the foil. Firescale does not affect gold foil. I have found that repeated firings of warm colors over silver foil sometimes produce undesirable changes in the color of the transparents. Finally, all the areas are enameled in thin-fired layers until the enamel in the cells are slightly higher than the bare copper. The final firing is to maturity.
You have a choice for the enamel finish: matte, semi-gloss or high-gloss. A matte finish is my favorite. It is a long process. I use Alundum stones in 150 and 220 grits. They arc about 6 " long and I " thick. The 15 0 grit comes in a smaller size and is good for small, hard to reach areas. Under running water, I start with the 150 grit and stone in all directions. When the unenameled copper areas are almost clean, I move to 220 grit or the fine side of a Carborundum stone. During the stoning, you need to check for low spots or pits in the enamel. If there arc any, you need to clean the piece before adding enamel. I scrub the surface with a glass brush, soak the piece in a solution of detergent, ammonia and water for a few minutes and rinse thoroughly before I reapply and fire the enamel where needed. Then I continue the stoning process until the entire surface is smooth and dull. There will be a lot of scratches at this point. Next come wet and dry emery papers to remove the scratches. I use 220, 320, 400 and 600 grits. I cut them into 4 " and 6 " squares that I use over a block of wood. I start With 220 grit then go to the others, rubbing in one direction over the piece and then in the opposite direction. Each step removes the previous scratches. It is best not to rush through the stoning.
When all the scratches are out, I wash the piece with detergent, ammonia and water again, rinse and dry. At this point, I use a polishing machine. My machine has two spindles, 1/2 hp, 3450 rpm with a scaled motor and filter. For polishing, I first use a bobbing compound on a hard-sewn muslin buff; then I wash and dry the piece and go to a hard-sewn felt buffing wheel with tripoli. The next step is to polish with a soft felt wheel and red rouge followed by a soft chamois wheel. These polishing steps can also be done with a flexible shaft.
After the piece is polished, I wrap it in a soft cloth until I send it to be gold plated. The plater applies a coat of nickel before the gold plating which helps the gold plating last longer. The appearance of the final piece depends on how good a job you did with the stoning and the buffing of the metal. Take your time and you will be rewarded with a beautiful surface and a sensuous enamel.
Related Articles

Enamels in Medieval Galleries

Etching Options for Champleve

Champleve – Photo Etching with PnP Paper

Champleve Jewelry – At The Turn Of A Wheel


The All-In-One Jewelry Making Solution At Your Fingertips
When you join the Ganoksin community, you get the tools you need to take your work to the next level.
