
Build an Advanced Jeweler’s Bench
This sophisticated bench costs a little more and is a bit more difficult to make than the one on the preceding page, but the extra effort will be repaid by years of efficient work. Use this pattern as a starting point, but feel free to make changes to suit your individual needs.
2 Minute Read
This sophisticated bench costs a little more and is a bit more difficult to make than the one on the preceding page, but the extra effort will be repaid by years of efficient work. Use this pattern as a starting point, but feel free to make changes to suit your individual needs.
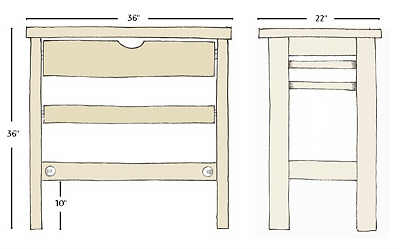
This bench is made of maple or a similar hardwood. Construction requires a table saw and cabinetmaking skills. The sizes given are standard, but of course you can change them to suit your needs. An advantage of this bench is that it breaks down to travel and can be fit in the trunk of a car.
Parts List
All measurements refer to inches.
- Top (1) 36 x 22 x 1 1/2
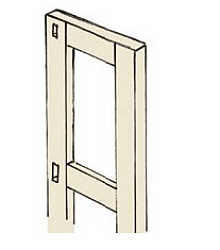
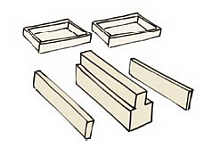
- Legs (4) 36 x 3 x 1 1/2
- Short Braces (4) 20 x 3 x 1 1/2
- Long Braces (2) 36 x 3 x 1 1/2
Drawer
- Sides (2) 20 x 6 x 3/4
- Front (1) 34* x 6 x 3/4 [*] approximate
- Back (1) 32 x 6 x 3/4
Sweeps
- Sides (2) 20 x 3 x 3/4
- Front (1) 34* x 2 x 3/4 [*] approximate
- Back (1) 32 x 3 x 3/4
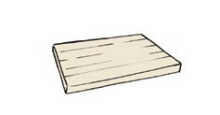 | Make the top, either from plywood laminated with Masonite, by gluing up strips, or from commercial butcher block. The heavier the better, since this helps anchor the bench. |
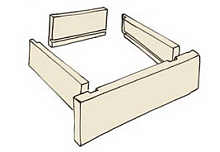
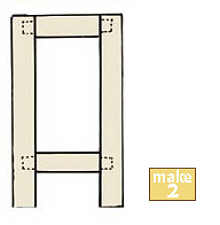 | The two leg units are made with mortise and tenon joints and permanently glued up. Drill 3/4″ holes across the top pieces. |
 | Cut additional mortises at right angles to the leg units to hold two cross braces. Corresponding tenons are cut on the brace pieces. |
 | With the braces in position, drill 3/4″ holes directly through the tenons from the outside. These will be joined with bolts that will hold the legs together but allow them to be disassembled. A 1 1/2″ hole in the brace allows access for a washer and nut. |
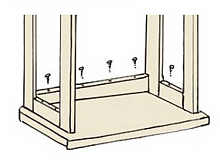 | Flip the bench upside down and set the top into position. Attach it with lag bolts and washers. |
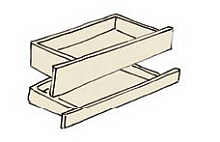 | Make two drawers, one with 6″ sides that will be close to the top and another with shallow sides that will catch sweeps. The dimensions will depend on the space between the legs and the clearance needed for the drawer glides calculate this before starting the drawers. |
 | Cut a dado on the front piece and either dovetail or lap joints on the back corners. Set a piece of 1/4″ plywood or Masonite into a groove along the bottom edge. |
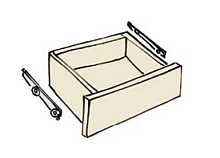 | Install drawer glides as specified by the manufacturer. |
 | To divide the drawer into smaller units, cut a center divider with a shelf track. Set small board of the same height along the walls, and make small open boxes about half the depth of the drawer to slide along these tracks. |
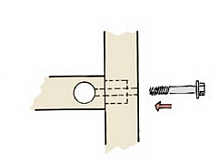
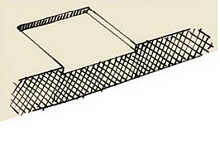 | To hold a bench pin, buy a 6″x6″x1/4″ piece of steel. Route an opening this size at the front edge of the top. |
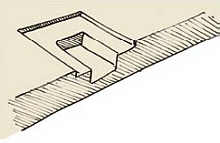 | Cut away an additional area equivalent to the tang of a bench pin. Drill a 1/4″ hole centered in this space. |
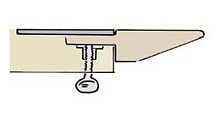 | Insert as 1/4″ T-nut, matched with a thumbscrew. This will hold the pin in place. Secure the steel with countersunk screws in each corner. |
See also: Build a Basic Jewelers Bench
Our guide to the best jewelers workbenches you can buy
Related Articles

Build a Basic Jeweler’s Bench

Basic Principles for Tools and Equipment

Customized Robo Grip Pliers

Customized 3 Jaw Chuck & Earring Holder


The All-In-One Jewelry Making Solution At Your Fingertips
When you join the Ganoksin community, you get the tools you need to take your work to the next level.
