Jewelry Repair 101: Introduction to Jewelry Repair
Article: Repairing a Silver Shank
Before they invented garbage disposals, we jewelers had it easy. But since the '50s, when the industrial revolution invaded the kitchen sink, we have been fighting back in the war against home convenience devices that eat jewelry and flatware.
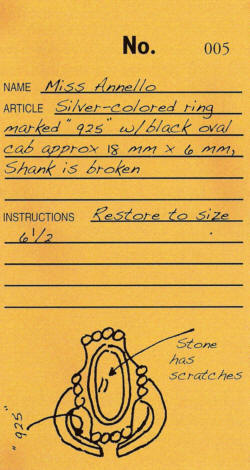
When the owner of this silver and onyx ring set it on a ledge next to the soap dish, she hadn't a worry in the world. Then, in the middle of wiping the spaghetti sauce off the serving spoon, she accidentally knocked the ring into the sink. The worst part is that she had no idea the ring had fallen until she flipped the switch and heard that terrible metal crunching sound. She dove for the switch, but as fast as her reaction was, it was too late. Gobbled up by the jaws of progress, one might say, the ring was tragically mauled by the sharp steel blade inside. The ring was crushed, as was its owner. At this point, she sadly put the ring into an envelope and brought it to you.
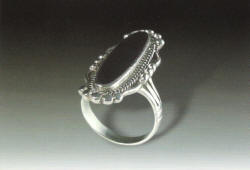
1
 |
| Figure 5.1. Silver ring with broken shank |
You survey the situation and note that, miraculously, damage has been limited to the shank (Figure 5.1) To your surprise, the gem and setting survived with only a small scratch. Inspecting the ring further, the 925 stamp on the inside of the ring indicates that it is sterling silver. You reassure your customer that she still has the reflexes of a teenager. Had she taken another second to respond, the disposal would have finished the job and destroyed the ring beyond repair. You measure her finger as size 6.5 and assure her that the ring will look "greatly improved" when she returns to pick it up in a few days. It is always best to be conservative in your promises, so that customers will not be disappointed to find that their jewelry does not look "just like new;" it is best to let them decide that for themselves.
2
Back in the shop you begin with a pair of half-round pliers to straighten out the worst area of distortion. Position the curved jaw on the interior and use the flat one on the outside (Figure 5.2). By placing the distorted section between the jaws and squeezing, most of the deformation can be corrected. If the desired curve has a larger arc than that of the pliers, turn the pliers at a diagonal angle across the material to create a larger radius arc. Never try to correct a curve or bend material in a smooth arc by using flat or chain-nose pliers.
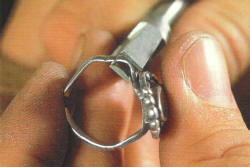 |
| Figure 5.2. Reshaping the shank with half round pliers |
3
Continuing with the half-round pliers, bring the two sides together (Figure 5.3). It does not matter if the ring is fully rounded at this point. However, it is important to bring the two ends of the shank into perfect alignment. After soldering, the metal will be softer and the shape can be further corrected.
 |
| Figure 5.3. Bringing the ends together |
4
Regardless of the rest of the shank's condition, it is important that the two ends meet well. The shape can be altered later, but right now only the joint needs to be perfect. Hold the seam up to a light and inspect its silhouette to make sure that you do not see a sliver or wedge of light between the ends. If you do, use a flat file to correct the seam (Figure 5.4).
 |
| Figure 5.4. Filing to align the ends |
5
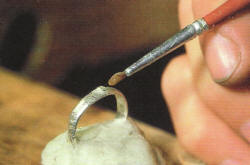
Once the seam meets, you are ready to solder. Since the heat-sensitive gem may not be heated, and since silver is such an excellent conductor, precautions must be taken to protect the stone during soldering. One way to do this is to bury the top of the ring along with the gem in a wad of wet refractory material. Specific products for this purpose can be purchased from jewelry tool suppliers. Some bench jewelers use wet tissue paper, watching it carefully during heating.
As the paper dries out they remoisten it before it catches fire. Another approach is to place the ring upside down in a dish of water or wet sand. Using wet sand has the added benefit of providing support while positioning, the work for soldering. Regardless of the technique, the heat-sensitive area should be completely enclosed, with as much of the shank protruding as possible. If buried too low, the shank will be difficult to heat adequately for soldering. This will prolong heating and place the gem at risk of being damaged. With the heat shield protecting the gem, flux the seam and place a snippet of easy or medium solder on top (Figure 5.5).
 |
| Figure 5.5. Setting up to solder in refractory wadding |
6
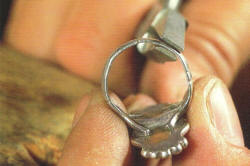
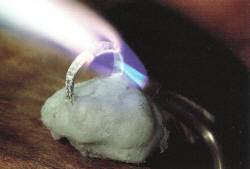
Soldering will be difficult, even though you are using easy solder, because so much heat is transferred to the wadding by the highly conductive silver. Another side effect of prolonged heating is that the moisture in the wadding boils and turns to steam, which can snuff out the flame. So the idea is to use just the right amount of protective wadding, go in with a very hot focused flame, and then get out quickly. This situation calls for a high-heat oxidizing flame directed at the underside of the seam. Hold a solder pick nearby, ready to spread the solder as soon as it flows (Figure 5.6).
 |
| Figure 5.6 Soldering with an intense oxidizing flame |
At the moment the solder liquefies, gently scrape and spread it with the pick, then remove the flame. The technique of moving liquid solder requires practice to master. The trick is to maintain the proper temperature for the instant required to spread the solder. As soon as the seam is filled, remove and shut off the torch. Quickly cool the shank and wadding by adding water to it. A light-hearted and dramatic way to cool the assembly rapidly is to zap the ring with that water gun you keep hidden under your bench.
7
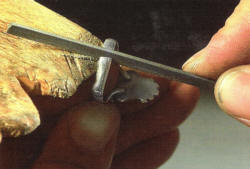
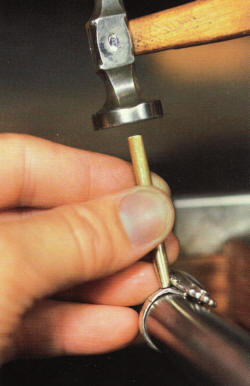
When you pickle the ring, do not place the gem in the acid. instead, hold the shank in the liquid while the top of the ring is kept dry in your fingers. Rinse and then dry the ring. Inspect the seam to make sure it is sealed. During heating, the back of the shank has become annealed. Place the ring on a fixed mandrel for reshaping. A handy tool to make and keep for such situations is a brass punch. Brass is softer than steel, which could mark the ring too easily. Tap the punch with a chasing hammer to force the raised areas against the mandrel (Figure 5.7).
 |
| Figure 5.7. Reshaping the shank with a brass punch |
8
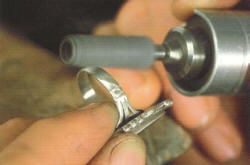
Check the ring size. If it is small, stretch the shank by forcing it up the mandrel with a mallet. If there are any deep nicks or scratches, use fine needle files or coarse abrasive paper to remove them. Check the bezel to make sure it is closed tight around the stone and does not permit any movement. If needed, use a bezel rocker, burnisher or setting punch to tighten the bezel. Finish with finer paper mounted on sanding drums as well as on sanding sticks (Figure 5.8). Finally, buff, clean, polish and again clean the ring.
 |
| Figure 5.8. Using a sanding drum on the shank |
9
 |
| Figure 5.9. Completed repair to the shank |
When Miss Annello returns and sees her ring she exclaims, "You are a miracle worker! My ring looks like new" (Figure 5.9). She is so pleased that she invites you over for a spaghetti dinner that night. You accept the offer, so long as she lets you wash the dishes.

The All-In-One Jewelry Making Solution At Your Fingertips
When you join the Ganoksin community, you get the tools you need to take your work to the next level.

