Jewelry Repair 101: Introduction to Jewelry Repair
Video: Installing Sizing Beads
Of all the arts and crafts, none is more intimately involved with the human body than jewelry. Neck chains, pendants and earrings are all dependent on the body as a stage and for movement. Certain items are often customized or even custom made to fit the wearer, and a ring must fit, well, like a glove. In addition to sizing rings to meet specific dimensions, sometimes the repair jeweler is asked to modify an item to accommodate a physical condition, such as arthritis.
Arthritis is a common malady which affects many people as they age. People with arthritis often have enlarged knuckles which make it difficult to wear rings. A ring that barely squeezes over an arthritic knuckle may be so loose on the finger that it slips around and around. The simplest solution is often to add two beads of metal on the inside of the ring. This basic approach works by effectively tightening the ring when it is on the finger. Yet the space between the beads permits the ring to be turned as it is slipped over the knuckle. Another situation justifying the addition of sizing beads is when a top-heavy ring spins, even on a person without arthritis. And still another reason to add them is on a ring that has a pressure-sensitive gem that cannot easily be removed during sizing. For instance, if the ring has a large opal mounted in a very thick bezel, one might elect to add sizing beads rather than try to reshape the shank.
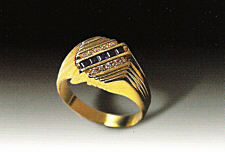 |
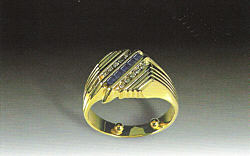
| Figure 7. 1. Ring before alteration |
1
This gold ring with diamonds and sapphires is brought in by an elderly gentleman who had developed arthritis in recent years. He complains that the ring barely fits over the knuckle. But after he forces it on, the ring rotates loosely around his finger, partly because it is top heavy (Figure 7. 1). You suggest adding sizing beads as the simplest and most cost effective solution. The alternative choices are more involved and costly.
2
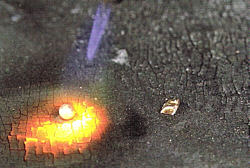 |
| Figure 7.2. Fusing the spheres |
The beads are made from two matching spheres of gold, about 2 mm in diameter. To make them, cut two yellow gold chips of equal size from a piece of clean 14k scrap. Lay them out on a charcoal block, add a bit of flux, and heat them until they fuse into balls (Figure 7.2). If necessary, add more gold to increase the size to 2 mm.
3
In order to accommodate the addition of two small balls and still fit the wearer, the ring should be enlarged by about one quarter of a size. This can often be accomplished merely by hammering the shank just a little bit. Examine the ring to determine if it has been sized before. If it has been sized, and there are seams in the shank, then it would be wise to use easy solder to attach the balls. If not, medium or hard solder will work well. Place a snippet of solder on the flat spot where each ball sat on the charcoal block. If there is no flat spot, make one by filing. Heat to flow the solder. The two-stage process of flowing solder onto one element prior to joining it with another is called sweat soldering (Figure 7.3).
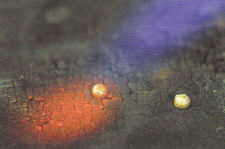 |
| Figure 7.3. Adding solder |
4
Clean the ring in preparation for soldering. Make two marks on the shank at about 5 and 7 o'clock, to indicate where the balls will be soldered. Now firecoat the ring and use a pair of cross-locking solder tweezers to clamp one of the beads into place with the solder side against the ring. Add a drop of flux at the joint and heat the ring to warm it up. Solder tweezers are often helpful holding elements in place, but they also have the negative effect of absorbing heat away from the scam and slowing down the soldering process. One solution for this problem is to preheat the legs of the tweezers before heating the ring. When the tweezers are very hot, focus the heat on the ring itself This heats the bead by conduction and causes the solder to flow from the ball to the shank, which is hotter (Figure 7.4).
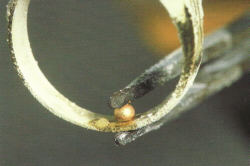 |
| Figure 7.4. Sweat soldering a bead in place |
Another approach to attaching the beads involves using a ball bur of the same size as the beads to make depressions at the two desired locations. Deepen the cavities to about 15 percent of the beads' diameters. Then melt solder into each of the depressions. Place the beads over the solder as you apply heat. When the solder in the holes melts, the beads sink into place at the desired locations and a strong solder bond is created.
5
When the job is complete, the two beads should be equal in size, shape and position. Buff and polish the inside of the shank, as well as the rest of the ring (Figure 7-5). These two simple little beads will go a long way toward solving the problem. Mr. Bumpstead is both surprised and pleased at the ease with which his ring now slides over his knuckle, when turned slightly to the side. And when on his finger, the ring no longer swims around loosely.
 |
| Figure 7.5. Finished ring with sizing beads |

The All-In-One Jewelry Making Solution At Your Fingertips
When you join the Ganoksin community, you get the tools you need to take your work to the next level.
