Jewelry Repair 101: Introduction to Jewelry Repair
Article: Different Methods on How to Resize Rings
There are different ways or methods on how to resize rings to fit the wearer that every jeweler needs to know. Read and find out how to resize rings.
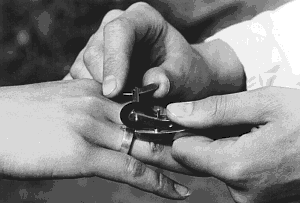
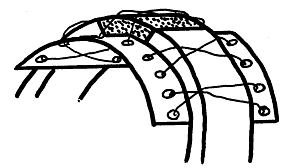
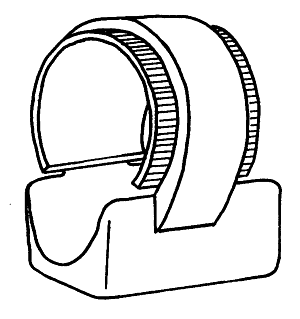
A ring fits well when it is no longer felt on the finger. If in the course of time the size of the finger changes or if the ring is to be fitted for another wearer, a sizing of the ring is necessary. The first step is to determine the finger size, which is done with a ring sizer, a set of about 30 steel rings in graduated sizes, figure 13.1. If the customer has a comfortable ring to use as a guide, its size is measured on a graduated ring stick.
Different Methods on How to Resize Rings
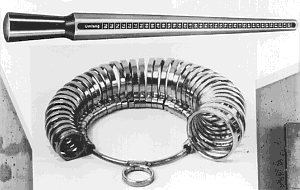 |
13.1 Ring stick and ring sizers |
In Germany, ring sizes are described by the diameter of the finger hole or inside circumference; in France and the United States, sizes measured by a number, with higher numbers indicating larger sizes. The systems are compared in figure 13.2.
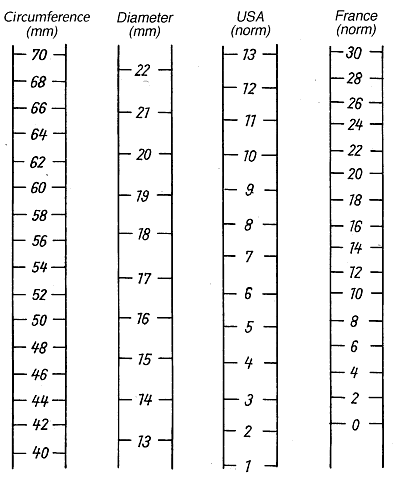 |
13.2 Different measurment standards for ring sizes |
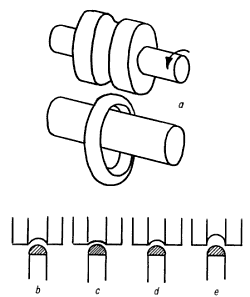
Selecting a correct ring size is not as straightforward as it might at first appear. For one thing, fingers are not round but instead have a cross section like the first image in figure 13.3. In addition, we all know that our fingers swell slightly in the course of the day - for some people this can be a significant change. And of course on hot days our fingers swell even more, while in cold weather our fingers might seem to shrink. No wonder it's difficult to make rings fit well!
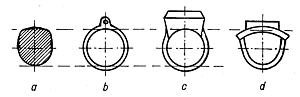 |
13.3 Possible measurment mistakes |
There is an additional challenge for people with slim, bony fingers. The ring must of course be large enough to slip over the knuckle, but if there is little skin at the base of the finger the ring slips around uncomfortably. Also, wider bands will need to be a little larger in size than narrow ones because the wide bands trap skin beneath them. Bands that have an opening under a stone or in some other way allow the finger skin to swell upward can afford to be a little smaller than the same ring without that opening.
Perhaps it would be better if all rings took the actual shape of the finger rather than a perfect circle, but for better or worse, that is the system that is in widest use. In the end what matters is to create a comfortable fit, regardless of its size. Customers who insist that they wear a specific size are condemning themselves to a poor fit. Similarly, when a ring size is handed over as a length of string or a mark on a strip of paper, this information must be taken only loosely since those devices have more flexibility than the metal of the final ring.
When a ring size is checked on a ring stick, the measurement is read at the edge that makes contact with the ring stick (figure 13.4). Though it should not happen that the culet of a stone projects into the finger area of a ring, it sometimes occurs, nevertheless. Such rings can be measured on a ring stick that has a groove running along its vertical axis.
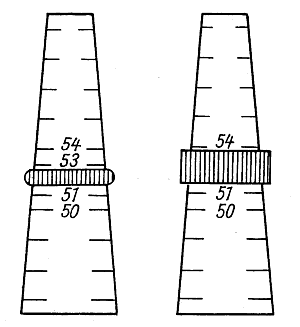 |
13.4 Reading the ring stick (size 52) |
What You'll Need To Resize Rings
Buy List
Sawing Rings Open
Though it's not truly jewelry repair, it sometimes falls to a goldsmith to cut away a ring that can no longer be taken off a finger. This most often happens because an injury or illness has caused the hand to swell, but it might be a matter of simply "growing attached" to your jewelry.
The first alternative is to hold the finger under cold water and to coat it with liquid soap. Hold the hand vertically in the air, allowing the blood to drain from it, and try one last time to remove the ring. If that fails the ring will need to be cut.
One solution is to use a jewelers sawframe with a coarse blade. Insert a blade upside down so the teeth point toward the back of the frame and slide the blade between the skin and ring shank. Cut by sawing upward away from the hand.
A better solution is to use a ring cutter made for this express purpose, shown here in figure 13.5. The lever pressed here with the left thumb presses the ring up against a circular saw that is turned with the other hand to cut through the ring. Ring forming pliers are then used to bend the ring open enough to allow it to be slipped off.
 |
13.5 Cutting with the ring cutter |
Enlarging Wedding Rings
When a plain band needs to be enlarged slightly it is often possible to achieve this through mechanical stretching. The number and variety of tools made to achieve this give some indication of how common a repair this is! Stretching is faster and less aggressive than the alternative of inserting an extra piece of metal and should always be considered.
One device uses an attachment for a rolling mill to redistribute the metal in such a way that the ring is made larger. If the shank is made thinner, the metal that use to be seen as "thickness" has gone somewhere. Where? It has been pushed outwards, or converted to length, making the ring slightly larger.
 | 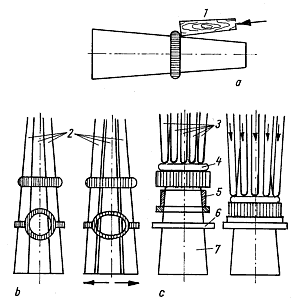 |
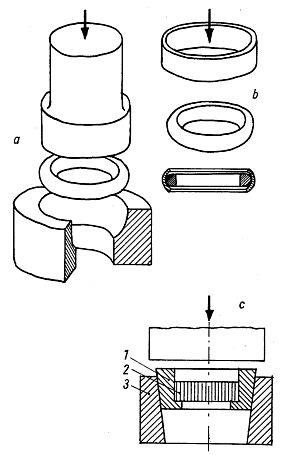
13.6 Sizing (stretching) machine | 13.7 Enlarging by stretching a) ring mandrel b) stretching mandrel (before and after stretching) c) spring head of the enlarging mandrel (before and after stretching) |
Another alternate is to anneal the ring, then slide it onto a lightly oiled steel ring mandrel. Tap the ring gently with a wooden, leather or plastic mallet as shown in figure 13.7a to stretch it. Because of the tapered nature of the mandrel it is important to take the ring off periodically, invert it, and repeat the process.
A variation on this that avoids the possibility of marring a ring with mallet blows is the use of a tool called the Schwaan Ring Stretcher. The tool consists of a tapered mandrel with a hollow core that has been split into four vertical segments (figure 13.7b). The ring is put onto this rod and a smaller solid steel taper is driven into the first unit with a mallet. This has the effect of stretching the petals (and therefore the ring), though there is no direct contact with the ring itself. This has to be done slowly with great care so that the ring doesn't break.
Figure 13.7c shows a stretching machine developed by the Fisher Company in Pforzheim. The machine uses a internal bushing of the intended size to prevent the stretching process from going too far, and includes a copper ring that protects the jewelry piece from being damaged.
No matter how sophisticated the tool, any stretching will stress the metal and there is always a risk of the ring snapping. More than that, there is a limit to how far a ring can be stretched. As mentioned, it's always worth considering but there are many cases where a more radical technique will be needed.
Enlargement of Gem Rings
Rings with stones cannot be stretched on a mandrel because of the stress this puts on the stone. There is a danger of breaking the gem, or at least popping it out of its setting. When stones are involved, and if the enlargement is slight, a tool like the one shown at figure 13.8 is recommended.
The device has a number of dies of different shaped grooves that mimic the cross section of the ring shank. Select the one that corresponds to the ring being stretched and attach it to the vertical post of the machine. The ring is then forced against this to locally "forge" the shank. As mentioned above, the action exchanges thickness for length, pressing the ring in such a controlled way that the change is unnoticeable. Of course there is a limit to the stretching that can be done this way, not only because the metal hardens at it is stretched, but the shank could eventually be made too thin.
If these methods cannot be used - most commonly because the desired increase in size is too great - then a piece of metal must be inserted into the shank. First examine the shank closely to see if a solder line is already present. A shank can be lightly heated to reveal the color difference at the solder line. If a line is present, saw the ring open on that existing seam. It there doesn't seem to be a previous joint, cut the ring open at the point opposite the stone, making certain that you don't cut through any hallmarking or engraving.
 |
13.8 Ring enlargment machine |
Insert a piece of metal that perfectly matches in color and makes a tight seam at both ends (figure 13.9). It is not critical that the cross section of the insert match; in fact there is an advantage to having it a little larger than the shank. After soldering the excess is filed away to blend the pieces together. In most cases it is possible to file the insert so it snaps into place, and while this might take some work, the resulting invisible seam is worth the effort. When the new section cannot be made to stay in place, use a thin piece of steel and binding wire as shown in figure 13.10 to hold the pieces together for soldering.
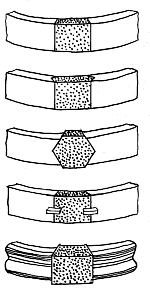 |  |
13.9 Enlarging by inserting pieces. A few useful ideas on how an inserted piece can be bound in place for soldering are summarized in picture. | 13.10 Securing the inserted piece. |
If the ring contains heat sensitive stones then this complicates soldering. Amber, coral and pearls are so sensitive that such stones need to be removed if a normal soldering flame is used. Other sensitive stones should be taken out if possible. If this is not possible, then they need to be protected against heat. Numerous possibilities have been recommended, all of which are based on the concept that the stone is packed in moist material so that the heat of soldering boils the water instead of being transmitted to the stone.
Though primitive, one solution is to protect the stones by packing them in a raw potato. Cut a hole and press the stone and mounting into it, adding shreds of potato to bury them completely.
A variety of moldable insulating materials are commercially available through tool and supply companies. These can be packed around the stone like modeling clay. A variation that is best used in conjunction with a heat insulator is shown in figure 13.11. The lid pieces (c) are slid over the ring and attached to the box (b) which is either filled with water or an insulating paste. The assembled unit is shown in 13.11d, ready for soldering.
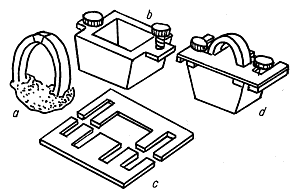 | 13.11 Appraratus for soldering of stone rings. |
It is always best if a small, very hot flame can be used in repairs that include gemstones. The microtorch is able to heat the metal so quickly that the heat does not have time to flow from the joint area to the rest of the piece. The motto is to get in and out as quickly as possible.
Allow these repairs to air cool, even if you think the heat has not reached the stone. It is a terrible mistake to correctly complete a repair solder without damaging a gem only to have impatience crack the stone because of thermal shock!
Remember that:
- A thick shank conducts heat more quickly than a thin one.
- A silver shank conducts heat better than a gold one.
- Even heat resistant stones can crack and break due to internal structural problems.
Sizing Down Plain Bands
When a basic wedding band or similar ring needs to be made a little smaller, the first method of choice is to compress it. Like its corresponding partner, stretching, this is fast, efficient and the least intrusive process. And like stretching, it can only be used when the change in size is small.
A ring sizing machine consists of a series of conical or hemispherical cavities and a flat anvil that is used to press the ring into them. Anneal the ring and select an opening that is just large enough to contain the ring, as seen in figure 13.12a. Apply some pressure to the ram, then flip the ring over and repeat the process. Check periodically to be certain you don't go too far, and remember to anneal periodically if you are compressing a lot.
If the ring is made of several metals, for instance of white gold and yellow gold, this method is limited and might even result in breaking the two metals apart because they have different rates of compression. If the outer surface of the ring is faceted, chased or engraved, protect it by putting a copper band around the ring to absorb the stress at the point of contact figure 13.12b). A variation on this device, shown in figure 13.12c uses a bushing to protect the ring's outer surface.
 | 13.12 Reduction of wedding ring |
Sizing Down Gem Rings
The stone or stones are taken out and the ring shank cut, again exactly where previous joints have been made if there are any. Remember to check the inside of the band for hallmarks and engraving and to work around them. The shank is bent so the ends come together to make a tight seam, and here again it is important to file the surfaces so they make a clean joint. Failure to do this will make an imperfect soldering that will leave irregularities or pits; in the process of filing these away it is easy to make the shank too small. In the case of thin shanks, file the two butting surfaces at an angle to increase the surface contact and thereby make a stronger joint.
In the case of massive mens' rings, it can be very difficult or even impossible to bend the shanks down to the intended size. In such cases it is advisable, as is shown in figure 13.13, to take out a wedge-shaped piece.
With larger stone settings and delicate ring heads there is a danger that the head of the ring will be bent out of shape and deformed on any of the methods described above. The shanks can break off at the head of the ring or from its shoulders where the solder joints are stressed. It also happens sometimes that a thin shank is simply worn so thin it can no longer be repaired with an isolated joint.
A proven method for dealing with a thin shank consists of soldering a piece on the inside of the ring to strengthen it and to simultaneously decrease the inside diameter (figure 13.14). Though not nearly as good as soldering, this solution can also be achieved with a strong adhesive.
 |  |
13.13 Tightening thick-walled rings. | 13.14 Narrowing inside diameter by insertion of inside ring |

The All-In-One Jewelry Making Solution At Your Fingertips
When you join the Ganoksin community, you get the tools you need to take your work to the next level.
