Jewelry Repair 101: Introduction to Jewelry Repair
Article: Reducing to Half
An excerpt from Ring Repair, his article talks about how a ring repair of reducing to half-size is done as described by Alan Revere..
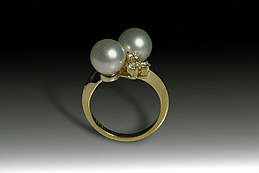
Article: Layd's Yellow ring market "585" w/2 rd pearls approx 7.7mm each and 6 white brilliants approx 1.8mm each. 1 prong thin. size 6
Instructions: Reduce to 5 1/5
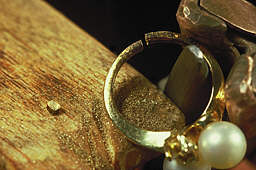
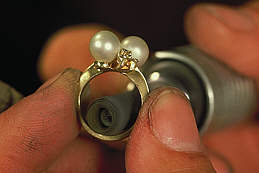
Mrs. Moder was speechless when her children and grand children gave her this ring on Mother's Day. It was exactly the one she had admired in a jewelry store window while strolling with her 13-year-old granddaughter a few weeks earlier. Mrs. Moder was so excited that she insisted on wearing the ring, even though it was too large. She just wrapped some tape around the shank and assured her family, "It fits fine."
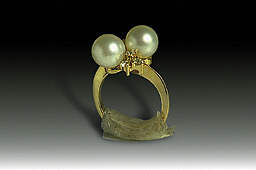
Now, a month later, the tape is shredding and Mrs. Moder has brought the ring in for sizing (Figure 4.1).
At the counter, you remove the tape with a sharp blade and then slide the ring up a man-drel. Next, you measure Mrs. Moder's finger with a set of ring sizers. Comparing her finger, size 5 1 / 2, to the ring, size 6, confirms that the ring should be brought down one half-size.
Examine the ring closely. It is marked 14k and you have no reason to doubt that fact. The stones and pearls appear genuine. Look even further: do either the ring or gems have any damage or irregular-ities? If so, point them out to the customer and write down your observations on the job envelope.
Fill in the rest of the information, noting that there is one thin prong, and give the customer a receipt. By not-ing such details upon take-in, you avoid potential problems later.
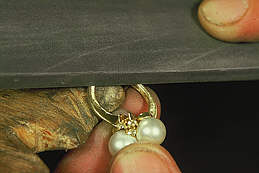
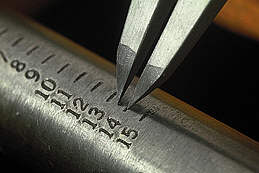 | Before proceeding, clean the ring. Because of the pearls, it is not wise to use an ultrasonic cleaner or to steam the ring as you normally would. Instead, use a toothbrush and warm, soapy water to scrub away any residual dirt. Since the ring is new, the shank most likely has not been soldered, but you should still check, first by close visual examination with a loupe and then either by heating or testing with iodine. Your investigation confirms that this ring has not been sized before.Many ring mandrels have a small gauge for mea-suring the difference between sizes. These gauges appear as a series of marks running up the length of the mandrel. Locate the gauge and set a pair of dividers on what you judge to be one half-size (Figure 4.2). If such a gauge is not available, or if it is not clearly legible, set the dividers at 1.3 mm using a slide caliper or metric ruler. (Note: The actual mea-surement should be 1.27 mm or one half of 2.54 mm which equals one ring size.) |
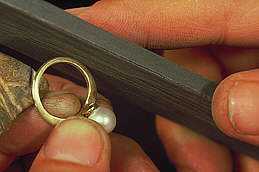
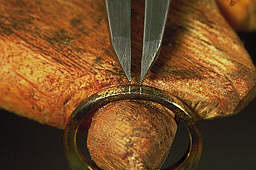 | Transfer the measurement, which represents the amount to be removed, by placing the points of the dividers against the shank. Firmly draw the dividers against the metal, scratching in two parallel lines (Figure 4.3). The metal between the lines will be removed. If a solder seam exists, place the marks on both sides of the seam. |
 | Hold the ring against the bench pin for support and use a 3/0 saw blade to make two parallel and straight cuts at the lines, about halfway through the shank (Figure 4.4). This bridge leaves the ring intact and stable to permit accurate sawing for as long as possi-ble. Alternate between the two cuts until the shank has been completely sawed through. Recycle the small piece of metal that falls out or save it for return to the customer, whichever is the store's policy. |
 | Now close the shank by alternately bending both sides until they meet. In this case a pair of ring bend-ing pliers with copper jaw protectors is used (Figure 4.5). Don't worry if the ring is not round at this point because it is more important that the two ends meet well. |
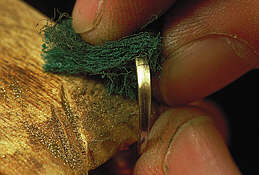 | Solder flows best over clean, grease-free surfaces. In order to insure that the metal is totally clean, use an abrasive pad to "brighten" the area around the seam (Figure 4.6). |
 | Examine the seam closely. It is important that when held in front of a light source, no light is visible between the two ends. If you can see a sliver or wedge of light, saw through the seam one more time to fully align the ends (Figure 4.7). |
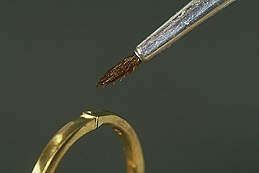 | Use a fine (#00) sable brush to apply flux to the seam. On a new ring without a soldered shank, such as this, use hard solder. If there were prior joints nearby, you would choose a solder with a lower melt-ing point. Spring the seam open either with your fin-gers or by sliding it up a ring mandrel. Use the flux-moistened brush to pick up a snippet of solder no larger than the cross-section at the seam. Slide the solder into place, then let the ring close on it (Figure 4.8). Tension soldering, as this is called, is the sim-plest method of joining the two ends of a ring shank. |
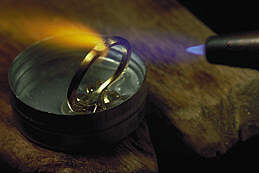 | Many materials cannot take heat and must be either removed or isolated from the heat while soldering. Before repairing jewelry with gems, refer to a chart on gem care. Pearls are extremely heat sensitive, as are most organic gems. However, there are several ways to solder around pearls without removing them and also without subjecting them to heat. Commer-cially prepared compounds and refractory padding can be used, but the simplest way to keep the top part of the ring cool is to put it in a small tin of water with the shank and seam up (Figure 4.9). The exposed shank can now be soldered while cool water protects the pearls from overheating.Use a hot oxidizing flame to heat the shank in a small localized area around the seam. An intense flame shortens the ring's exposure to heat. Move the flame from side to side following the shank, heating alternately and equally on both sides of the seam until the solder's flow temperature is reached. Keep the flame on the metal at all times to raise the tem-perature as quickly as possible as well as to avoid oxi-dation. As soon as you see the solder flow and re-join the shank, gently knock the ring over into the water to quench the heated area. |
 | Pearls cannot be put into the pickle either, so hold the top of the ring in your fingers with the shank in the solution. After about a minute, remove the shank from the pickle, rinse, and dry it. Check to insure that the bond of glue that holds the pearls was not broken during heating and is still strong. Next place the ring on a mandrel and use a mallet to round the shank (Figure 4.10). Check the size. At this point the rounded shank should be a fraction of a size too small. Tap harder to stretch the shank slightly if needed. For more aggressive stretching and thinning, use the planishing face of a goldsmithing hammer. |
 | Now refinish the surfaces that are no longer polished with progressively finer abrasives. Beginning on the inside of the shank, use sanding drums of abrasive paper to remove excess solder, file marks, etc. If the inside of the seam is very clean and needs little work, go immediately to grit #400. If more correction is needed, use #240 paper which is more abrasive. Use a smooth scraping motion with the spinning drum, while trying to maintain uniform thickness and shape. As always, when using spinning abrasive tools like this sanding drum, keep the tool moving to avoid overly abrading one area. Inspect your work frequently to insure even sanding (Figure 4.11). |
 | Although you could also use sanding drums on the flat side surfaces, it is best to choose the tool that makes the most surface contact. And so, greater pre-cision is achieved by using flat sanding sticks on the sides of the ring, again progressing to finer grits. Use long strokes, making as much contact as possible, while trying to avoid disturbing areas which are still polished (Figure 4.12). |
 | Continue by sanding the exterior of the shank withlong curving strokes, rolling the ring into the sanding stick each time. Monitor the precise thickness to make sure the shank remains uniform (Figure 4.13). |
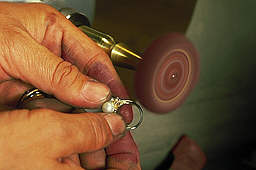 | Buff and polish the ring on a polishing lathe and/or flexible shaft machine as needed. Observe all safety rules with these spinning tools: as always wear gog-gles, tie back loose clothing and long hair, etc. Begin on the inside of the ring, using a tapered felt inside ring buff with a cutting compound. Next use the same compound on cotton wheels to buff the other areas. When finished, remove all traces of the com-pound with a toothbrush and soapy water before progressing to the final step. Using similar wheels, repeat the same steps, now using red rouge to achieve a high luster (Figure 4.14). After sizing, the shank measures 1.1 mm by 1.9 mm. |
 | Now clean the ring thoroughly for the last time, removing all residue of polishing compound and voilá, the ring is ready for delivery (Figure 4.15). One of the most embarrassing things for a jeweler is to deliver a newly repaired piece of jewelry and have polishing compound come off on the customer's hands, so be sure to clean the ring well. When Mrs. Moder, accompanied by her grand-daughter, returns to pick up the ring, she is delighted with the fit and amazed that there are no traces of your work. And you, being a skilled and confident craftsman, accept her compliments as your due. |

The All-In-One Jewelry Making Solution At Your Fingertips
When you join the Ganoksin community, you get the tools you need to take your work to the next level.
