
Photographing Small Art Objects
18 Minute Read
As a former staff photographer for the Metropolitan Museum of Art, Sheldan Collins has photographed an extraordinary range of art objects from one of the world's most extensive art collection. In his new book, How to Photograph Works of Art (Amphoto/Watson-Guptill Publication, 1992), he shares his experience and expertise in photographing both flat and three-dimensional subjects using 35mm, medium-format and large-format cameras.
Although intended for professional photographers, the book is written in a style that is accessible to anyone with moderate experience at photography. In a recent interview, Mr. Collins offered some excellent advice for the metal artist who is photographing his or her own work.
VC: We can assume that most of our readers own a 35mm SLR camera, but for those who don't or are ready to buy a new one, what is your advice, especially in regard to the automatic cameras available today? I noticed in your book that you recommend one with a manual override.
SC: The automatic cameras are designed to work with average subjects, whatever that means. So, when confronted with a more unusual subject like a piece of bright metal against a dark background, the meter may be fooled and give you an underexposure or overexposure.
VC: As will any light meter.
SC: Yes, but you should be able to override it. You must judge whether the meter is indicating a reasonably good exposure or not because of the reflectance of the subject matter. The meters in 35mm cameras are reflective meters - that is, they read the light reflected from the subject. And that's really what you're photographing - reflected light. There are also incident meters, which are hand-held meters placed near the subject to measure the light falling on it. They're useful too, but we'll stick to reflective meters because they're the predominant type.
VC: How is the meter fooled?
SC: The meter's dumb. It averages values - light, dark, whatever - it interprets the light reflected from the subject as a gray. What the meter is doing is taking in a scene, whatever is in the field of view, and stirring all the tonalities into a soup - the lights, darks and medium tones. The values that come out of that soup from most subjects will be an 18% reflectance. There's a zone system of exposure that Edward Weston, Ansel Adams, Minor White and people like that developed. It's a great system, a little complicated to learn, but if people familiarize themselves with it, it can be an enormous benefit in their work. It helps you to start seeing scenes or setups as zones of gray values ranging from pure block, which is zone 0, to pure white, or zone 10. Zone 5, the middle, is this 18% reflectance. You'd think it would be 50% reflectance, but it's not, and that's the key to something important. The meter will record the tonalities so that they reflect less light than you might expect.
VC: So how do you compensate for the meter's averaging when shooting an "unaverage" setup?
SC: What you do with a reflective meter in a camera is look at the scene and ask yourself a question. This metal - suppose it's silver or gold, something very shiny - conceptually it's white. But if it's shiny, it's going to reflect whatever is around. If there's black around, it's going to reflect black. So you hove to use reflectors or light to fill the shiny surface with light. Then you ask yourself how will the meter gauge this. It doesn't know it's supposed to be a predominantly light scene. It's going to interpret it as gray.
This is the heart of the matter really. If you have a light object on a light background, the meter looks at the scene and says it's pretty bright out here - stop down the lens or use a faster shutter so that less light reaches the film. Consequently it will record all those whitish bright tones as zone 5, or 18% reflectance gray. That's too gray.
VC: So the light meter says, essentially, this image is going to be overexposed, let's stop down, and you get something that's darker thon you want.
SC: Yes. You override what the meter chooses and increase exposure a bit, but how much more is a bit more? You learn by experience, but usually you can safely give 50 to 100% more exposure than what the meter is saying. In terms of f-stops it's a 2 to 1 ratio. One stop brighter exposure doubles the amount of light reaching the film, so you can go ½ stop to a full stop or 50 to 100% more than what the meter says. I do o lot of 4 x 5 work now, and I follow what the meter says and then bracket anyway. Some people say this is what separates the pros from the amateurs. Pros bracket more to be sure they've got a good exposure. If you know what you're doing, you can make three exposures at ½-stop increments. For ordinary scenes that have light and dark, you can just do what the meter says, then give it ½ stop more and ½ stop less and you've probably got it. But for a very dark subject against a dark background, again the meter is fooled and you end up with a gray image, an overexposure. So you give the shot slightly less exposure. However, there are those instances where the scene is so dark that you do need more exposure to capture detail. That's the nuts and bolts of exposure and bracketing.
VC: Do you think an incident meter is a necessity for this kind of work?
SC: No, it isn't necessary, but it can be helpful. I learned a terrific trick from an old hand while working at the Metropolitan Museum. Practically every shot he took he checked with both a reflective meter and an incident meter. He would interpolate between the two, and 80% of the time got a pretty good exposure. Doing this is a good way to gain on understanding of exposure - what's going on - the difference between the reflective and incident readings. If they match, that's easy. But in extreme cases the difference can be two stops. That's quite a big range, so you go halfway between and brocket both ways.
VC: What is your advice on choosing and using lenses?
SC: A macro lens is really necessary for something that's closer than 18″ to the camera. Although normal lenses can be made to focus closer than 18″, the quality falls apart due to their physical limits. Macro lenses are excellent for life-size photography or tabletop work, photographing on object that appears 1/5 life size to life size in the camera. Sometimes they require using an extension ring between the lens and the camera body to push the lens proper farther out from the body. Without the ring, you may be at ½ life size, but with it you can go from ½ life size to life size.
VC: What length macro lens works best for tabletop setups?
SC: The big problem with the standard 50mm macro lens is that, if you're shooting life size, the front of the lens will be too close to the subject to allow comfortable lighting. It's going to be just a couple of inches from the subject - that is, double the focal length from the center of the lens, which in a 50mm is 2″. So the front of the lens will be 4″ from the subject, but if you're using a lens shade or the lens is recessed inside the lens barrel, which macro lenses tend to be, the lens is going to be 2″ or 3″ from the subject. How do you get light in there? Even at ½ life size the camera is very close with a 50mm macro. I think a better choice is 100mm. Macros come longer than that, but this is probably the most useful size.
VC: I would think that another reason for using a lens size that allows you to place the camera farther from the object would be minimizing the problem of reflections. Lighting is an important aspect of photographing metal objects successfully. Since the choice of lighting is closely related to the choice of film, we should begin with what films you recommend.
SC: Each film is designed for a particular color balance, which means it's mode to match a light source that's either close to daylight or one of the standard tungsten sources. I would imagine most of your readers use either daylight coming through the window or electronic flash or tungsten studio lights. You can do pretty well with window light, especially north light, with some reflector cords, but you can't really control the color balance. The color balance of the film responds pretty readily to changes in the weather, whether it's cloudy or cloudless. And different types of color film interpret each of those slightly differently. I would avoid films that give high-saturation color, in the beginning at least, because they're not faithful to the work. Films like Ektachrome 100 Plus Professional (EPP) and Ekta EPX or EPZ are great for fashion and advertising photography for a saturated, gutsy look. I would think metalsmiths don't want that kind of look, that they want to record what appears to the average eye. For that purpose, stick to a film like Ektachrome EPN 100.
VC: What lighting source do you use with it?
SC: I use it with studio electronic flash, which is not to be confused with the electronic flash unit you attach to your camera. L would think that most of your readers would use tungsten film instead because tungsten lights are a lot cheaper than studio electronic flash. With tungsten lighting, you use what is called Type B film. You must block out any daylight because, in relation to Type B film, daylight is going to be quite blue. Ektachrome EPY 64 was redesigned recently; now it's called 64-T. It's very good and stable in terms of color fidelity down to 10 or 20 second exposures. The older stuff wasn't; once you got past 2 or 3 seconds you had to compensate for long exposures by adding yet more exposure - the old reciprocity problem. But this film has no problem until you get to 20 or 30 seconds.
VC: I can't imagine anyone needing a longer exposure than that. Why would you use a long exposure for a studio setup with plenty of lights?
SC: Even though the light might seem very bright, for any film in the 50 to 100 ISO range it's not that bright. You want good depth of field, and the way to get depth of field is to use a small aperture. A small aperture necessitates a long shutter speed, which requires a tripod. For any exposure of 1/30 second or longer you should use a coble release, even on a tripod.
VC: All right, let's say we've got on SLR with a 100mm macro lens, and we've set it up on a tripod and loaded it with Ektachrome EPY 64-T. How do we light the set?
SC: Photo floods work well, but don't use them directly - bounce them off a white card. You can buy big white cards and shiny silver cards at art supply stores and cut them up to use as small reflectors and to put in highlights. You can control the reflectance from the silver cards by using dulling spray. You might keep some bright and some muted for different kinds of reflectance. Some people use mirrors, which work well. I don't because I travel a lot and they're fragile, so I carry a lot of cards. And you need clamps - spring clamps, little clips, clothespins - which you can use to stand the cards up against whatever is around - bottles of spray, blocks, books, etc.
VC: So you just keep moving the lights around . . .
SC: Till you like what you see through the viewfinder.
VC: Bounce the light off the cards, bounce it off the ceiling, the walls . . .
SC: Only if you've got white ceiling and walls. I think if someone is serious about doing this, they don't need to invest a lot of money, but they should get a good aluminum stand and something like a Tota-light and an umbrella. You can do a heck of a lot of work with one Tota-light and a few cards. You can also make your own diffusing screens. Frosted acetate is an excellent diffuser and is the safest to use. It reduces o spotlight's harshness without absorbing too much intensity. There are many other materials you can use, even tracing paper if it is placed for enough from the bulb so it doesn't ignite. Be careful where you place diffusers. The lights use quartz halogen bulbs, which get very hot and can melt or burn screens. The bulbs are stable in color temperature and last about 400 hours. They come in 500, 750 and 1000 watt sizes, but 500 is fine. A 1000 is just one stop brighter than a 500, and it's a lot hotter.
VC: With this lighting, do you still need to cover up the room's windows?
SC: At least pull the shades or curtains. It depends on the subject matter and how bright the sun is. With mixed light, your eye doesn't notice the change. Nothing seems wrong until you take a picture and see a tiny area where something is screwy. Maybe the area is blue and the rest of the image looks good. This is caused by daylight coming in and affecting the background. Or maybe everything looks right but there's a big bluish streak across the object. If it were white or silver, it would look like a normal highlight.
VC: Even with a small aperture and long exposure, there seems to be a problem getting some objects totally in focus. Is there a solution to this problem?
SC: The depth of field in a 35mm camera is parallel to the film plane. As you stop down the lens, the depth of field extends farther in space in front of and behind the plane of focus. If the subject is flat or very shallow, you need to stop down only 3 or 4 stops. But with three-dimensional objects, you may need to stop down to f16 or smaller to gel the whole thing sharp.
VC: Why not always use the smallest aperture?
SC: Stopping down causes a long shutter speed, which may cause slight color shift and introduce diffraction problems. That's very complicated, very abstruse. It's a technical problem that falls within the "circle of confusion," which seems quite large sometimes.
VC: That's a great term.
SC: lf you spend too many days working alone in your studio, the circle of confusion can encompass the whole house. But, to get back to our subject, if you're photographing a bowl, for example, there's going to be a gradual diminution of sharpness. The farther edge will gradually become more blurred. You hove lo compromise. One of the advantages of the view camera is that you can change the relationship of the film plane to the lens plane to the subject plane. To keep everything sharp, you tilt the lens over until the planes extended from these three areas arrive at a common point, they intersect. You can't do that with most 35mm lenses. You can with a couple of them, but they're wide-angle lenses, strangely enough. There is also something called a bellows unit for special macro lenses, which works sort of like a miniature view camera. It's a sophisticated little gizmo and fairly expensive. It's certainly not a necessity.
VC: It seems that the alternative is to accept some level of blurriness if you're photographing certain objects with a small-format camera.
SC: There are optical limits to this business. One of the advantages of macro lenses is that they will usually stop down to f32, which gives you that small aperture. The image has got to go out of focus somewhere unless you shove everything farther away. You might think, why not push the subject farther away so the depth of field will increase. It will at a given aperture, but then if you blow it up to the size you want, you have the same problem plus larger grain. You don't gain anything at all. Some people say small-format lenses have greater depth of field than large format. It's not true. Optically they follow a law. Once you blow up a slide to the same proportions as an 8 x 10 at a given aperture, you're going to have the same depth of field. If you shoot both at f22 and blow them up to the some degree, they will have the some depth of field if they were shot from the same relative position.
VC: Let's soy somebody has made a bowl that is wide, not too tall, but for some reason, perhaps the work they've done on the side of it, they want to be able to show the side. They may lose the farther edge in order to show the detail in front.
SC: Yes, you have to sacrifice something. What some people won't admit is that it sometimes requires more than one shot to show on object. If you're limited to publishing or submitting just one slide, you have to pick the optimum. You can overcome that problem by choosing the best point of view and the greatest clarity. Usually the simplest approach works best. You don't want the photography to overwhelm the power or the beauty of the object, so why not just let it appear?
VC: What is the best way to capture texture and detail? I guess that is both a lighting and depth of field question.
SC: You don't need a bright light if you can bring the light pretty close to a small subject. Top light or light from above works well, and you can usually get that with the Tota-light or something similar. But sometimes everything's too tight - you've got the tripod and the light stand on legs and you're crashing into them and the legs of the table - so you get a boom. Another purchase, but it may not need to be more than 2 or 3 feet long. Put the light on the end of that and a counterweight on the other end.
VC: Are there special lighting setups you recommend?
SC: A very good trick for lighting a tabletop setup - I learned this from Lee Bolton, who was a master at museum photography - is to place secondary lights just below the surface of the table. You can use several lights. One is above as the main light, and it throws a shadow. The others are placed just below the surface of the table on each side, so that their light illuminates only the subject, not the background, and they don't make shadows. Think about it - shadows occur because one area of the background is more brightly lit than the rest. The shadow part doesn't get darker; the light part gets lighter.
VC: We make the assumption that shadows are dark when in fact they are simply areas that are not lit.
SC: Right. It's tempting to fill the shadow with light. Most people put a second light on the shadow, but then they throw another shadow and also mess up the ratio. Every light you put on the background just creates another shadow. To get rid of that shadow, you can take shiny silver cards and tilt them to catch light and soften the shadow. I'm always trying to teach people that shadows are not wrong. Of course, deep, dead shadows may be distracting, but shadow can give definition and separate the object from the background and give it a little dimension.
VC: It seems to me that we could quickly run into the problem of filling with too much light.
SC: You have to put light where it's dark and subtract light where it's light. Now and then there are things that are uniform in tone or reflectance and you need to introduce some contrast, but in the right place and not in such a large area that it wipes out texture. A polished gold object should hove shine, but not everywhere because it wouldn't look like gold if it was all highlight - it would be silver or white. You wouldn't know what it was mode of if it reflected too much light. You want some gradation of subtleties in the highlights, so you let some blocks come in, grays and blocks. You can do that with black cords or just what's out in the room not reflecting light. But you do have to be careful with shiny things - what they're reflecting.
VC: Yes, one jeweler wanted me to ask, "How do I get myself out of the picture?" That's down to the real basics.
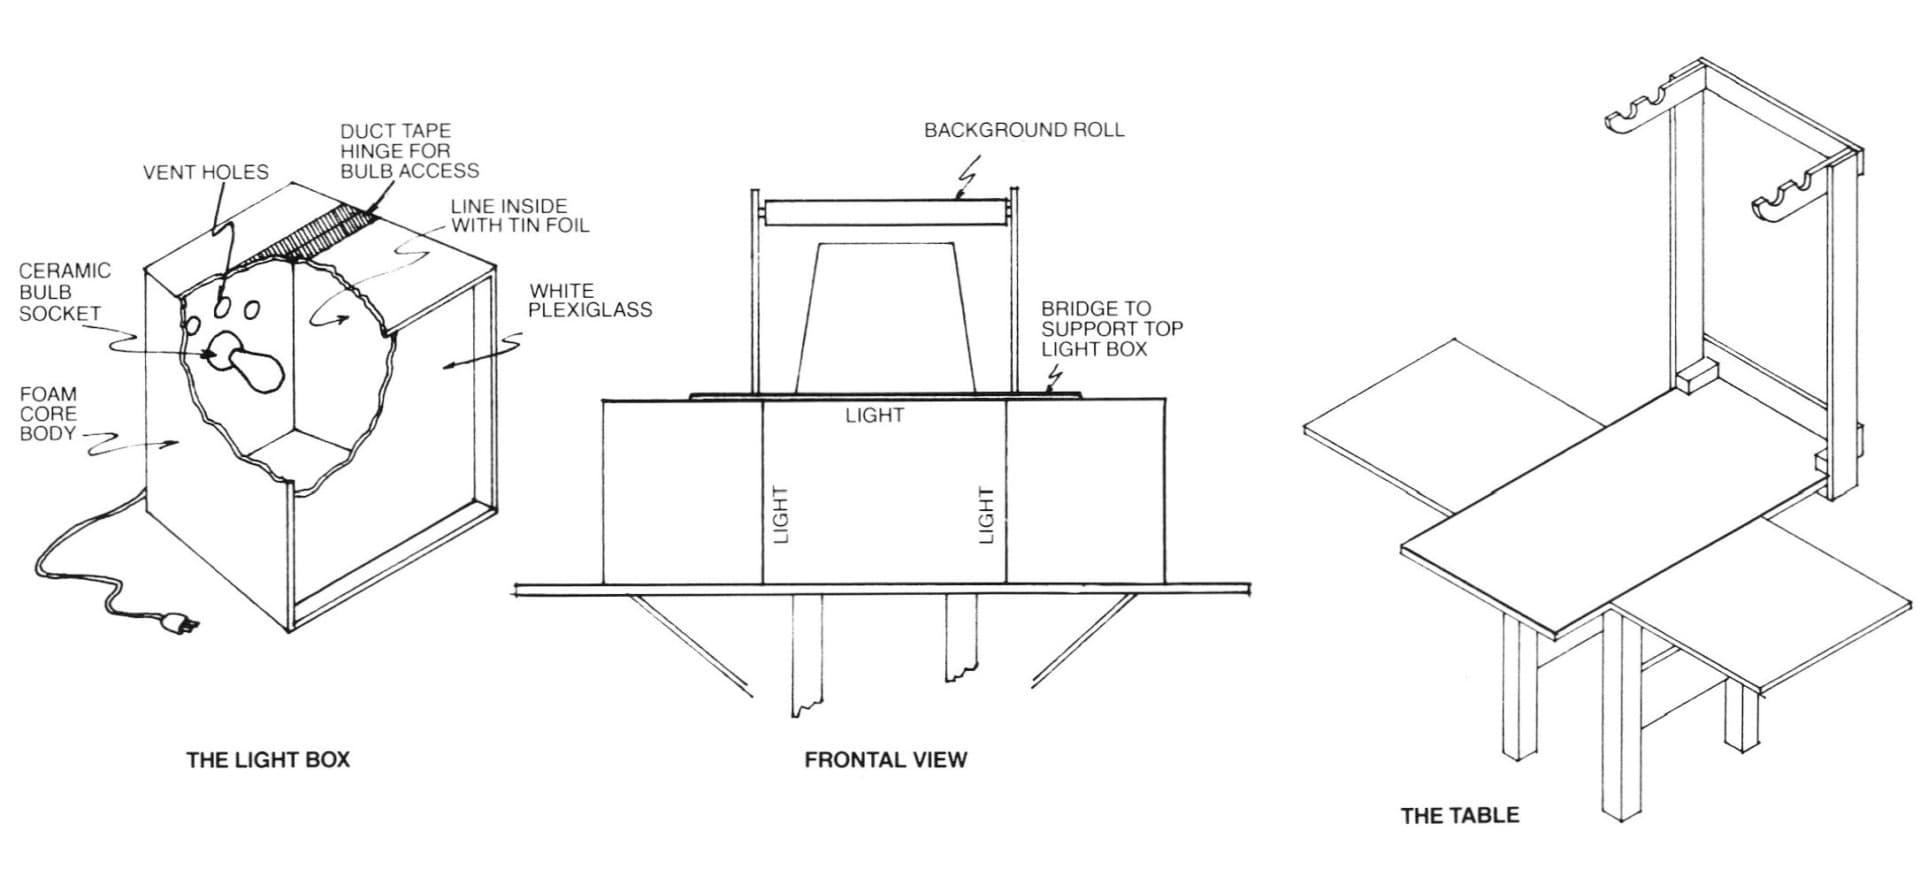
SC: A simple solution is to hang while paper or cord between two stands and place it between yourself and the setup. You cut a little hole for the lens. In extreme cases you can build what's called a tent, which is a three-sided box about 3 or 4 feet square on each side. You tape white or light gray seamless paper to a frame and cut a small hole for the lens. However, if you're going to be photographing a lot of small objects, I especially recommend a vertical setup [see next page], which is fairly simple to construct and uses just one light. It "floats" the object you are photographing on a piece of nonglare gloss and allows you to change backgrounds quickly and easily.
VC: This has been enlightening and it seems we have just touched the surface. Those who want more complete information are sure to find it in your book, which I recommend highly.
SC: Thank you.
Virgina Craft, interim editor of Metalsmith, is an editor and writer living in New York City.
Related Article:
Related Articles
How to Construct a Portable Photographic Studio

Testing the MK Gem eBox

Lighting for Jewelry and Small Object Photography
Cost Effective, Small Scale Jewelry Photography


The All-In-One Jewelry Making Solution At Your Fingertips
When you join the Ganoksin community, you get the tools you need to take your work to the next level.
