
Building a Photo Light Box
11 Minute Read
I am truly excited to have this opportunity to share with you a simple way to take fantastic studio quality photographs of your works of art.
Photography is one of the most important aspects of your art, no matter what art form you work with. Every juried show requires photos, all catalogs and brochures need a photo, and 100% of all on-line sales demand pictures. The better the picture, the greater the rewards.
You now have the opportunity to fire your photographer and take full control of your craft.
I have three goals I wish to accomplish with this magazine article. 1) A short and to the point lesson in photography. 2) Provide you with the information to construct a light box. 3) And, pass along some tips to help you use the light box.
A Short Lesson In Photography
For many years, I struggled to learn the art of photography. I studied books and magazines to learn all the technical aspects of the art and the camera. I also purchased almost every gadget on the market to become a better photographer. Boy, was I stupid, or what?
After years of research, I have learned that there are only two major things you need to understand, and that they are somewhat simple. They are composition, and lighting.
First, lets list the primary rules for good composition.
1) Move closer to your main subject.
2) Learn and understand the rule of thirds.
These two simple guidelines are the main difference between a snapshot and a great photograph.
Move Closer To Your Main Subject
Have you ever picked up your vacation pictures from the drug store and wondered why you took that picture? Or, have you ever pointed to a small dot to help someone else to see the main subject? All of that can be avoided by walking closer to your main subject. A good thing to remember here is that the camera lens sees everything, and that your eye only sees what you want it to see.
Learn And Understand The Rule Of Thirds
One of the best ways to learn the rule of thirds is from a television set. This will require some sewing thread and some Scotch tape. Cut four pieces of thread a bit longer than your TV screen. Now, tape two threads vertically and two horizontally to divide the picture into nine equal sections. By watching for just a short time, you will begin to see how powerful the rule of thirds is. Many of the cameras used for movies and television have these lines on them to assist the cameraman.
I have listed the two most basic, yet powerful, requirements for an outstanding photograph. However, please understand that there are a few more rules to good composition, and you would be well advised to learn and understand them.

Lighting
Lighting can be the trickiest part of a photograph, until you learn how simple it can be. Lighting is equal in importance as the rule of thirds. Quality lighting can make your main subject jump out of the photo and demand to be seen or just let it blend with the background. Let's make our jump every time.
There are two types of Iight - outdoor and indoor/studio lighting.
Outdoor Lighting
Outdoor lighting can be hard to work with, because it is constantly changing and can be difficult to find just the right combination to photograph your work of art.
The best time for outdoor lighting is when the sun is below 45% of the horizon. This would be early morning or late afternoon. For a brief time on a good day, the sunlight turns into magical light that puts a golden glow on everything. In that magical moment, it is almost impossible to take a bad photograph.
Indoor/Studio Lighting
Studio lighting has the greatest advantage for fantastic photos for this reason. The artist is in full control of the total outcome.
Think of this, you have just spent twenty-two hours on a labor of love; you have taxed your talent, knowledge, studio and kiln to its maximum. In your hands you hold your finest work ever. Now it only takes fifteen seconds to make a perfect photograph of your finest work ever. That is just how simple it can be.
I have built a light box that provides perfect lighting with the flip of a switch. The light box is so simple to use you almost feel cheated and at the same time you have full flexibility to maintain full artistic control.
Recap Photography Lesson
Move close to the item being photographed (fill about 2/3 of your viewer). Think about the composition and have the correct lighting.
Believe it or not, it is just that simple.
I have one more rule to pass along, practice it without fail and you will be a great photographer. NEVER SHOW ANYONE A BAD PHOTO!
Constructing The Light Box
Below is a complete list of materials that were used to build the light box.
2×4 Lumber -4 pieces 30″ long, 8 pieces 12″ long
Stringer Lumber - 4 pieces 7/8″ x3/4″ x 12″ long, 1 piece 7/8″ x3/4″ x 25″ long
1/4inch Plywood
Utility Hinges
Sash Lock
3/4 inch Screws
Aluminum Foil
Spray Glue
1/2inch PVC Pipe
4 PVC Elbow Fittings
8 PVC 'T' Fittings
Fluorescent Light Cover
6 Spiral Lamp Fluorescent Bulbs - Daylight 6500
to 6800 Kelvin
6 Light Sockets
Light Switch
Light Switch Cover
Ten Foot Power Cord
14 ga. Braided Copper Wire, (10′ Black, 10′ White)
Wire Zip Ties
Wire Nuts or Electrical Tape
Building the light box will require 8 to 10 hours. For the most part, it is easy construction, however, if you have any difficulty with the wiring, please get someone to help you.
Start by cutting the frame from two-by-fours; there will be twelve pieces to form the box. Before you assemble the frame, use spray glue and aluminum foil to cover the wood. Now assemble the frame with screws.
Now, cut five wood stringers. Place one across the back of the frame, one on each end, and two across the top. At this time, you can attach your light sockets to the stringers. One on each end, two across the back, and two in the top of the box. Now is the best time to add the wiring. I have found it best to place the switch on the right side of the box. (The switch will be mounted after the side is attached.) From the switch location, run a wire to the top socket on the right. Then, wire in line the socket on the right side, the two sockets in the back, and move to the socket on the left side, then from the left side to the socket on the top left. Use zip wire ties as required to control the wires. Remember, if you are not sure about electrical wiring, have someone help you.
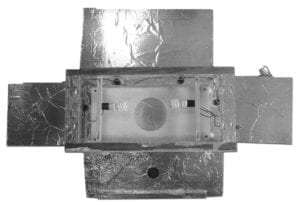
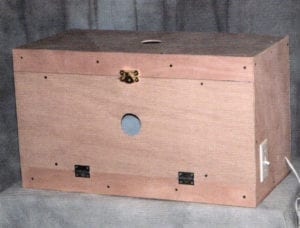
That was a fun few hours, the rest is easy going. Let's continue by cutting plywood panels for the two sides, the back, and the bottom of the box. After cutting these four panels, cover the inside with aluminum foil using spray glue. Then attach the panels to the frame using 3/4 inch screws. You may need to do a little trimming for a perfect fit. As luck would have it, a perfect fit is not required. The top is made the same as the other panels, except that you need to cut about a four inch diameter hole in the center for your camera. Be sure to add the aluminum foil before you attach it with screws. The front is made in three sections. Cover the two-by-four at the top and the bottom with 1/4 inch plywood, no aluminum required. Cut a door to fit the opening, cover the inside of the door with aluminum foil. Add a support at the top and bottom of the door; the support will keep the door from bending, and also will hold the screws for the hinges and sash lock. Cover supports with aluminum foil. Cut a four inch diameter hole in the center for your camera. Attach door with two hinges and place the sash lock at the top center of the door. As you can see, the inside of the box is one huge silver reflector.
Providing you followed these instructions to the letter, you now have a large, ugly plywood box with two four-inch holes in it. Trust me, you're gonna love it one day, and wonder how you ever did without it.
Only two more steps, and the light box will be finished. Hang in there. Cut a square hole in the right side to fit the light switch, attach the switch with screws, and cover with a switch plate cover. Now drill a hole large enough to insert a power cord, pull enough slack to reach the switch, then tie a knot in the cord so that it can not pull out of the light box. With the power cord unplugged, connect it to the switch, then wire the lights to the switch. Remember, if you are not sure about electrical wiring, have someone help you. Add the six Spiral Lamp Fluorescent Bulbs - Daylight 6500 to 6800 Kelvin. Get all the kids and pets out of the studio, have a cell phone handy, grab a fire extinguisher, then plug it in and test it out. If the light comes on, congratulations, you have an odd-looking lamp.
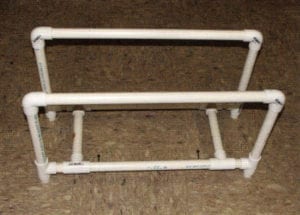
The final step is to build a simple stage that fits inside the light box, using T-fittings and elbow fittings and PVC pipe. The bottom of the stage should be about even with the bottom of the door of the light box. The size of the stage will need to fill the inside of the light box, but leaving about an inch clearance around each lightbulb. Then using fluorescent light cover (2′ x 4′ white plastic used in fluorescent lighting), cut a bottom right and left side and back panel, attach the two side panels and back panel with 3/4 inch screws. The bottom panel can just sit in place. Now, cut a top panel and cut a 6″ diameter hole in the center; if the hole is too small the camera will see it. Attach the top panel with 3/4 inch screws In order to fit this stage into the light box, remove the bottom plywood panel, set the stage inside, and replace the plywood panel. One two-inch screw through the bottom PVC into the two-by-four will hold the stage in place.
Tips To Help You Use Your Light Box
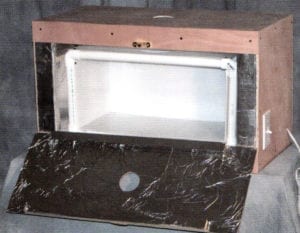
First, let me explain why your light box works. The six light bulbs are color balanced to produce natural sun light. The light is reflected off the aluminum foil walls and is diffused by the milky white plastic panels.
The light box produces a soft even light that allows you to photograph an endless variety of items. The light quality is so soft that there is rarely a glare, even on the glossiest of surfaces. The colors reproduced in the camera are rich and vibrant.
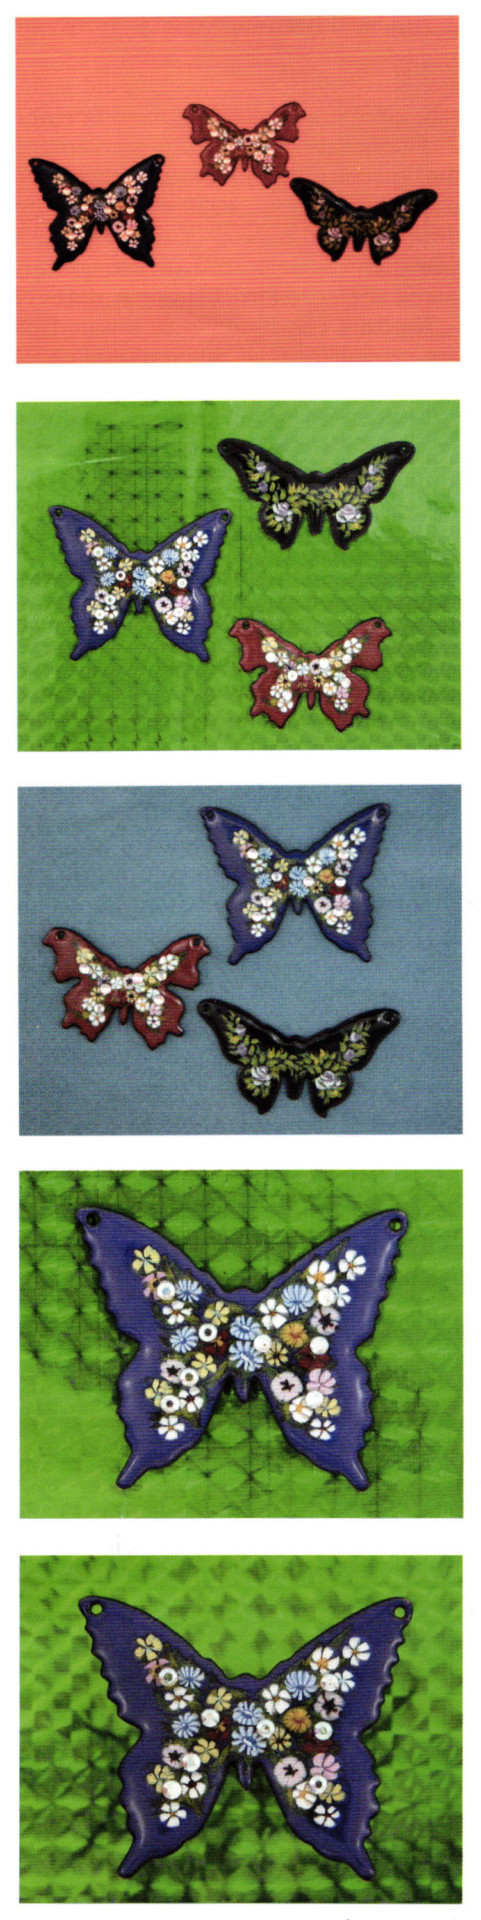
The light box provides a white background. To jazz up the colors, you need a selection of color backgrounds. I have found that artist quality craft paper works great for this. You can find this paper in an art supply store. Two other sources for great backdrops would be designer paper used by scrapbookers, or most any fabric such as flannel or velvet.
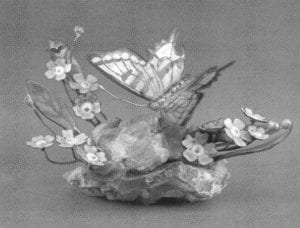
I use a large sheet of artist quality craft paper to cover the back wall and floor. As you see from the photographs, a simple change of the backdrop color changes the look of the butterfly.

In the last two butterfly photos, I have used the same subject and the same background. The difference is that I used a small tube from an ink pen to raise the butterfly about 1-1/2 inches above the background in the last photo. This softened the pattern in the green and made the blue of the butterfly just a little bit richer.
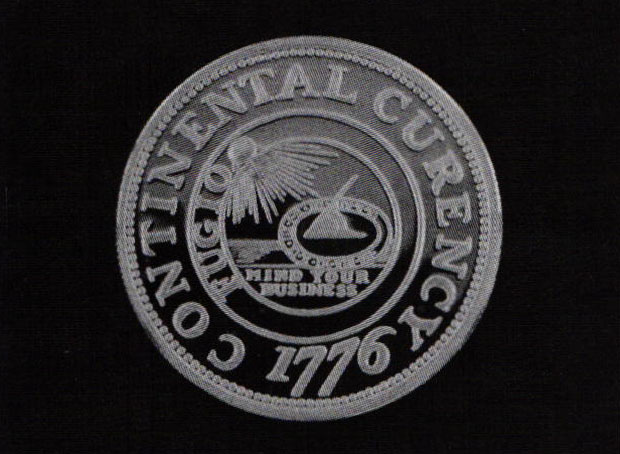
The coin is photographed on a small section of cloth for the background, however, in the second photo, I have blocked the light from one direction using a CD jewel case to add shadow depth. I also want you to notice how well the soft light reacts to the mirror-like surface of the coin. The coin is a new reproduction coin, not an original.
The final tip is that you can not make a mistake with this system, but you can make improvements. Experiment and let your creativity run free. Most of all, enjoy being in total control of your art.
I would enjoy seeing your comments and photographs.
Bob Corman yabe@fuse.net.
Related Articles
Photographing Small Art Objects

Photography Considerations

Depth of Field in Photography

Tips on Working with 35mm Slides


The All-In-One Jewelry Making Solution At Your Fingertips
When you join the Ganoksin community, you get the tools you need to take your work to the next level.
