
The New Interactive Jewelry Design Technology
10 Minute Read
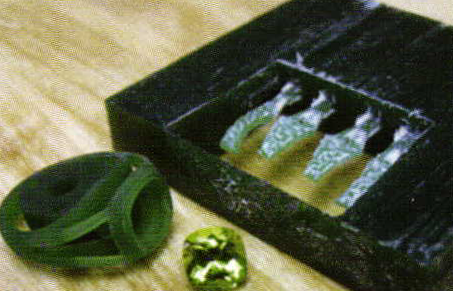
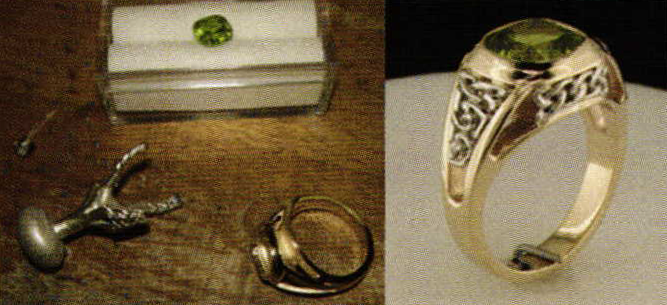
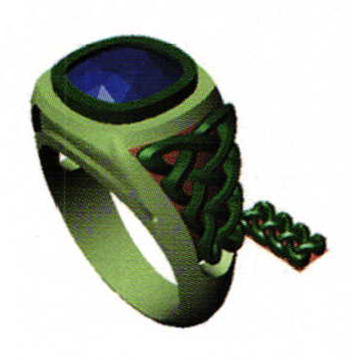
Take one 2.5 ct. cushion-cut peridot, add to it one very picky technical writer from a jewelry design software company, and what do you get? A tutorial describing how to use the powerful new interactive jewelry design technology available in Matrix Version 5 together with up-and-coming features of Rhino Version 4 Beta to add a Celtic knot pattern to the cut-out sections of a signet ring quickly and easily.
What's on the horizon in Rhino 4?
Features in Rhino version 4 that you can test now by downloading the Beta release version of the software from their website allow users to bend, twist, and taper polysurfaces (or, objects made up of more than one surface) as never before. Many of these new features also utilize History a new option in Rhino that relates a copied object to its original. As you make changes to the original object, the new one follows suit, morphing on-screen to match the changes in real-time as you make them.
Matrix Version 5 will begin to utilize this new Rhino technology in builders such as Raised Band Builder, Award Ring Builder, and Mesh Mapper Builder soon in the up-and-coming Version 5.4 update. In the meantime, you can follow this tutorial to see how the new technology will work and try it out "long-hand" yourself.
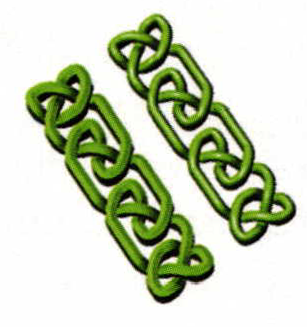
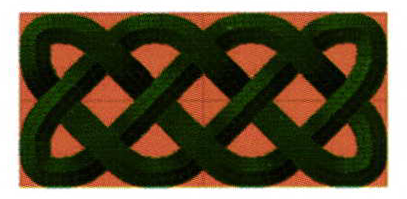
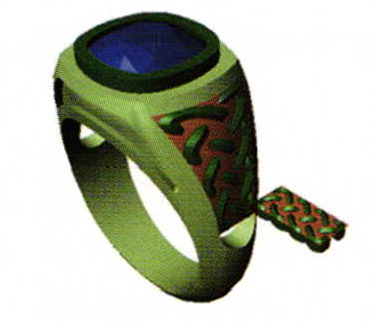
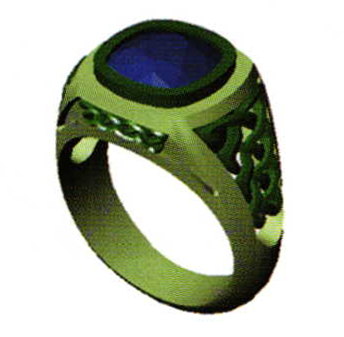
In this example, the hard-edged, polysurface Celtic knot on the left was the desired look for the signet ring. Compare this to the soft-edged, Nurbs surface Celtic knot on the right, which is a single, continuous surface (like a tube) and is the only option for creating a knot that can be bent, twisted, and tapered in the previous version of Rhino.
Using Rhino 4, though, we're able to easily fit the chisel-edged knot perfectly into the cut-outs in the signet ring, automatically matching the curvature and shape ofthe knot to the contour and taper of the cut-outs.
What's new in Matrix 5?
Matrix Version 5.3, whichis available now andruns on the previous version of Rhino (Version 3), offers its own range of powerful new builders to make the unique cushion-shaped gem, signet ring, and Celtic knot design quick and easy to achieve.
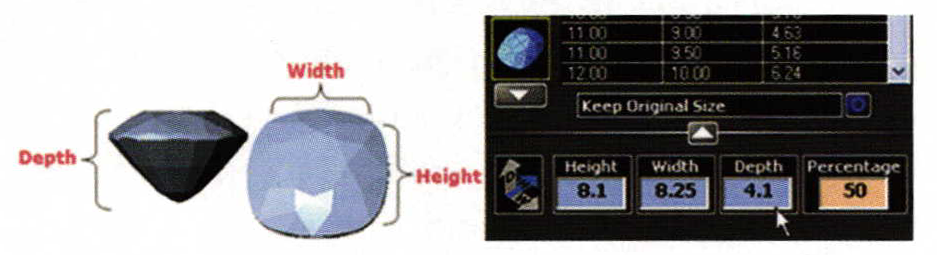
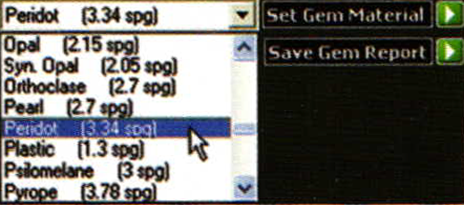
1) First, the peridot was measured with a set of digital calipers to get each dimension (height, width, and depth). In Version 5 of Matrix, the user has two choices for modeling custom gems. One is the newlyredesigned Gem Loader builder which, in addition to offering a complete range of gem cuts, shapes, and sizes straight out of the tables and formulas found in The Complete Handbookfor Gemstone Weight Estimation by Charles L. Carmora, G.G., also offers an Advanced Options Tab used to enter in the very measurements you just took: height, width, and depth.
Mr. Carmora's formulas now inform the brand-new Gem Reporter feature in Matrix Version 5, as well, which allows users to calculate gem weight based on a wide variety of gem materials by changing one or more of the gems onscreen to the new material and re-calculating the carat weight based on the tables and formulas in the text.
Another option is to model the gem yourself. In the Custom Gem Builder found in Matrix Version 5, the user first traces the shape of the gem with the curve tools found in the program. Point objects are placed wherever the faceting should be located at the top of the gem. Then, the user can choose Diamond or Gem cut and interactively control facet count, crown height, crown angle, pavilion depth, girdle thickness, bulge factor (or, shape at the bottom of the gem), and pavilion rows. Finally, the user can save this gem to a custom library newly available within the Gem Loader builder and use it again in a future model.
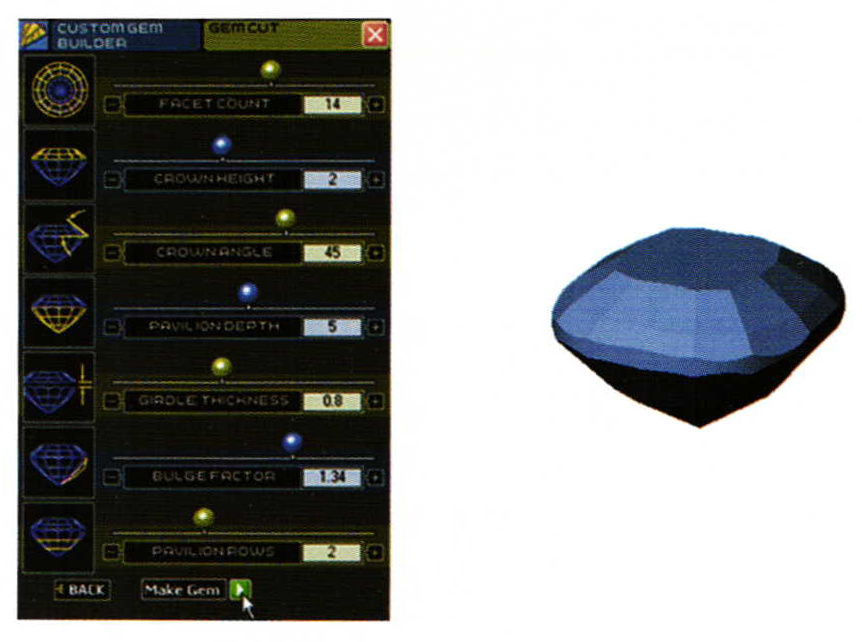
Using either of these two new tools, a more true-to-life representation of a stone can be created in the program. For gems that are hard to model with, Custom Gem Builder is indispensable, making an accurate placeholder for a gem more quickly in a Matrix model than was ever possible before. It should be noted, however, that this builder does not assign real-life faceting to the gem for the purposes of rendering; its function is merely to model an accurate placeholder for a real-life gem and not to mimic real life gem cuts onscreen.
In addition, custom gems modeled in the program using either of these two methods can be added to many builders in the Settings and Cutters menu - such as Bezel Builder, used here - just like traditional stones already found in the library. Traditional builders can now therefore create custom-shaped settings and cutters that precisely match the dimensions of the new gem.
Next, the signet ring of choice was modeled. Two brand-new, fully interactive options for building signet rings are available in Matrix 5, and they are capable of doing a lot more than a typical class ring style. Build a ring with virtually any combination of library profiles instantly, watching it change in real-time onscreen in front of you as you adjust the interactive controls. Or, draw your own profiles and add them to the library for custom-shaped rings.
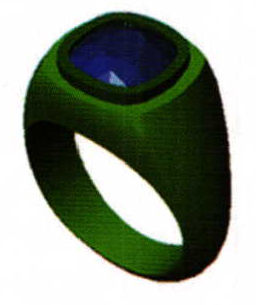
The Two-Shape signet ring builder features different profile options at the top and middle of the ring, while also adapting the ring to different user-defined shapes at the left and right sides of the ring - and, if desired, the front/back of the ring - for a wider range of possible shapes. Or, the Cross-Section signet ring builder allows the user to interactively adjust the shape and taper of the shank at the bottom of the ring. In this model, a simple cross-section ring was built with a taper at the bottom, cushion-cut profile at the top, and straight, simple edge profiles to create the slim, clean lines of the ring.
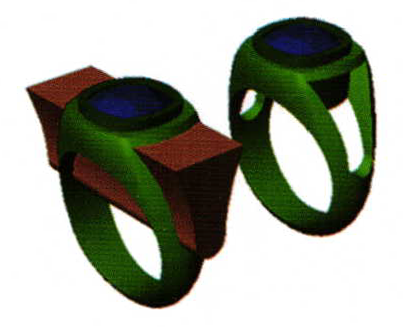
To create the cutouts, draw closed, planar curves in the shape of the cutouts in the view port where the cutouts should appear. Use Extrude Planar Curves to extrude the cutouts and Boolean Difference them from the ring.
In order to save metal, this previous step was also performed to the cutout shapes in the front and back of the ring. However, you may wish to quickly and easily see how this ring would look with an inset surface instead on the front and back using another new feature found in Matrix Version 5: Surface pullback. This builder saves numerous steps to shave minutes off of any project that requires inset surfaces.
Project the flat curve (in this case, the one in the Through Finger viewport,) onto the surface or polysurface where the inset should be placed. Then, input the projected curve and the surface or polysurface together into the builder. Indicate the depth for the inset surface and a preview curve will appear, indicating the shape and location ofthe new inset surface. Ifdesired, adjust the interactive control for a beveled edge on the surface, and watch the preview curve change in real-time as you raise or lower the angle for the edges. Set the inset and hum a little tune while the builder does all the work for you, creating the side walls and inset surface quickly and efficiently.
Alternately, select the Cap option in the builder when you wish to retain the surface that was removed during this operation. It will leave the surface that was subtracted when the inset was cut, cap that piece, and leave it in the model as its own separate part. This piece can now be used as a two-tone accent during a render, or it can be used as a Pave plate.
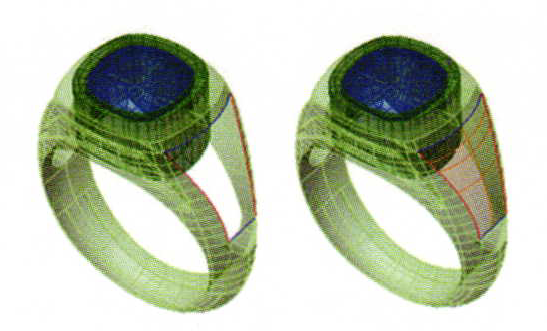
Surface Pullback Tool: Input a Curve on Surface (left) & create an Inset (center) or a Cap (right)
Finally, use the Celtic Knot Builder found in Matrix Version 5, which is the same builder that was introduced in Version 3.5, and create the knot of your choice to go into the sides and/or front of the signet ring. Remember that you can pick the polysurface option (indicate "Nurbs Profile OFF" in the builder) and still bend this knot, thanks to Rhino Version 4.
Before taking the model over into Rhino 4, there is one final step. In order to use the Sporph function, which takes any object resting on a surface and applies it onto a new surface, adapting it to the new size, shape, and curvature of the new surface, you first need two "backbone" surfaces. The first, known as the "original backbone surface", is the surface on which the original object rests. The second, or, the "new backbone surface", is the one to which you will apply the object, creating a new object that conforms to its shape, curvature, and location.
The best way to create backbone surfaces for this operation is with Sweep 2, since the user controls the U/V directions (rails and profiles) of the new surface. So, select the Dup Edge tool and create curves along the edges of the newly cut surfaces. Create them only where you want the rails and profiles for the two-rail sweep that will create the new surface. If necessary, Join the curves to create single curves for both rails and profiles. If desired, select the End O-Snaps and the Polyline tool and create a final profile curve, which can be a straight line connecting the two rails. Finally, click on Sweep 2 and select the rails and profiles as directed. A surface will appear. This is just a guiding surface: you will delete it from the model once you are all through using it (don't worry - it will not be in your finished model).
Use Dup Edge & Polyline tool to create rails (red) and profiles (blue). Use Sweep 2 to create surface (orange, at right).
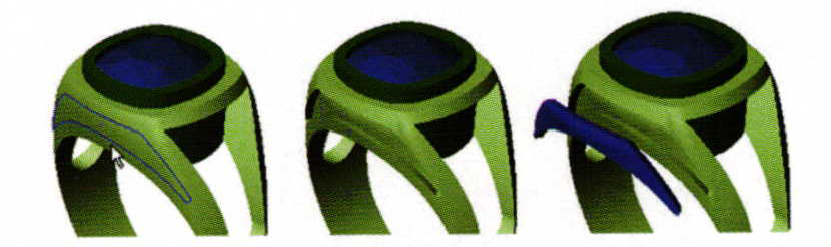
Now, create a similar surface around the Celtic knot in the viewports. To ensure it is centered on the knot, you may wish to use the Bounding Box command in Matrix and Dup Edge to place curves at the bottom of the box. Delete the box, keeping just the curves, and use the longer curves as rail curves; the shorter ones are profiles.
You're now ready to import the whole kit and caboodle into Rhino Version 4. To do so, it's as easy as "cut and paste"! Select the entire model by pressing "Ctrl + a" on the keyboard and press "Ctrl + c" to copy it. Open up Rhino Version 4 Beta and, within this program, click on the grid to activate a viewport and press "Ctrl + v" to paste the model.
Here comes the fun part. Type "History Manager" into the Command line to start up this function. Make certain that both options are set to "Yes" and press Enter to continue.
![]()
Then, type Sporph into the Command line. The object to sporph is the Celtic knot. The "original backbone surface" is the one on which it currently rests. The "new backbone surface" is the one youjust modeled in the corresponding cutout part of the ring. Make sure to select both surfaces near the same corner. Wait patiently forjust a moment, and the Celtic knot will appear on the new surface. Amazing, huh?! But wait… there's more!
Because you turned on "History" in Rhino 4, any object that you "sporph" will show up in the same relationship to the new surface as it was to the original surface. In this case, it was resting on the original surface, so it's resting on the new surface. But suppose you want it slightly sunk into the new surface, so that it is flush with the outside of the ring? Because you turned "History" on in the beginning of this step, you are all set up to make adjustments to the original knot and have the changes appear in the new knot. In this case, select the original knot in the Through Finger viewport and drag it straight down, setting its top about flush with the surface. Wait patiently, and you'll see the new knot do the same thing, sliding just below the orange surface so it is flush with the surface of the ring. Be careful, though… move the knot anywhere off its original surface and it will be chopped off on the ends!
| Drag knot down & knot on surface moves, too! | Delete surface to see results: |
 |  |
Once you're done making all the adjustments to this model, copy the model in the same way described above and paste it back over into Matrix.
Repeat the previous two steps with a new knot and the front cutout of the ring. Then, Mirror the knots front to back and right to left to complete the design. "Sporph" can be used on any surface, polysurface, or mesh as long as you've modeled both original and new "backbone surfaces" to use during the operation.
 |  |
Related Articles

Dorothea Pruhl: Liberal Jewelry Sculptures

How to Make a Plique a Jour Fairy

Translating Line Art into 3D Models in Matrix

Metalsmith ’89 Winter: Exhibition Reviews


The All-In-One Jewelry Making Solution At Your Fingertips
When you join the Ganoksin community, you get the tools you need to take your work to the next level.
