
Making a Filigree Wire
One of the necessary steps in making filigree is the forming of the wire. It is made by twisting very tightly two pieces of very small silver wire and then flattened. Either sterling or fine grade silver wire may be used. Fine is preferred, even though it is a bit more expensive but because it is more resistant to fire scale and needs much less annealing than sterling.
4 Minute Read
One of the necessary steps in making filigree is the forming of the wire. It is made by twisting very tightly two pieces of very small silver wire and then flattened. Either sterling or fine grade silver wire may be used. Fine is preferred, even though it is a bit more expensive but because it is more resistant to fire scale and needs much less annealing than sterling.
To begin, measure off about 8 feet of your 26 gauge wire, double it. Put the two ends in a vise and place the loop end in a screw hook which has been inserted in the chuck of a hand drill.
Start winding; if after 15 or 20 turns of the drill, the wire breaks, it indicates the wire you purchased had not been annealed properly. Retrieve the wire and anneal it again. To be safe, it is a good idea to anneal the wire each time you begin to make filigree wire. Don't forget you have the option of using a Foredom tool instead of a hand drill. If, for any reason, you stop winding or are finished winding, don't relieve the tension on the wire. Keep the tension and release the wire by removing one end from the screw hook. Not following this procedure will allow the wire to get tangled.
Start winding carefully, taking care not to put too much "tension" on the wire. Check the length which will shorten as you wind until the wire measures about 40″ in length with a diameter of 20-21 gauge. At this point, it is necessary to anneal the wire again which has hardened from the twisting. To anneal, coil the wire tight in a coil (1½"-2″ in diameter). Bind it with binding wire. Using a propane torch carefully, heat the coil in a not so bright area until you can see just a small bit of cherry red. At this point, quickly drop the coil in a pyrex dish of water. Be sure you have thoroughly heated the coil of wire. Uncoil your wire, put one end in the vise and pull the wire until it is about 47 to 48″ again. Pull the wire carefully; from experience, you will learn by feel how much length you have gained. Don't pull too hard and try not to get too much stretch because you may snap the wire. This will do no harm but will cause you extra work. At this point, the wire should measure approximately 21 gauge with a length of 47″ to 50″.
You are now ready for the next step to flatten the wire. There are two ways to do this. Using a fairly heavy ball peen hammer, flatten the wire by striking it with steady, even blows on a vise or steel plate. Try to keep the thickness and width as uniform as possible. Stop often to check your dimensions. The width should be between 18 and 21 ga. and the thickness should be 29 to 30 ga. These dimensions are not too critical. The important thing is that the coils of wire you have assembled should be close to the same dimension. A better way to flatten the wire is to use a rolling mill. This is a tool that is not available to many of us. Hopefully, the Gem Club in your vicinity will have one. It is also possible that you may be able to find a supplier of filigree wire to alleviate the tedious job of making your own wire.
If you are using a mill to flatten your wire, set the mill using a .006″ thickness gauge. Run just a short length of wire through the mill and check its dimension before continuing. When the wire has completed its run through the mill, it should measure 30 ga. for thickness and 17 or 18 ga. for width and be approximately 70″ in length. At this point it is important to know if your wire is properly annealed. To check this try to make an element as shown in a later chapter. If you have difficulty winding the element it is an indication your wire needs annealing.
As noted above, the dimensions of the completed filigree wire should be 29-30 ga. for the thickness and 17-18 ga. for the width. If you would like a more delicate look to your completed filigree jewelry, you may form your wire as small as 40 ga. for thickness and 21- 22 ga. for width. When you have checked and are satisfied the wire should be pickled and neutralized.
The completed length of wire now should be coiled around a ¾" or 1″ dowel, making sure the wire lays flat. Hold the wire in place by drilling small holes through the dowel.
It would be advisable after making several lengths of wire and you are satisfied with them to make a sample card
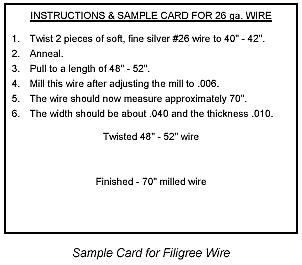
Take a three or four-inch length of the wire at the various stages in making the wire and glue them to a filing card. Refer to this card to insure uniformity as you proceed. To complete the making of filigree wire, it is necessary to pickle and clean the wire as will be explained shortly.
As an aid when twisting the wire, make a hand control if using a Foredom or Dremel tool which will eliminate the use of a foot control. The heart of the controller is an ordinary light dimmer switch available at any hardware store. The unit can be housed in an ordinary electrical outlet box with an electrical plug-in socket in another box or both the controller and socket can be housed in one larger box. Since you will be on your feet and moving around quite a bit, this hand control unit will be advantageous to have.
Read also:
Related Articles

A Crowning Achievement Part 2
Tips for Creating Jump Rings

How to Make Earring Posts by Hand

Wire Drawing Hints


The All-In-One Jewelry Making Solution At Your Fingertips
When you join the Ganoksin community, you get the tools you need to take your work to the next level.
