Tips for Creating Jump Rings
Jewelers use jump rings extensively as chain components, connectors, and linking devices for multiple construction problems. Here are a few tips and methods for creating jump rings.
2 Minute Read
Jewelers use jump rings extensively as chain components, connectors, and linking devices for multiple construction problems. Here are a few tips and methods for creating jump rings:
- Most jump rings are round, but other shapes can be made-it just depends on the cross section of the mandrel rod they are wound around. Whatever shape mandrel you use, I recommend using steel because the wire stays put after being wound. (I also like to use drill bits as mandrels.)
Broken burs, old needle file handles, and round metal rods make great mandrels. When making your own mandrels, cut a slit into the end of the rod to permit the wire end to catch when you're winding it. You can also drill a hole through the rod for the wire end.
- When winding jump rings, don't make the coiled sections longer than 2 cm. It's difficult to hold long sections while cutting the jump rings apart.
- It's a good idea to anneal the wire before you begin. Robert Kaylor of Boise , Idaho , coils the wire into a tin can while annealing to avoid accidentally overheating one section of wire. The metal can creates a "muffle," which provides a more even heat for the wire.
- You should straighten the wire before winding it onto the mandrel. My favorite method of straightening wire is to stretch it. Place one end in a fixed vice, grab the other end in a stout pair of pliers, and stretch it the same way you'd pull a wire when drawing.
- You can straighten (and even draw) wire very effectively by using leverage. Clamp one end of the wire in a vice and make a small loop at the other end. Place the loop on the rod and lever against a wooden block attached to the bench top.
- After straightening, wind the wire into a coil on the mandrel. You can make a jump ring coil by using an old-fashioned hand drill to hold the mandrel. Clamp the drill handle into a vice and chuck the mandrel into its jaws. Carefully feed the wire onto the mandrel while slowly and steadily cranking the drill. Kink the end of the wire to a right angle and slip it into the jaws of the chuck. Feed the wire through tightly gripped fingers, keeping tension on it as you wind. This will keep the jump rings taut.
- It's easy to make your own basic jump ring winding tools. The simplest tool uses a little brass hinge section. Clamp it into a vice, insert the winding mandrel, place the wire into the slot or hole at the end of the mandrel, and turn. It helps if you bend the end of the mandrel into the shape of a hand crank.
- Another wire winding tool is a rechargeable battery-powered screwdriver, which has low speed and high torque.
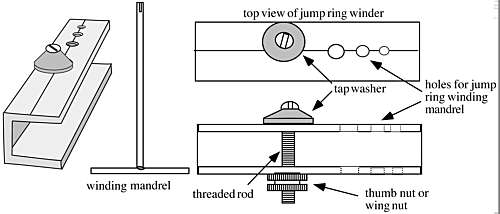
Here is a jump ring winding tool that I created from an extruded aluminum window channel (see photo). The slit in the end of the T-bar winding mandrel catches the wire. The wire is then fed under the washer, which is clamped tight. This keeps tension on the wire while it is being wound onto the mandrel.
 |
| Photo: Charles Lewton-Brain |
When you are ready to remove the jump rings, disengage the mandrel by turning it in the opposite direction. As you pull out the mandrel, the jump rings slide off easily.
![]()
In association with
![]()
The award-winning Journal is published monthly by MJSA, the trade association for professional jewelry makers, designers, and related suppliers. It offers design ideas, fabrication and production techniques, bench tips, business and marketing insights, and trend and technology updates—the information crucial for business success. “More than other publications, MJSA Journal is oriented toward people like me: those trying to earn a living by designing and making jewelry,” says Jim Binnion of James Binnion Metal Arts.
Click here to read our latest articles
Click here to get a FREE four-month trial subscription.
Related Articles

How to Step-Roll Wire

Soumak on Metal

Cutting Jump Rings

How to Make Earring Posts by Hand


The All-In-One Jewelry Making Solution At Your Fingertips
When you join the Ganoksin community, you get the tools you need to take your work to the next level.

