
Liver of Sulfur 101
Liver of sulfur, a stinky jewelry studio standby, can be used to create beautiful patinas on Silver, Silver Precious Metal Clay or Art Clay.
18 Minute Read
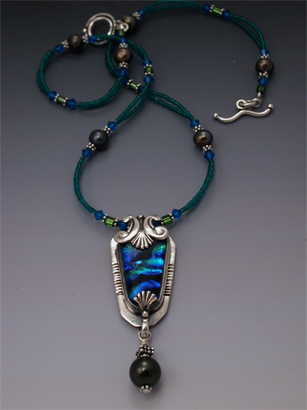
My husband wanders into my workspace. "Wow, what died in here?" he says. Even with the ventilation fan at full blast, it's hard to mistake the odor of rotten eggs produced by liver of sulfur. But don't let the smell scare you, because nothing else can produce such eye-catching color on the surface of fine silver metal clay. This mysterious solution creates colors as dark as night or as beautiful as an iridescent rainbow. And they range from subtle gold to magenta, purple, and everything in between.
For some, it's not just the smell. It's easy to be intimidated or baffled by the surprising results that can be achieved. Liver of sulfur (LOS) can be fun and spontaneous on one hand and unpredictable on the other. I've done quite a bit of research and a number of bench experiments to bring you solutions, recipes, and answers to some of the most frequently asked questions about using it with metal clay. With a bit of knowledge you too will feel less intimidated, and once you realize that LOS patinas can be removed, you might feel free to experiment without worry over ruining a piece you spent hours creating.
LOS, or potassium sulfide, is a chemical coloring agent used to put a patina on metal. In this case, the metal is fired and finished Precious Metal Clay or Art Clay.
It comes in liquid or solid form. The liquid can be used straight from the bottle. Solid LOS is usually sold in small chunks, which are mixed with water as needed. LOS has a shelf life of one day to six months, if you're lucky. For this reason, I prefer to buy the solid and make my own solution, mixing only what I can use in a single session. I store it in an opaque, airtight container and mark the outside very clearly. If you are coloring 1-10 items, mix about a cup of solution; increase proportionately as needed. If a prepared batch of LOS turns a milky, clear color it may no longer be effective for applying a patina to metal clay. At that point it's time to mix a new batch. LOS in all forms should be stored in a dry, dark place because air or light will weaken it.
Liver of Sulfur, 101
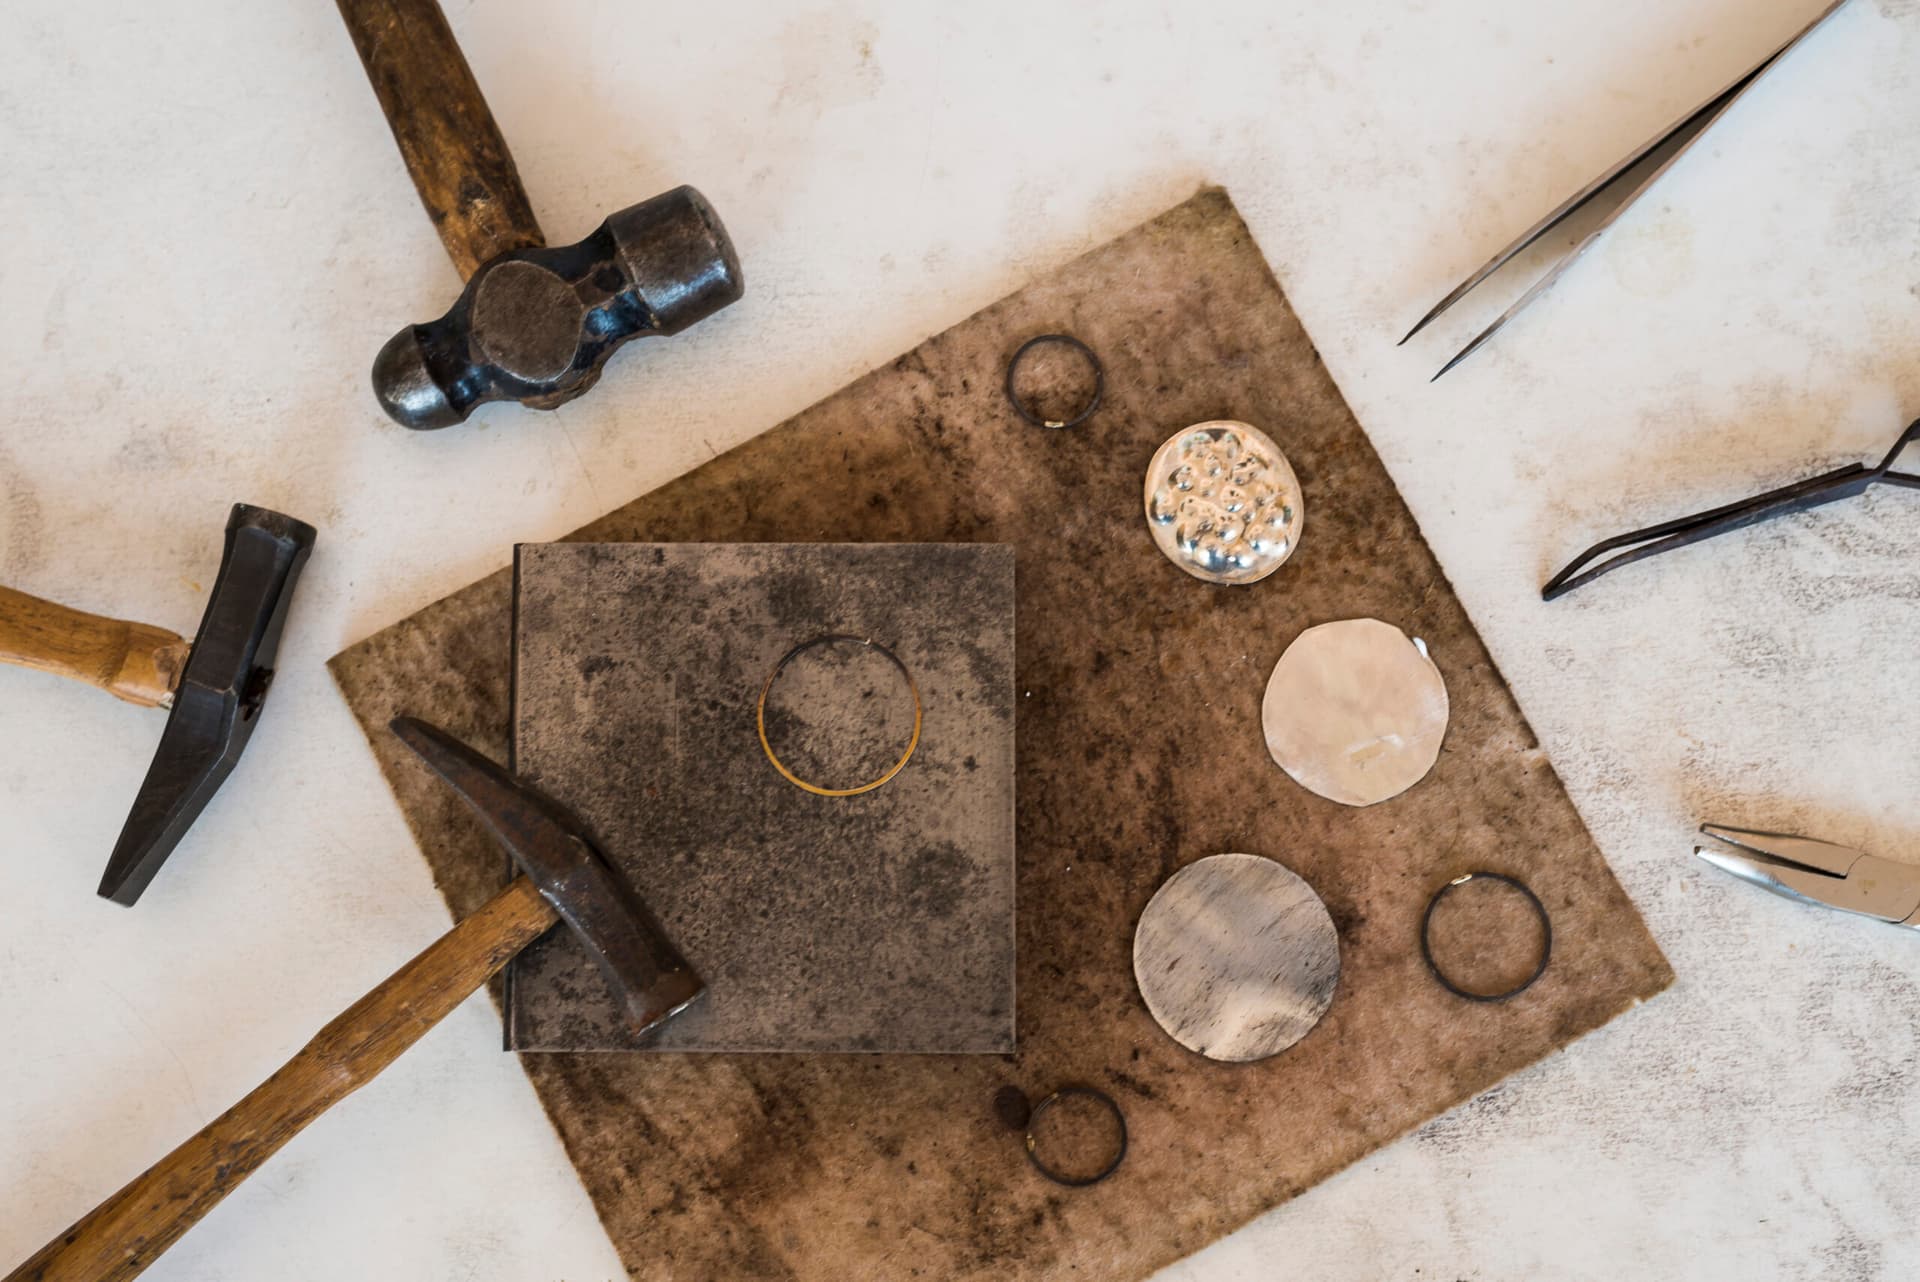
Here is the basic recipe, with general guidelines to proportions. Whenever water is mentioned in the process to follow, I prefer distilled water, because it assures there are no chemicals in the water that may cause unpredictable application. If distilled water is unavailable, or if you've never had problems with your water source, you might be okay.
What you need:
- 1 cup of water
- Plastic spoon for mixing
- A pea-size clump of solid liver of sulfur
- Glass or plastic airtight container
To mix your own solution, put the clump in a container of water and stir. The color of the solution should be a very pale yellow. At this strength, it will give you better control over your results. A strong solution will "develop" too quickly, taking control out of your hands because it will move through the colors too quickly to stop the process. More on this below, but first, let's set up.
Workstation Setup
LOS will indiscriminately affect all metal. Jewelry you don't want a patina on will be colored if LOS residue remains on brushes or containers. I've even had finished jewelry prematurely tarnish because it was stored in the same room as my LOS workstation, so I suggest keeping those areas separate.
Although you don't need special tools or equipment, you may want to establish logical studio rules to prevent contamination of other items and projects.
The tools I use are exclusive to LOS and include paint brushes; containers, and wire scratch brushes. I mark everything clearly with permanent marker, so I don't accidentally use it for something else. Since I often tumble pieces that have a LOS patina, I make sure I tumble them alone or with other items that have LOS on them. Afterward, I scrub the tumbling container well with soap and water and I soak my stainless steel shot in soapy water. After the soak, I use a small mesh plastic strainer to rinse the shot. I then mix a fresh bath for my next batch of tumbling. I've never had a contamination issue with stainless steel shot, but others have reported problems with carbon shot, so I don't use it with LOS.
Basic workstation
What you need:
- Heat source (for example: a cup warmer or bowl of very hot water)
- Prepared liver of sulfur solution
- Bowl of cold water
- Plastic spoon for mixing and/or dipping
- Tweezers or string (optional for dipping)
- Soapy rinse water
- Rag
- Baking soda
Set up your workstation so you can easily move from one stage to the next. I like a row with the heat source first, then the LOS, then a bowl of ice cold water. There are several ways to work, but remember this — the secret to controlling the process is the temperature at which you work, combined with the solution strength. As mentioned above, the solution should be pale yellow for better control. Temperature will affect how fast the colors will "develop" The hotter you work, the more quickly the colors will move from shade to shade. They progress roughly as follows: gold, pink, magenta, blue, purple, bronze, gray, and black.
Getting Down to Business
Before you begin, your metal clay piece should be squeaky clean and free from dirt or oils from your hands. A piece can be fresh from the torch or kiln, scratch brushed or with high mirror finish. After any handling, scrub with a soft brush and soapy water. Once clean, handle a piece with tweezers, a spoon, or suspended from a string. If you must, pick it up only by the edges.
LOS is always "active," meaning the instant you put a piece of metal into it; it will start to show color. To accelerate coloring, heat either the LOS or the piece. I prefer heating the piece because it gives me more control. Heat until warm to hot, then submerge it into the LOS solution. Let the color develop for a couple of seconds, then remove and put in the cold water to retard developing. Repeat this progression until you reach the desired color. Finally, rinse the piece in soapy water with diluted baking soda to remove any LOS residue that may continue to develop. (Please note: do not rub the piece with a soapy baking soda paste or a thick mixture, as abrasiveness will remove patina.)
Another method is to heat the LOS solution on the cup warmer, dip the piece, and finish with the cold-water bath and soapy water rinse. I use this method to achieve even coverage on pieces with varied, high-low, or multiple level surfaces. These types of pieces tend to heat unevenly on a cup warmer because portions may or may not be touching the warming plate.
You can vary the basic process as long as you latch onto the concept that heat speeds color development and cold water retards it. For instance, I often use heat creatively by dipping a piece of LOS, putting it on the cup warmer to develop, and then into the cold water bath and soapy rinse. Watching a piece color right before your eyes this way is so exciting!
Helpful Hints
- Don't develop color in one jump or it may flake off.
- When hot water cools, replace it.
- When cold rinse water warms or gets yellowish from the LOS, replace it.
- If you have used glass, gemstones, or delicate includes, don't heat on a cup warmer — use water to warm the piece instead. Inclusions may crack from thermal shock if the water is too hot or heated too quickly, so be patient and work up color slowly.
- For subtle coloring, work warm, not hot, and stop the process immediately when you like the color — if you let a piece sit for even a couple of minutes, it will continue to develop, possibly moving past your intended color.
On to the Fun Stuff - Liver of Sulfur Recipes
I encourage you to experiment with the techniques and recipes below. Vary them and combine them for different effects because experimentation is the only way to understand the dynamics of LOS. I suggest you make a sample set of patinas for yourself and carefully document each process, so you know what you did and are able to repeat it.
For samples, try pieces with both textured and smooth surfaces. My "Patina Sample" has the texture of sandpaper on the front and a mirror finish on the back.
Try any texture or finish you'd like, because it will give you a chance to see how patina and color will develop on different surfaces. If expense is an issue, reuse a sample piece by choosing one of the methods below for "Removing a Patina" I also keep a "test" piece handy so I can try a solution before proceeding to my final piece. Be aware that on any given day, even a known solution and heat source may produce unexpected results. Experimenting should help remove some of the guesswork, and keep in mind that you can adjust solution or heat along the way. Be brave, and enjoy the unexpected journey of discovery!
My five favorite patinas
The following techniques begin with the basic process described above. Additional materials or tools are listed.
Traditional antiquing (Black crevices, bright highlights)
Additional supplies:
- Polishing cloth
Scratch brush a piece and burnish it or tumble for 45 minutes or more to a mirror finish. Use the LOS to patina the piece to a dark black. For faster results, work with hotter temperatures and longer soaking, and build color gradually versus doing it in one big jump. After a final soapy rinse, dry the piece and rub "highlights" off with a polishing cloth. See the drama and depth that you have created!
The look of hematite
Additional supplies:
- Tumbler with stainless steel shot.
- Non abrasive hand soap or burnishing solution
- Polishing cloth (optional)
This method will take the "Traditional antiqued" method to the next level, coloring the metal a reflective, deep gray-to-black similar to the mineral hematite. After applying the patina, you may choose to remove or not remove highlights with a polishing cloth. Put the piece in the tumbler, add 1-2 tablespoons of hand soap or the recommended amount of a burnishing solution, and then add water to about an inch above the shot. Tumble for 20-30 minutes. Wow, what sheen!
Steely gray/blue-gray brushed finish
Additional supplies:
- Non abrasive hand soap
Progress through coloring a piece until you reach a gray or blue-gray. Use a steel or brass brush and a bit of hand soap to scratch brush the surface for a steely effect. More brushing will lighten the color, and a stiff brush will be more aggressive than a soft one. This is a soft and subtle patina that can have a sophisticated look!
Layered color
Additional supplies:
- Ammonia if desired
- Scratch brush
- Polishing cloth
- Small brush
Use any LOS recipe to develop one or two shades past gold or light brown, stopping with a cold-water bath. Brush or selectively remove color from portions of the piece with a polishing cloth. Then, wash in soapy water to remove hand oils and polish, and then dip again in LOS. You'll notice the unremoved patina will continue to darken, while the area where the patina was removed becomes gold.
Also, try detailing the LOS in selected areas. Put the piece on a cup warmer and apply LOS with the brush. Be sure other areas have no LOS residue on them or they will darken as well. Before detailing, wash the piece in the sudsy, baking soda water mix.
Iridescent effects
Additional supplies:
- Ammonia
Adding a tablespoon of ammonia to the LOS solution kicks the process up a notch. Colors intensify and have an iridescent effect. Gold's become brighter, blues more saturated, and the purples pop. Ammonia, in my opinion, adds an additional element of wonder because it seems to make the LOS solution more "sensitive." You are likely to get a tonal range instead of flat color. For instance, a pink area may have a subtle pink to bright magenta. If you are particularly interested in a specific effect, a test piece may be in order. Be adventurous and watch how a kick of color can change your whole piece!
Selective coloring using a resist
Resists prevent a patina from penetrating to the metal below. They can help to create interesting patterns, or can be used to preserve areas on a piece. Resist coverage should be solid, or streaking due to uneven application may result. If you make a mistake when applying a resist, don't despair. Removal solvents are listed with each recipe. After application of a resist, proceed through the LOS process, letting color develop as desired. Darker patinas will create the best contrast, but subtle effects with lighter patinas are worth investigating.
Sharpie pen resist
What you need:
- Black Sharpie
- Alcohol
Apply a fine or broad tip marker to areas you do not want the patina on. Don't make the mistake I did and use a different color — black is the only one that works. Remove marker by soaking the piece in alcohol for a couple of minutes. Rub the alcohol off gently with a cotton swab because aggressive rubbing will remove the patina as well as marker.
Nail polish resist
What you need:
- Nail polish in an easy to see color
- Nail polish remover (acetone)
- Fine brush
Follow the steps for the "Pen Resist," replacing marker with the nail polish and alcohol with the nail polish remover. Use a brush to apply the polish results in a fluid, varied weight line.
Wax resist
What you need:
- Beeswax
- Fine brush or kistka
- Boiling water
To apply wax, heat it in a small container on a cup warmer until molten. Paint a design with the brush as if it were thick paint. Or, you may want to try a kistka, which is used in Ukrainian egg decorating. They can be purchased at a hobby store and come in several sizes for thick or thin lines. There are electric or manual models. For manual models, heat the bowl of the kistka with the flame of a candle. Use the hot bowl to scoop up the beeswax. It will stay in the bowl until you touch the tip of the kistka to the metal surface. Beeswax is usually white or yellow — after heating in the kistka it will turn black.
I've never tried an electric kistka, but it is reported that they keep wax hot for the duration of a work session and that they create a nice, fluid line. With any kistka, check the line quality before applying wax to the work by experimenting on paper. With a bit of practice and a steady hand, you can get intricate detail with the wax resist method.
To remove wax, submerge the piece in boiling water. If you used stones or sensitive inclusions, thermal shock may result so either use another resist method or be prepared to remove the wax slowly with warm instead of boiling water.
Contact paper or tape resist
For this method, you must use contact paper or tape with good adhesive that does not leave a residue. It must lie flat from edge to edge. Good tape options are electrical or packing tape.
What you need:
- Contact paper or tape
- Xacto knife
- Burnisher
- Paper punches
- Scissors
Cut or punch shapes from the tape and apply them to the piece. Flatten them with a burnisher or the back of your fingernail so LOS will not seep under the edges. This will give a crisp, clean look.
To remove tape, lift the corner with your fingernail or the knife and peel it back. Be careful not to scratch the metal. You can get some nice hard-edged or precision shapes while creating interesting patterns with this technique!
Protecting the finish
LOS is a patina, and in general patinas are not permanent. If not treated or finished, effects will wear off over time. You should not have a problem in crevices, but "high" areas are more prone to being brushed or rubbed. Here are a few finish recipes to help patina last longer.
Beeswax and naphtha
What you need:
- 1 part beeswax
- 1 part naphtha (lighter fluid)
- Airtight storage jar
- Cotton swabs
- Soft cloth
Use small beads of beeswax and naphtha, mixing in equal amounts. I obtain naphtha from a drugstore or cigar shop. Mix to the consistency of cake icing. The naphtha odor will not remain on the jewelry. Apply a thin layer with a cotton swab, let dry, then buff lightly with a clean cotton swab or soft cloth. If you apply too much wax, you'll need to be aggressive in removing it. This can also cause some of the patina to come off. Apply it in a thin layer, and you should have no problem preserving the finish. If the finishing mixture thickens, add more naphtha to thin it. And obviously, don't use this method near a flame.
Renaissance Wax
What you need:
- Renaissance Wax
- Soft cloth
Warm the wax between your fingers and apply a thin layer to the piece with you fingertip. After that, follow the directions above for "Beeswax and Naphtha." Some people report that during buffing, the intensity of the patina may be removed. In addition, hand oils can dull the finish, so it's best to gently buff to preserve the patina and restore the sheen.
Jeweler's Lacquer or Furniture Lacquer
What you need:
- Good quality clear wood lacquer
- String to suspend the piece
- Wind free spraying area
- Newspaper
- Denatured alcohol
Jeweler's Lacquer can be purchased at a jewelry supply shop. Furniture Lacquer can be purchased in high gloss, satin sheen, or matte finish from a hardware store and will provide the most protection over time. When I use it, I prefer satin because it gives the piece protection and a nice sheen without being artificially shiny. Quality lacquer should thin over time, rather than chipping or flaking — and it should not turn yellow. Before applying, it is imperative that the piece should be squeaky clean and free from wax or oils. Soap and baking soda solution should do the trick.
Suspend the piece on a string over an area covered by newspaper. Apply two coats of lacquer per side, allowing it to dry between layers. If you have used wax resist, be sure all residue is removed. To ensure this, double rinse the piece in boiling water, first by dipping in a container of boiling water and then by rinsing with fresh, boiling water over both sides of the piece. Wax will rise like scum to the top of water and residue may remain after dipping, therefore the second rinse is necessary. Finally, clean the piece with denatured alcohol, followed by a sudsy bath with baking soda added.
Removing patina
Okay, you did some experimentation and you hate the way it looks or things didn't go as you planned, so now you want to know how to remove a patina. Well, there are a couple of things you can do to "save" your hard work. When selecting a removal method consider this important rule: if you have used heat sensitive stones, glass, or inclusions, removal using extreme heat or boiling water is a no - no and may ruin your work by causing them to crack or fracture. I recommend you try the "Tarnish remover" method instead.
Heat from a torch or kiln
This will remove patina and return a piece to its original pre-LOS state. After using heat, you will need to restore a mirror finish to any piece that had one.
What you need:
- Torch
- Fireproof solder block
- Long-handled tweezers
- Eye protection
- Ventilation
Place the piece on the block. Holding the torch several inches above, apply heat in a circular motion. Be careful not to overheat or you risk melting the piece. Soon, the patina will begin to disappear. Use tweezers to flip the piece and repeat on the reverse. Always wear protective eyewear and have good ventilation when using a torch.
Using a kiln
What you need:
- Kiln
- Kiln shelf
- Kiln gloves
Place your piece on the kiln shelf and into the kiln. Turn it on. As the piece heats up, the patina will disappear. Remember to wear kiln gloves to remove the piece, and have good ventilation. Do not heat past 1650 degees or you risk melting the piece.
Tarnish remover
What you need:
- Tarnish remover
- Bowl
- Spoon, tweezers or string
Tarnish remover will remove patina as well as tarnish. Some solutions are toxic, so have proper ventilation and wear gloves and eye protection. Follow directions, which differ, by brand. In general, you will simply dip the piece, which will remove the patina. After dipping, scrub any residue with sudsy water and baking soda, then rinse well.
Home recipe for tarnish remover
What you need:
- Plastic or heat-resistant glass bowl
- Aluminum foil
- Boiling water
- Baking soda
Line the bowl with foil, add jewelry, cover with boiling water, and sprinkle with baking soda. The baking soda should start to bubble and the tarnish will settle on the aluminum. When the water cools and the bubbling stops, the piece should be shiny. For deed crevices, I've had to repeat this process. When finished, rinse the piece well.
A Final Note About Coverage
Several factors affect the coverage you will achieve. Some finishes have a varied, tonal quality; others are more consistent and flat. Dirt, wax, skin oils, and chemicals in the water can prevent even coverage. Always start with a squeaky clean piece of fired and finished metal clay. If you must handle the piece, use tweezers or hold only the edges.
Different metal clay finishes will take color differently. A piece fresh from the kiln may differ from a piece with a mirror finish. Varies finishes on one piece can be interesting, but a piece with an inconsistent finish due to poor craftsmanship may look spotty.
I hope that any intimidation you may have experienced in the past has turned into an overwhelming excitement to experiment. Curiosity and enthusiasm should move you past the unpleasant smell of liver of sulfur, and open a world of possibility where your visual and creative palette can extend as never before.
Related Articles

Helen Shirk: Patterns of Growth
Patination Safety Considerations
Cupric Nitrate Patination of Metals

A Method of Steel Patination


The All-In-One Jewelry Making Solution At Your Fingertips
When you join the Ganoksin community, you get the tools you need to take your work to the next level.
