
Jewelry Designs: Faceted Stones Pendant
8 Minute Read
Welcome to Stacey Rhodes Jewelry Designs, where we will detail all of the steps involved in adding a new piece of jewelry to our line. In this issue will we will be working with our latest design. I'll take you through every phase of production, from the idea to the showcase.
The Idea
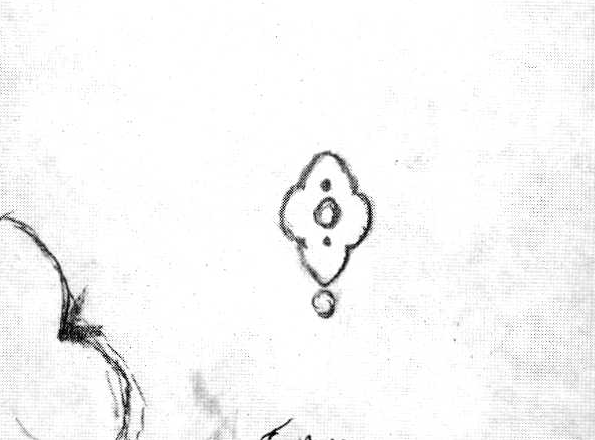
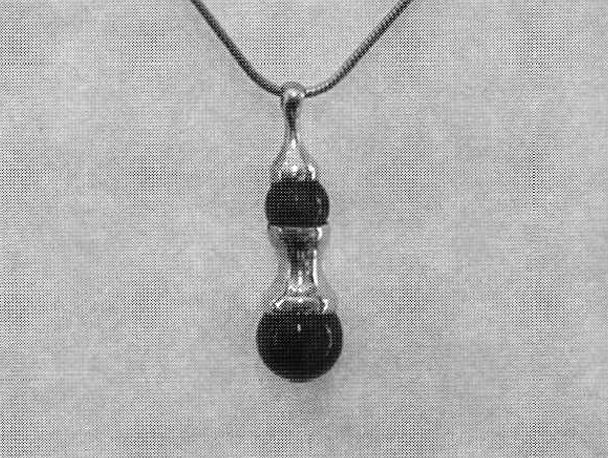
Let's start with the sketch. This is how almost every piece we produce begins. A couple of features I notice immediately about the sketch is that it will contain a faceted center stone, two faceted side stones, and a sphere dangling from the bottom. We decide to bezel set the center stone, and gypsy set (also called flush set) the two side stones.
Let's Carve A Wax
Most jewelry produced over the last century began its life as a wax pattern. There are three ways to get a wax pattern:
a.) Buy one for a couple of dollars from most major jewelry supply houses.
b.) Inject one yourself using a wax injector and a rubbermold.
c.) Carve one.
The approach we will be taking is C. I start with an 8mm thick, flat carving wax to carve the initial pattern. TIP: Before drawing on, or marking the wax, file the top smooth. Most flat carving waxes have a rough bark finish that doesn't allow you to make smooth lines.
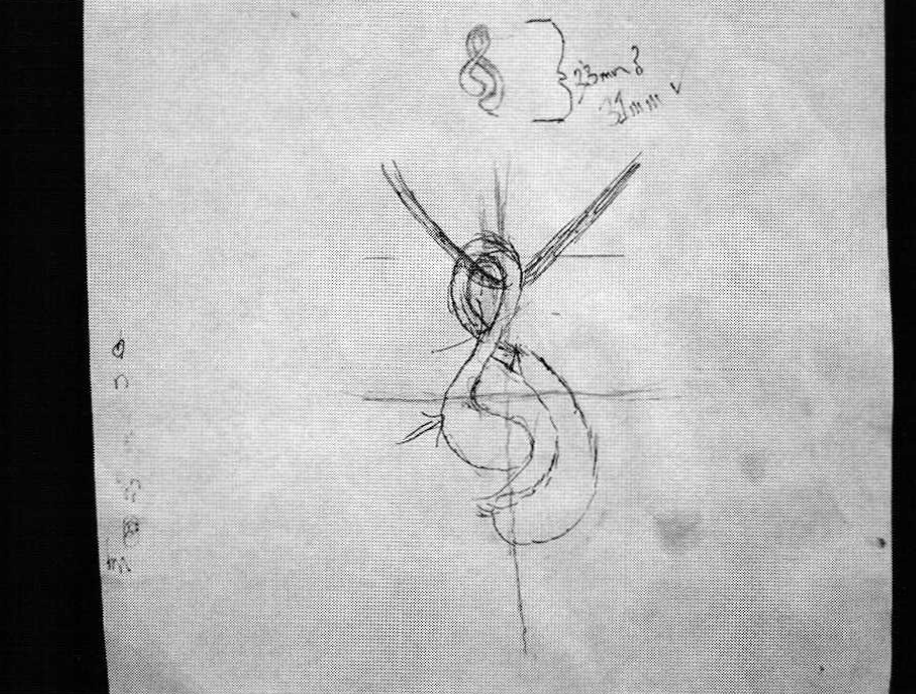
I'll take a few measurements first, and Stacey and I agree on 23mm as the overall length. I open my dividers and mark the 23mm distance between the top and the bottom on my wax. Next, using a fine point Sharpie, I have Stacey draw a rough sketch ofthe piece, using only the 23mm as our absolute; everything else right now is negotiable. Once the sketch is complete, I take a sharpie and draw lines through the center axis, both North/South, and East/West. With the drawing now roughly divided into four sections, Stacey and I decide which quadrant we like best. There is always one section that stands out as the best, which I marked with an arrow.
From here, just start correcting your marks in the other three sections to try to match your favorite. Rub off the lines that don't match and draw them again. You don't need perfection yet, but an extra l5 minutes here, will save a lot of time later on.
I start removing material, keeping the piece moving at all times, removing only a small amount of material in every section. The beauty of wax is that it is a very forgiving material, and will allow room for mistakes. When I'm ready for final corrections, I'll lightly file away my marks off of the top of the wax. This is where I'll have to eyeball the piece. The sketch was helpful in getting me to this point, but I find it is now a hindrance, because it was never totally accurate. With the marks gone, just lightly file wherever you feel you need some adjustment. Here you are flying strictly by the seat of your pants, striving for "Optically Correct". This is where it helps me to have Stacey sitting across from me, helping make those slight adjustments.
After about an hour of detail filing, we are happy with the overall shape and size ofour new pendant. I now cast the blank in Sterling Silver, and we are ready for the next step.
Making The Perfect Bezel
After casting, I use a 320 grit sandpaper and smooth out the top. I now take a piece of 1mm square Silver wire and bend it into a circle, about 6mm. I solder the two ends together and then using a brass hammer and a mini mandrel, I tap it round. After placing a 5mm stone on the bezel, I find it's a little big, so I saw out a piece, re-solder, and re-round. I ended up doing this 2-3 times before I'm happy with my new bezel. The photo shows the bezel in relation to the stone. The outside diameter is now about 5.4mm. Perfect! It's about a week later that I discover it's wrong. But I was happy for a little while….
Stacey and I then place the bezel on our blank, and move it around for about l0-15 minutes trying to determine center. Once Stacey is happy, I use a pair of self-locking soldering tweezers and carefully solder it into place. I then spent about the next 45 minutes moving it around until Stacey is REALLY happy. Once it's sweat soldered into its final location, I drill out the center, and the bezel is finished.
The Side Stones
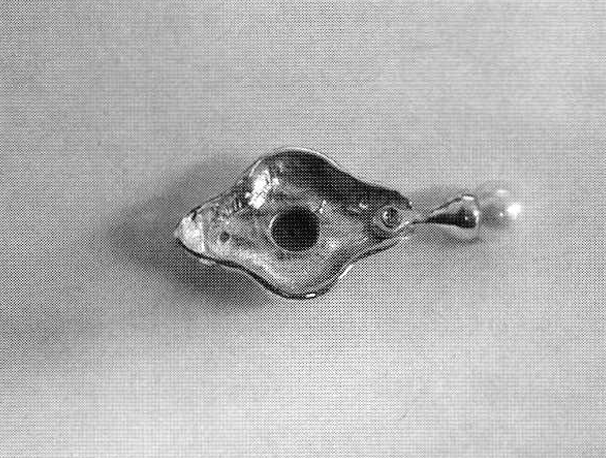
We decide that the small side stones are going to be 2mm each, gypsy set. So using our Sharpie, we place a dot approximately where we want the stones. We spend a few minutes, changing our minds and finally agree on the perfect location. Then using a 1mm round bur, I place a small indentation into the blank. I don't want to drill a hole in the model, because it can cause casting problems. What I'm doing is making an indentation that will show up on all of the wax patterns and make placing these stones very quick and uniform once in production. In this photo you can see the finished bezel and the indentation for the side stones.
The Dangle
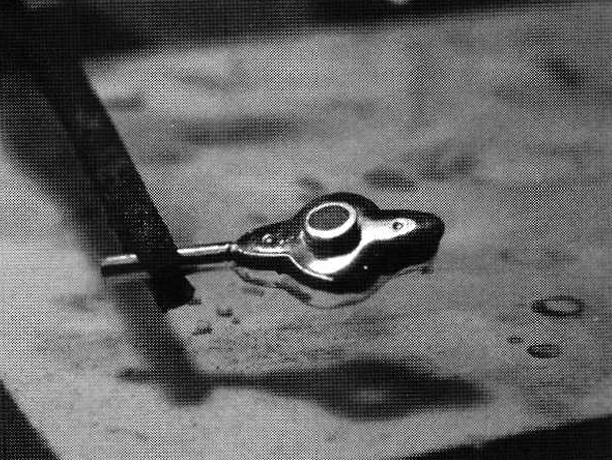
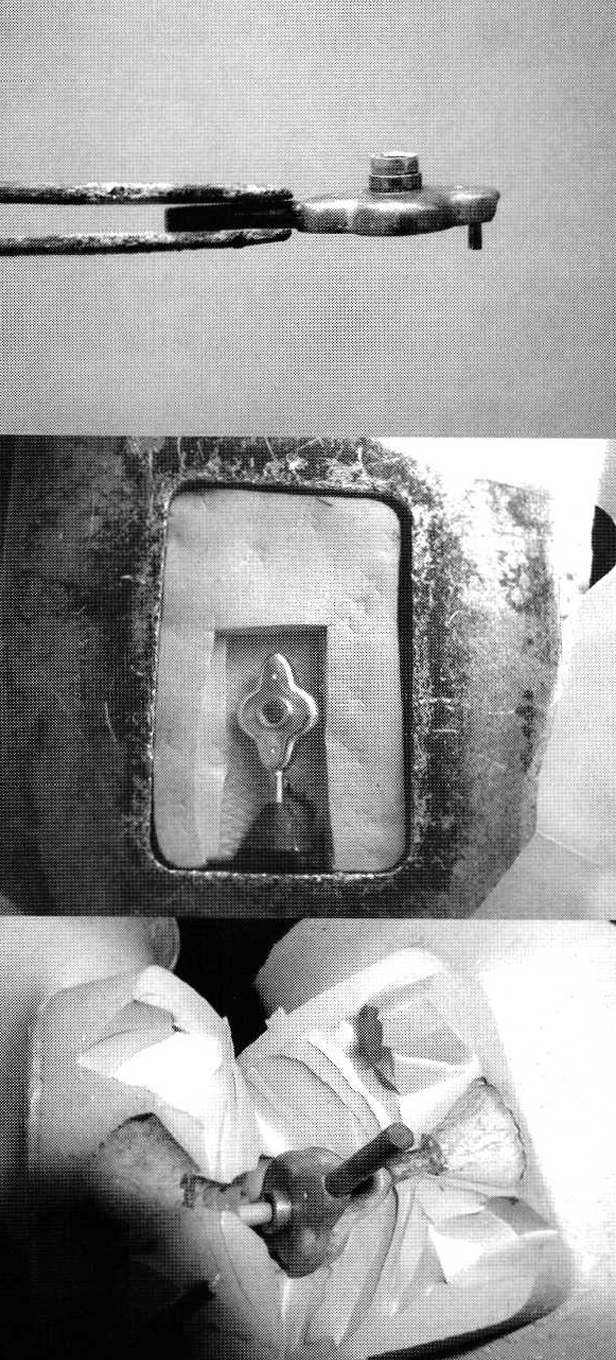
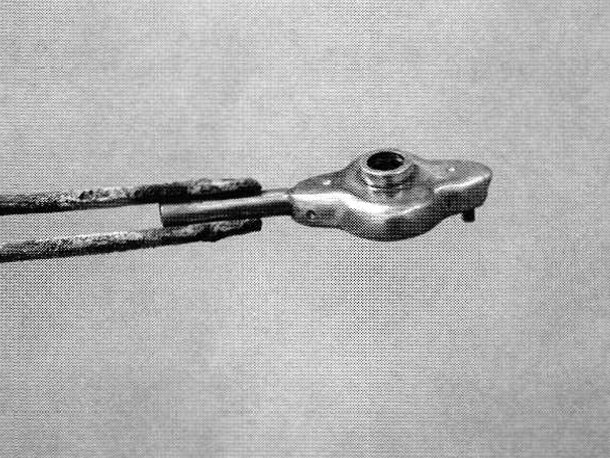
This has puzzled me since I first saw the sketch. As of now, I still have no idea how I'm going to pull this off. I need something that can be cast into the production model, and be relatively quick to assemble. So, what I came up with was using a bead cap from one of our earlier designs (shown in photo) and a rivet. The cap on the top was the perfect size, and it allowed me to reuse a piece that I already had in production. (By the way, it seldom works out like that.)
I grind away some of the back of the pendant to allow clearance for the cap, and I solder a 1.5mm round wire about 2mm from the bottom, and slipped one of the bead caps into place. Stacey and I both agreed it needed to be moved, so we played with the wire for a few minutes until it just screamed perfect.
I leave the wire about 6mm long because it will be trimmed in the finish out. My plan, which actually worked, is to place the finished cap over the wire, trim the wire to about l mm above the cap. Then, using a small ball bur, hollow out a little of the wire and flair the ends. This will secure the cap to the pendant, while still allowing the piece to dangle freely.
We're finally done with the model.
Making Our First Production Run
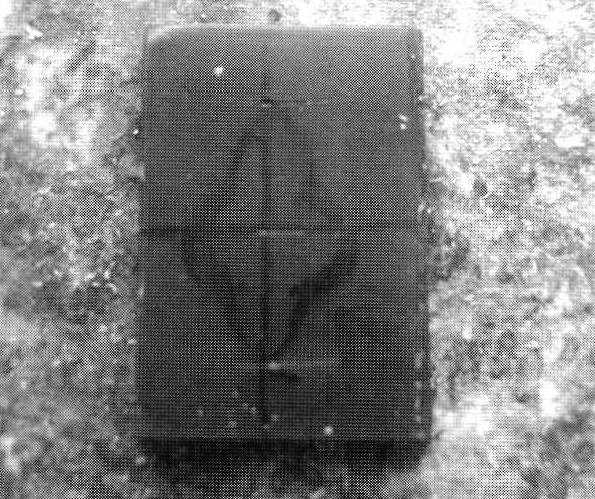
This is where all bench jewelers learn patience, understanding, and the ability to laugh in the face of adversity. I guess you've realized by now it didn't go as planned. Remember my perfect bezel? It was too small. It was here that I realized that I didn't take into account the rubber mold shrinkage factor. I know that "No Shrink Pink" is a wonderful product, and a huge improvement over earlier molding rubbers, but it still shrinks! So, go back to the "Making the Perfect Bezel" section add about 1mm to all of my measurements, and then you'll have the perfect bezel.
I now remake the bezel, which you can see in this photo. The oldbezel is just sitting on top ofthe new bezel to show the difference in size.
I make another rubbermold, and inject a couple ofwaxes. My mold lines go right down the side of the pendant, just where I placed them for easy cleanup and removal. The bezel looks good; the wire on the back is clean and smooth. I'm happy, so let's make a few.
The First Two Pieces
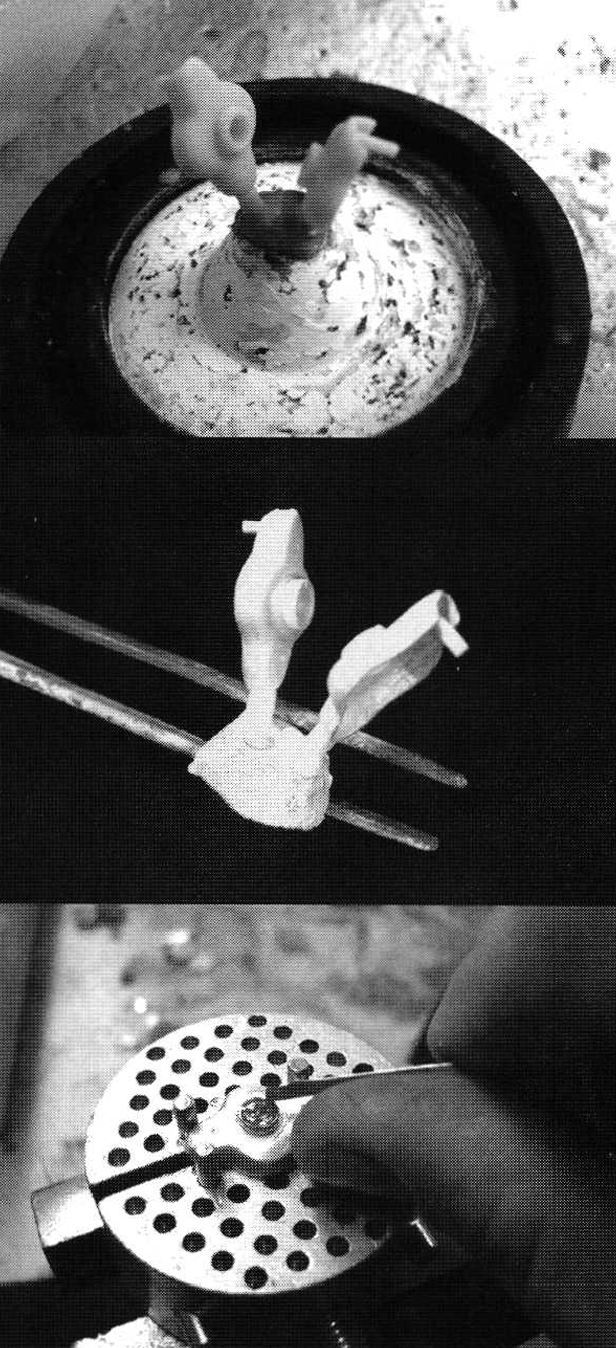
This photo shows the two waxes sprued and ready to cast. The next photo shows the actual casting. Everything came out just fine, there were no surprises in the casting, so I'm ready to clean, polish, and set.
My NOW perfect bezel is just the right size. Setting of the first stone begins.
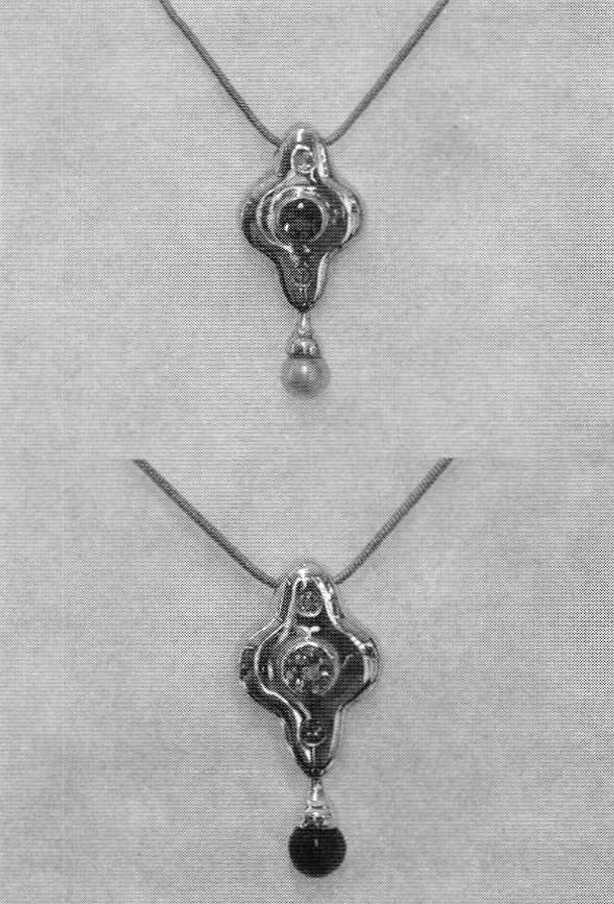
Stacey decided on a 5tnrn Pink Tourmaline, with 2 small Aquamarines, and a Pearl on one piece,and a 5mm Blue Topaz. with 2 small Pink Tourmalines, and an Amethyst bead on theother. We decidetouse a 1mrn Sterling Silver Chain. It is here I discovered another annoying little problem.
Oops
I meant to placeguide indentations into the original model for the chain. With a pendant like this, there is no real landmark to guide you in drilling holes for the chain. Each time I make a new pendant, I'll have to mark and measure where to drill my holes. This takes about 15-20 minutes on each pendant.I now go back to my original, and carefully place the holes. I start with a small drill bit and a piece of thread to see how the pendant is going to hang. I move up in drill bit size and enlarge the holes about 4 times until I'm happy with the way the pendant hangs. Because I don't want to leave a hole in the model due to casting concerns, I simply plug the holes on each side of the model with a gold wire, and solder it in place.
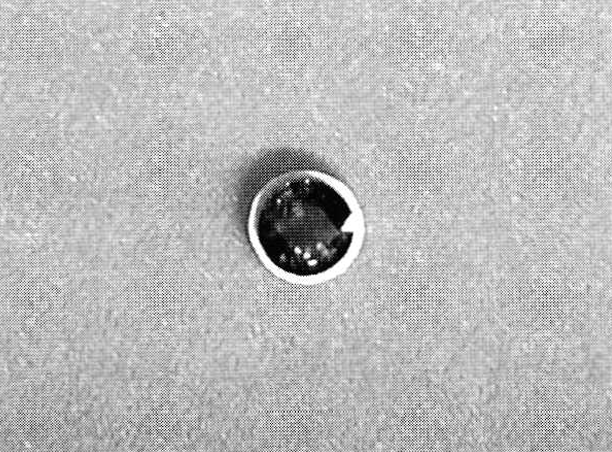
After I clean up and polish, I can clearly see the end of the goldwire. Using a small round bur I place a indentation and make onemore rubber mold. This photo shows the finished indentation. Now every time I make a new pendant, I just drill through the indentation, and insert the chain. I've reduced a 20 minute operation down to about 1minute.
In Conclusion
I like it! And most importantly, Stacey likes it. From a bench jeweler's standpoint, this was a pretty tricky piece. We have 3 elements to combine, with 3 different styles of gemstone setting. When I decided to write a column for this publication, I decided all of the redo's and mistakes had to be included. I had to go back and correct my original model 3 times and make 3 different rubber molds. Is this unusual? Not really. Any one of the connections could have been left alone, and let stand. But anytime you can spend a couple of hours on your original and shave off30-45 minutes of production time on each new piece, is time well spent.
Next time we'll be working on a piece we call "Sisters" which you can see in photo 16. Ifyou have any questions, you can contact Stacey or I at "koehlerc@bellsouth.net".
Related Articles

Al Pine: Conceptual Exploration

The Work of Georg Bunz

Susan Hamlet: Culture Of Materials

An Interview with Anne Stachura


The All-In-One Jewelry Making Solution At Your Fingertips
When you join the Ganoksin community, you get the tools you need to take your work to the next level.
