
How to Hammer Metal
Stand straight, facing the work. Once you get yourself into this correct body posture, use your feet to move yourself so that your arm is comfortably bent to slightly greater than a right angle, with the face of the hammer resting on the metal to be formed..
5 Minute Read
Whether you're flattening a small piece of wire or making a punch bowl, good hammering practices are uni- versal.
Hammering can be a satisfying and Zen-like experience when you are hammering comfortably and effectively. Proper alignment of the torso, arm, and hammer improve accuracy and avoid muscle strain. When hammering, keep your upper arm in a relaxed position with your elbow hanging directly down from your shoulder and your forearm perpendicular to your body. Stand straight, facing the work.
Once you get yourself into this correct body posture, use your feet to move yourself so that your arm is comfortably bent to slightly greater than a right angle, with the face of the hammer resting on the metal to be formed.
Keep Your Stance: Move Something Else
Stand so that your hammer, shoulder and elbow are lined up in front of the metal and your body is to the side of the work. This allows the hammer to come down in an arc that is perpendicular to your body.
If you need to sit instead of stand, orient yourself in the same way by moving the chair. Sitting side-saddle or twisted at the waist restricts the limbs from moving freely and can strain your muscles. Many people like to sit for fine work and stand for heavy hammering, such as forming a large vessel. One advantage of standing is that it is easier and more natural to move your body into a comfortable, non-fatiguing, non-straining posture.
Whether standing or sitting, the working height is important. Set things up so that when your arm is bent at a right angle, the hammer is slightly above the metal. If the hammering surface is too high, there is a tendency to hitch the shoulder up, raise the elbow, or stick the elbow out — all of which stress the body and reduce accuracy. A hammering surface that is too low may be hard on your back, but it tends to be better than a surface that is too high. If you find that you need to reach up to hammer, it is best to use a small platform to elevate your body. Quick and easy platforms can be made from phone books, cement blocks, bricks or a few two-by-fours and a piece of plywood nailed together.
Wear ear protection to protect your eardrums from the hammer noise and comfortable leather gloves to dampen vibrations, prevent blisters and improve gripping power.
 | Betty Helen demonstrates the proper stance. Notice how her right shoulder, elbow, and wrist are in line with the work. The proper grip on the hammer is relaxed, with fingers and thumb comfortably encir- cling the handle. |
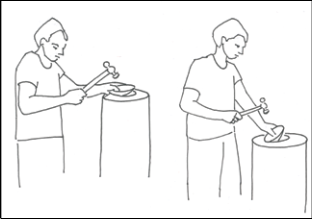 | Avoid working on a surface that is too high, as shown on the left. This cramps your shoulder and wrist, leading to loss of control, discomfort and possible injury. |
Hammer Grips to Avoid
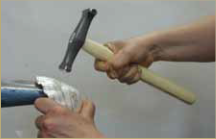
 | Do not point your finger along the handle- like this in the long term, it can lead to pain. |
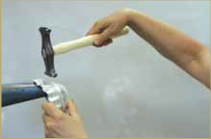
 | Do not clench the handle in a white-knuckle grip like this. Also, it is usually better to hold the handle closer to the end rather than choking up like this. |
 | This shows an extreme version of working on a surface that is too high. Notice the extreme bend in the wrist: Ouch! |
Shake Hands with Your Hammer
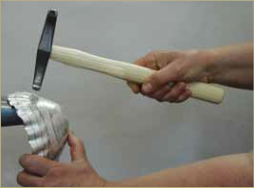
A handshake is more than just a polite greeting when it comes to hammers; it's the best way to approach them. When you pick up your hammer, reach out to it as if you were shaking somebody's hand and take hold of the handle. Use a relaxed, loose grip that will let the handle move within your hand. Grip firmly enough to guide the hammer but loosely enough that it can rebound easily.
Avoid putting your forefinger or thumb straight along the handle because this can cause tendonitis. It's generally best to hold the hammer near the end of the handle, but find the place that allows you to balance control with the force of the blow. Gripping the handle above the optimal point is known as "choking up" on a hammer. Though it's best to avoid choking up, there are a few occasions where it is acceptable, such as when you need to have control of a very heavy hammer.
Some people find it helpful to think of the ham- mering motion as being like the motion of throwing a ball. The whole arm works in one fluid motion. Start by appropriately orienting your body so that the upper arm is in a relaxed and stable position at your side, with a right angle at the elbow. The motion begins by lift- ing the hammer while holding the hand slightly upward from the wrist. As the hammer motion continues, the lower arm and hand move downward toward the point of impact so that when the hammer makes contact, the hand and wrist are in line with the arm. Avoid letting the wrist bend downward.
After impact, the wrist and the arm bounce up with the rebound of the hammer. At all times, the arm, the elbow, the wrist and the grip should be relaxed. Use your ears as well as your eyes—if you hear a single hit, then all is well; if you hear a double hit, that means your wrist or arm are tense, which is restricting the rebound of the hammer.
As you learn how to hammer comfortably and ef- fectively, maintain this upper body position and rela- tionship to the hammer as your work progresses. Move either the work or your feet, but not your arm/hand/ hammer arrangement. Avoid hitting sideways, back- wards, or any-other-ways. Hammering should main- tain a natural arcing motion.
Think of being a "hammering machine." The arm, the hammer, and the stake maintain a constant rela- tionship. The hammer keeps going in the same com- fortable position while the metal is moved over the stake. Find a rhythm. Some people are like a staccato machine gun: ratatatatatatatat. Some hammer in 4/4 time: bububuBUM or HUPtwothreefour. Your natural rhythm will provide a consistent surface, keeping things even, and increasing your stamina
 |
Purchase your own copy of “Creative Metal Forming” today. |
Related Articles

Making a Pearl and Diamond Ring

All About Jump Rings

CAD/CAM Techniques

How to Make a Plique a Jour Fairy


The All-In-One Jewelry Making Solution At Your Fingertips
When you join the Ganoksin community, you get the tools you need to take your work to the next level.
