
Eutectic Process for Artistic Effect
11 Minute Read
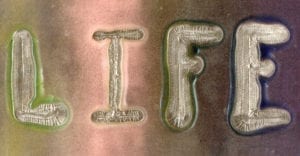
Some years ago, I was working on a cloisonné piece using silver wire on copper in my home studio and obviously was not paying attention to its firing time. I pulled the piece out and was intrigued with what had happened. The mistake of burning out a silver wire is quite familiar to anyone who has done cloisonné enameling. I asked myself, "What happens with this when it is taken a step further?" To my surprise, it is an actual process - a Eutectic Process.
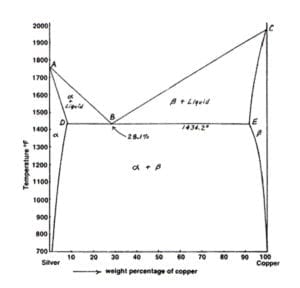
The Eutectic Process is defined as a mixture of two or more substances that liquefy at a temperature lower than both. After the mixture is cooled, one of the components will begin to separate into its solid form. The remaining liquid continuously becomes richer in the other component. Eventually, the composition reaches a point where both substances begin to separate simultaneously as an intimate mixture of solids. This final composition is the eutectic alloy and the temperature at which it solidifies is the eutectic temperature. The two metals are soluble in the liquid state yet when cooling is complete, the grains of the solid alloy consist of two distinguishable metals, one on top of another. Basically, if the silver wire touches the copper base when enamel is present (acting as a flux), it will begin to melt.
My experiments have been conducted using copper, fine silver cloisonné wire (flat or round), balled up fine silver, silver foil and lead free enamel. There are various factors that will help or hinder the outcome of each firing.

Surface: This process can be done on a flat or curved surface. A steep bowl can be more difficult because the silver will melt and pool in the bottom of the bowl. The copper can be polished or patterned. The flow of silver will accentuate etched markings in the copper or hammer marks.
Color: Certain colors seem to work better than others. I have found that blues, purples, tan, pink, orange and olive work well. Dark green doesn't allow the silver to flow due to the copper content within the enamel.
Fine silver: I use cloisonné wire, round and flat, or balled up silver. I have begun to do some experiments using the silver foil also.
Firing temperature: This can vary. I prefer to fire around 1650°F or hotter. The process seems to work quicker with more controlled and cleaner results. Torch firing is an alternative to using the kiln. This works well for large flows and repairs.
To get started, I clean the copper, coat it with a thin coat of enamel, and fire. Most of my work and experiments use transparent colors. I like to start with lighter hues because I can always add more enamel with the second firing to darken the color. The next step is to lay down the silver in a pattern or randomly, depending on the project. I use the round wire when there is a larger eutectic flow, (the thicker the wire the more silver expansion - 30 to 22 gauge). Cut strips from fine silver sheet work also. Next, I will add more color, keeping the sifted enamel away from the silver. Fire the piece in the kiln at about 1650°F for about 1 and half minutes. I don't use a pyrometer so this is a guesstimated temperature going off the color of the inside of the kiln. This process however, will begin to occur at the temperature of 1434°F. The hotter the kiln the faster the process works. I might open the kiln door to slow down or interrupt the flow. This can alter the silver expansion during the process. Watching the process through the peephole helps control the results. I fire each piece 3 - 5 times, with pickling after each fire. The more it is fired, the enamel around the edge of the silver starts to blacken and burn out, being that the coat of enamel is thin.
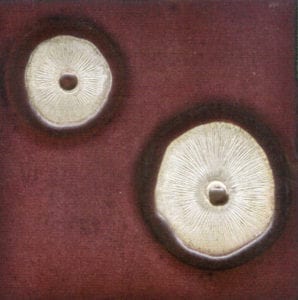
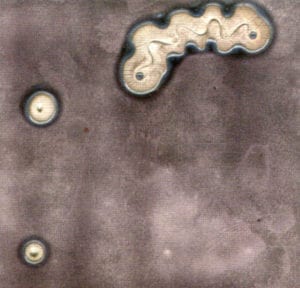
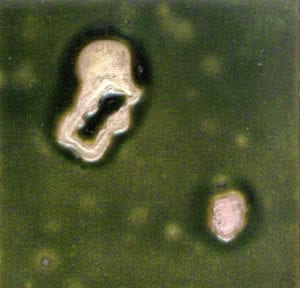
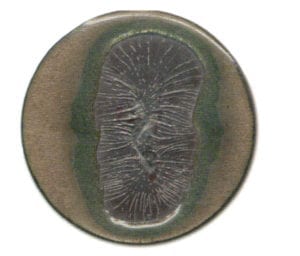
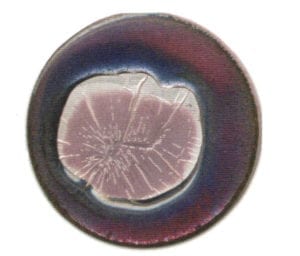
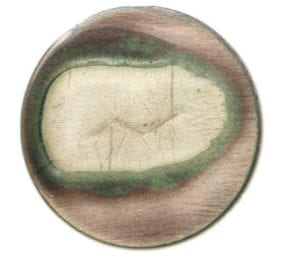
An interesting thing that happens with each additional firing is that a 'ring' appears around the edge of the silver. Firing it again will continue the eutectic flow but creates a new ring. This will continue only as long as there is still silver left to expand. Not only does the silver flow take place moving outward, but downward too. Next, I'll remove the piece from the kiln and let it air cool. The silver at this point has a black coating. Submerge the piece into Sparex (a Sodium Bisulphate pickling solution). After 5-10 minutes, the piece is removed, rinsed and immediately towel dried thoroughly. The silver now will have a whitish look with a hint of red (cuprous oxide). A glass brush will remove this layer and give the silver bright satin look.

On occasion, a silver piece doesn't seem to flow and I'm left with the ball or wire still in tack. This can be remedied by using an oxy-acetylene torch, heating the spot from the bottom until the enamel is glowing orange. This will normally get the silver to flow. This is also a good reason not to counter enamel until the last firing of which can be done at a normal firing temperature, 1450°F, and won't affect the eutectic silver. Again, it doesn't seem to work on medium and dark greens. Torch firing also works on a spot where the silver expanded under the enamel. This looks more like enamel over silver foil. By torching it from the bottom, the direct heat allows the silver to be brought back up to the surface and the enamel is pushed to the edge. The glass built up around the silver, adds a nice contrast in color and thickness. Depending on the color used, and the number of firings, the enamel may be left with a greenish ring. I like to utilize this with certain pieces. Using different color enamel on the second firing will leave multiple rings of enamel in different colors.
I have been asked, when discussing this process, about enameling the eutectic silver. Through research and experimentation, I have not yet mastered this step. What happens is oxygen is combined with the copper that is in the alloy. This causes fire scale. When the alloy is exposed to oxygen in the air at higher temperatures, the copper at the surface is converted to Cu2O (cupric oxide). This is the black color that appears on the eutectic metal after firing. Under that is a reddish layer (cuprous oxide). The problem with being able to enamel on this is that the metal deep inside is affected, not just the surface. This means that depletion silvering, or 'bringing up the fine silver' will not work. Silver has the ability to absorb oxygen into the metal where it bonds with the copper atoms. Bill Helwig suggested use of the Thompson Enamel 2000 series enamel - meant for copper and silver - and fire below 1450°F. This leaves the 'whitish' layer intact, which is necessary for the enamel to fire clear. He further reminded me not to speed up the pickling process by using nitric acid, because it etches away that essential layer. One should use Sparex, which does not dissolve silver.
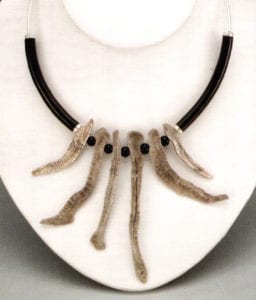
After enameling, I will finish my piece. It can be hammered and formed as well as cut and soldered. Glass brushing will give it a satin look, which can be buffed and polished. Finally, I like to coat the silver with a wax finish to help it from tarnishing.
I have been working with this process for about 6 years. The more experimenting I do, the more interested I become in how and why things are happening. I discover new results every time I work. This can truly be called an experimental technique. In doing a little technical research I have learned the following:
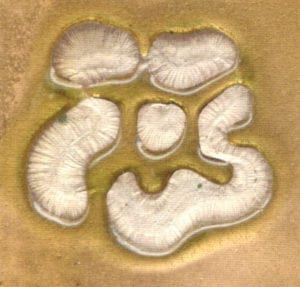
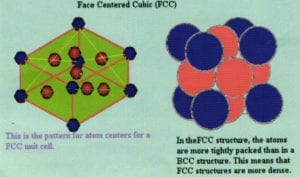
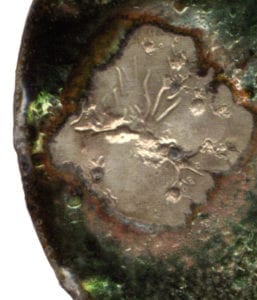
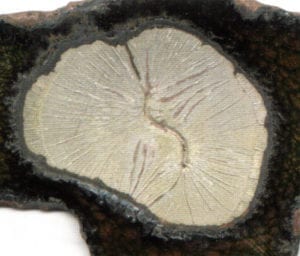
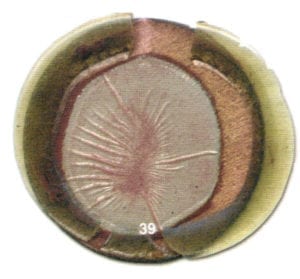
During solidification a crystallization structure is formed. These particular metals form an FCC, or face-centered cubic structure. The atoms are tightly packed, making them dense. They begin to bond together and grow at the points of nucleation. The sizes of these crystals that form depend on the number of nucleation points. Crystals will increase in size and grow until they impinge upon adjacent growing crystals. During freezing, the crystals in the liquid form follow a pattern called a dendrite, meaning branching, and resemble a pine tree. Eventually, the spaces between the dendritic arms are filled with yielding crystals and grow to form a more regular crystal. Adding an alloy element (eutectic), is one way to create defects in the crystals. This produces different atom sizes, which cause distortions when growth occurs. The entire microstructure changes to a new phase, or two phases may be present, as in this case.
Most metal will also experience shrinkage during solidification. This is another factor in diffusion, or the movement of atoms to new sites within a material. The liquid begins to cool first where it contacts a mold (that being the copper base that the process is taking place on). Therefore, the eutectic alloy solidifies from the bottom up.
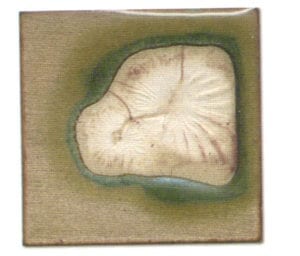
The linear coefficient of thermal expansion is a factor in this process. This describes the relative change in length of a material per temperature degree. When the metal is in a liquid state, energy increases separating atoms and causing the material to expand. Just as cooling will result in contraction. This can cause stress in a component resulting in the striations that appear on the surface.
References
http://www.ndt-ed.org
Society of American Silversmiths, Firescale Issues, Charles Lewton-Brain
http://www.handyharmancanada.com/hbpm/silver/silver.htm
Thompson Enamel Workbook, Woodrow Carpenter, Bill Helwig, Tom Ellis, pg. 10, Copper-Silver Phase Diagram
http://www.ul.iel-walshenlfup/unit%20cell%20bup1.htm
http://www.ndt-ed.org/EducationResources/Community-College/Materials/Structure/solidification.htm

Related Articles

Klaus Fessmann Draws Delicate Sounds

Award Winning Ring by Ryan Roberts

Gerda Flöckinger: First Lady of British Jewelry

Eva Kucerova


The All-In-One Jewelry Making Solution At Your Fingertips
When you join the Ganoksin community, you get the tools you need to take your work to the next level.
