
Different Methods of Cutting Azures
Azure is the American English derivative of the French term a jour or adjoure. An azure is a countersunk cutout on the back of jewelry, behind bead, channel, or flush set diamonds. Usually azures are a square or triangle shaped, resulting in what looks like bright cutting on the backside of the jewelry. It is an important aspect of diamond setting that is often neglected today.
3 Minute Read
Azure is the American English derivative of the French term a jour or adjoure. An azure is a countersunk cutout on the back of jewelry, behind bead, channel, or flush set diamonds. Usually azures are a square or triangle shaped, resulting in what looks like bright cutting on the backside of the jewelry. It is an important aspect of diamond setting that is often neglected today.
Reasons for Cutting Azures
- Allows light to enter the stone from the back. (With the modern cut of diamonds, this is no longer a major issue as it was 100 years ago)
- Makes it easier to clean behind the stones.
- Removes the burs left from drilling the hole.
- Adds an additional design element to the jewelry.
- Removes excess metal from the jewelry making the piece lighter in weight. This is of more importance in larger pieces of jewelry, especially earrings.
- Provides the jewelry a Professional looking finish.
The Traditional Method
Traditionally, bench jewelers would either hand cut azures with a graver, or feed a saw blade through each hole and meticulously cut each opening. Although resulting in fine cut azures, both methods are extremely time consuming.

A Simpler Method
Many jewelers today cut azures using a bud or cone bur. This produces a round cone shaped cutout. This method is quick and easy, and it does remove the burs left This antique broach is a fine example of azures cut on the back side of the jewelry.
from drilling and allows for easier cleaning behind the stones. Although, better than no clean up at all, it does lack in adding a design element to the back of the jewelry. It also does not maximize the removal of metal to lighten the weight of the jewelry. This method should be seen as the minimum requirement, and avoided on finer, high-quality jewelry.
Cutting Azures Using Burs
Professional looking azures can be cut fairly easily using a combination of bur in considerably less time than cutting by hand using gravers or a saw.
Cutting Azures with burs is an advanced technique. Only bench jewelers who have developed their skills of cutting with burs should attempt it. As with learning any new technique — practice cutting azures on a piece of scrap metal before attempting to use this technique on actual jewelry.
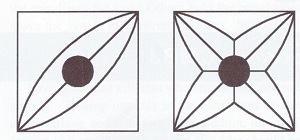
Although a square shaped cutout is most common, a number of different patterns or combination of patterns can be created with azures. Before beginning to cut the azures sketch different pattern designs to find one that is most pleasing to you, and fits the area of the jewelry. By combining triangular, square, pentagon, hexagon, or octagon shapes a variety of designs can be made.
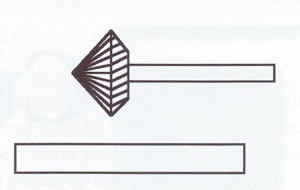
To begin, cut a tapered hole with a bud bur in the backside of the hole drilled for the stone. Then, using a hart bur held perpendicular to the jewelry, cut the corners in each hole. Start at the center of the hole and cut a line upwards to the surface to form each of the corners.
Cut across the hole forming two oppisite corners. Then, cut the remaining two corners forming an X cut over the hole.
Next, use a small wheel bur to clean away the metal between the corners. Use the end face of the bur to cut the flat side of the azure.
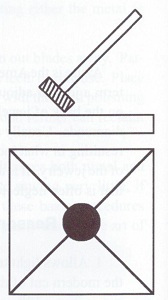
Caution: Make certain you hold the bur at an angle to the surface of the jewelry. Cutting straight down will remove the metal needed for the seat to hold the stone.
Then use a polished flat graver to clean up and polish your cuts. If necessary, a small bristle brush with rouge can be used to polish the azures. With a little practice, you can easily cut professional looking azures in just a few minutes.
Related Articles
Re-tipping Platinum Prongs

Step by Step Guide to Fishtail Settings

Flush Setting Round Brilliant Diamonds in Platinum

Custom Antique Coin Pendant


The All-In-One Jewelry Making Solution At Your Fingertips
When you join the Ganoksin community, you get the tools you need to take your work to the next level.
