
Bead Setting Method – Part 3
3 Minute Read
In past issues of BENCH magazine, I have dealt heavily on making a bead raiser and using it to bead set diamonds, and I have a CD on this topic for sale. Some of you out there are probably asking, "Gerry, there must be an easier method to secure diamonds or small colored stones?"
Well guess what, there are. In my setting class I always teach my students the hardest methods first, and then navigate them through the advanced stone setting. So relax, read, enjoy and learn another option we have of making beads without any straining of your hands or upper shoulders in forming each of these little items of joy.
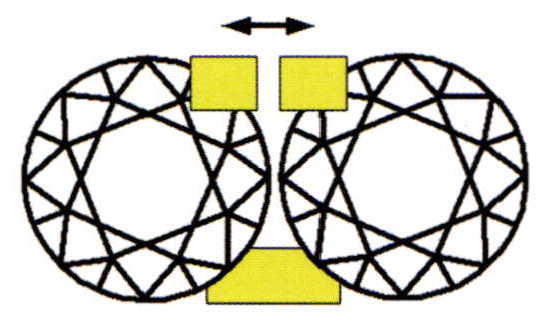
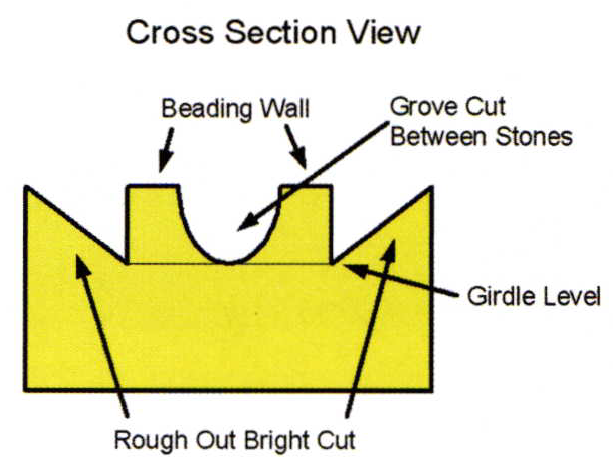
The method involves splitting a very thin bar with the help of a thin #39 or #40 flat graver. To start open the hole for the diamond exactly the same size as the stone. Drop the level of the girdle just a tad lower than what you have been doing normally. You want the table of the stones to be just below the surface of the metal.
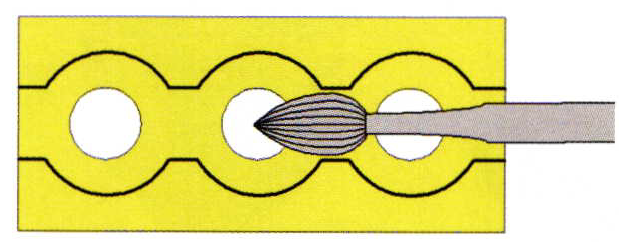
Next use a #06 bud bur and run it very carefully through the midpoint between the holes. You will see a little groove forming down the center of where the stones will be set. DO NOT make this grove too wide or the beads will be too thin. When you have almost reached the depth of the girdle of the stones, speed up the bur to make a smoother finish.
Next rough out the bright cut along the sides of the stone holes with a graver. The metal left between the bright-cut and the groove you cut will form a beading-wall. What you have created is a narrow deep channel in between two little walls. Always maintain the same thickness of the two walls and they must not be too thin or the subsequent beads will not have the strength to hold the diamonds securely! It should be clear now that ifyou cut the initial groove too wide it will in turn makes the bead thinner. I cannot over emphasize this fact!
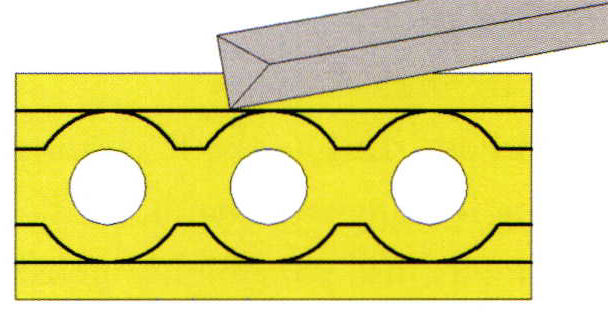
When you are rough-cutting, don't let the graver cut too much off of the walls either. Accentuate the cutting angle AWAY from the wall areas. Gradually cut deeper into the metal to rough out the bright-cut. Then use a highly polished graver to finish the bright-cutting.
Place the stones intothe holes and make sure the diamonds are all at the same level.Then use a flat-facedgraver with the face or leading edge cut really thin. Place the graver in the middle of the wall. Split the wall inhalf and very carefully bend it over the girdle and upper facets of the stone. Check with a 10 X power loupe that the amount of metal being placed against the Crown Facets is even and ON the diamonds surface.
There is a little trick I now use to keep the graver from slipping and cutting off a bead, and that is to have the leading edge of the fat graver slightly scored or roughed on the edge. If you have your graver sharp as nails it might slice off through the wall and cut off the bead as it is being pushed over the stone.
Next, burnish over the beads with your beading tool and round off the tips of the beads. You need to cup each bead and then push them slightly onto the diamond, while smoothing out the bead tip.
Next, you need to clean up the area where the splitting occurred.I use a smaller #004 bud bur and run it VERY CAREFULLY between the beads. This aesthetic cleaning will leave your bead setting looking well maintained!
Finally, use your highly polished flat graver and retouch any ofthe bright-cutting.
Related Articles:
Bead Setting Method - Part 1
Bead Setting Method - Part 2
Related Articles
Diamond Setting Applications

Diamond Gemstone Properties
Diamond, The Brilliant Ice
Diamond Grading System


The All-In-One Jewelry Making Solution At Your Fingertips
When you join the Ganoksin community, you get the tools you need to take your work to the next level.
