
Cut Loose – Wax Carving Basics Part 1
If you are accustomed to working in this additive fashion, the subtractive process of carving wax may be daunting to you at first. It challenges you to find a form, such as a ring, that is trapped in a block of wax. You must get an image of the piece in your minds eye, and then remove excess material until you have created that image. Sound tricky? Well, it does not have to be..
8 Minute Read
This article talks about the wax carving basics that every jewelry needs to know when creating wax models and patterns for jewelry creation.
The most natural way to make things is to build. When you erect a house, for example, you pour the foundation, construct the frame, put up walls, and so forth. The same process of addition is used in jewelry fabrication. To create a ring, for example, you may form a shank from sheet, build the setting from wire, and solder the two pieces together.
If you are accustomed to working in this additive fashion, the subtractive process of carving wax may be daunting to you at first. It challenges you to find a form, such as a ring, that is trapped in a block of wax. You must get an image of the piece in your mind's eye, and then remove excess material until you have created that image. Sound tricky? Well, it doesn't have to be.
If you follow a logical progression of removal of material, and continually redraw layout lines, you can feel more at ease when carving wax.
Discovering Your Process
If you are creating a master model from carving wax, take heart in knowing that you are working with an amazing material. Carving wax is ideal for creating complex curvilinear forms, sweeping curves, and most anything that would be difficult to construct from sheet, wire, or tubing. It is capable of being highly detailed, machined, and polished-and it is extremely forgiving. For example, if too much material has been removed, it can be built up again by simply adding wax. Unlike working with metal, where a tight fit is required to successfully join two pieces, a good fit is totally unnecessary with wax; gaps can be filled in easily with molten wax.
But as fortunate as you are to be working with such a forgiving material, it doesn't make the process a breeze. Each of you will develop your own carving process. Mine consists of three phases: avoidance, amateur hour, and flow. Avoidance starts when the design is transferred to the wax. I can think of a million things to do before starting to carve-I am loathe to do anything that will remove my layout lines. (To be honest, avoidance starts when it's time to work up an estimate and give it to the customer, but that's another story.)
When I've finally taken the plunge and started carving, I reach a point that I call amateur hour. This happens when the piece suddenly looks like a mess: The precise layout lines are lost, and I'm staring at a loose, nebulous form. (Amateur hour is actually a misnomer, as this phase of the carving process can last for many hours.) In my early years as a master model maker, this phase would put me in a panic. It would last 3/4 of the way through a project and felt like it would never end. But then something magical would happen. One little section of the piece I was carving would start to tighten up, and as the form started to emerge, the panic would ease. I'd work away at that area, then the adjacent areas, continuing all around the piece. Miraculously, the form would become defined, and I could move on to enjoy the easy final phase of my carving process: flow. Which speaks for itself.
I've come to accept amateur hour as part of my job: It's the nature of the process for the piece to be a mess at some point. Perseverance is the only way through it. As you become more skilled, this uncomfortable phase shortens considerably.
Experimenting with Design
Some of my favorite jewelry is the result of working serendipitously. Instead of starting on paper, sketching the jewelry and creating color renderings, I start with a block of wax and an open mind. Approaching design this way allows the process of carving to inform some of my design decisions, and it's a fantastic way to discover a new collection.
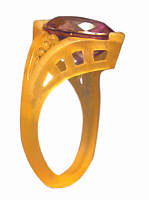
When working in this manner, I usually start with a vague idea of what I'd like to create. For example, in the step-by-step project illustrated in this article, I planned to create a ring with a pear-shaped center stone, the point of which I wanted tipped low. With that in mind, I worked my way through the important known parameters first-cutting a ring blank wide enough to accommodate the stone, opening the blank up to the proper ring size, determining the overall height of the ring, and cutting a bezel for the stone. Then the fun started.
I began removing the bulk of the excess wax around the stone and shaping up the shank of the ring. In the course of working, the knife-edge shank curved up to blend into the bezel. I decided to remove the center sections of the bezel to make a partial bezel and V-tip prong.
As you can see, one design decision impacted the next until the ring was completed. In the end, I had a finished piece that I couldn't have conceived of a few hours earlier.
Laying Out a Ring
When you are creating a ring that is to be symmetrical, it is important to start with a ring blank that is squared off, has parallel sides, and has an inside hole that is perpendicular to the sides of the blank. Begin by drawing layout lines on the ring blank with dividers and a scribe. Hint: Dividers with sharp round points are best. If your divider tips are wide, file and sand them to sharp points.
Open up the ring blank to the proper size and scribe a line determining the thickness of the shank. Lay out the north/south and east/west axes on a flat side of the ring blank, then layout the height and profile of the ring. Trim up to, but not over, your layout lines, making sure to keep the shank perpendicular. Hint: Right-handed people tend to file off too much of the right edge, while left-handed people tend to file off too much of the left edge. Be aware of this and compensate for best results.
Use dividers to mark a centerline and two or more additional lines around the shank. Transfer the north/south and east/west lines around the side of the shank, and then to the other side of the ring blank. It is also quite helpful to transfer these lines across the inside of the shank. (Be careful not to scribe too deeply inside the shank, or you will have extra cleanup to do later.)
As you remove material, continually redraw the layout lines. If you lose the lines, it can be hard to find your way back to symmetry. It's also important to continually look and work all around the piece.
Seeing the Form
In order to see the form you are carving clearly, good general lighting is a must. Add a lamp that can be angled and you have the ideal lighting situation. You can adjust this light as necessary to show the highlights and shadows on the surfaces of the wax.
In addition to using good lighting, it can be helpful to cover the surface of the wax with a non-permanent marker or paint at various phases of the carving process. When you wipe off the excess, paint will remain in the scribed lines and surface imperfections, highlighting them. For best results, use tempera, poster, or gouache, with a drop of dishwashing liquid added to break the surface tension. When you have finished carving, the paint can be removed easily with water.
Carving and Scraping
Files (as well as wax burs and cylinder burs) are great for roughing out the overall form of a wax model, but using only files to carve wax is extremely limiting. Wax offers little resistance to a file; it is easy to catch an edge and file unevenly. In addition, the file blocks your view, making it difficult to see how it is affecting the surface of the wax. Files also leave rough marks on the surface that need to be removed. For these reasons, I use carvers and scrapers to transform a roughed-out wax into a refined, precise model.
When using scrapers, if you are not removing material with each stroke, adjust the angle of the tool. The object is to remove material, not burnish the wax. Removing too much material at once often results in over-cut and cracked waxes. It is better to remove material a sliver or a shaving at a time.
Oooops!
At some point, you'll need to repair a cracked wax or build up an area where too much material has been removed. There are some important properties to keep in mind when working with molten carving wax: It melts at approximately 240°F/116°C and is quite viscous. It has a crystalline structure that takes up to 24 hours to realign and harden when it has been melted. If you build up an area with the same wax from which the piece is carved, then scrape or file it right away, the consistency of the repaired area will be tougher than the surrounding areas. It's a lot like filing a board of pine and hitting a knot in the wood. This occurs because the crystalline structure of the wax hasn't realigned yet.
Instead of using carving wax for this type of app-lication, use build-up/repair wax, which is harder and ideal for durable repairs. It melts at approximately 230°F/ 110°C and is formulated to match the consistency of the original carving wax upon application and cooling (which takes about a minute).
To ensure a good bond between the waxes, it is absolutely essential to melt the area that is being repaired. Keep the piece still while the molten wax is cooling or the crystalline structure will not realign and the bond will be weak. While the wax is molten, look for trapped air bubbles and use a wax pen to coax them to the surface. If the repaired area has inclusions or strings when the pen is removed, increase the heat and be sure to melt the wax well. And don't forget to remove paint or marker from the area before melting the wax, as it may give the wax a porous consistency.
![]()
In association with
![]()
The award-winning Journal is published monthly by MJSA, the trade association for professional jewelry makers, designers, and related suppliers. It offers design ideas, fabrication and production techniques, bench tips, business and marketing insights, and trend and technology updates—the information crucial for business success. “More than other publications, MJSA Journal is oriented toward people like me: those trying to earn a living by designing and making jewelry,” says Jim Binnion of James Binnion Metal Arts.
Click here to read our latest articles
Click here to get a FREE four-month trial subscription.
Related Articles

5 Classic Casting Tips

Manufacturing a Free-Form Pendant

Custom Designed Wax Carving

Foredom Milling Assembly for Wax Components


The All-In-One Jewelry Making Solution At Your Fingertips
When you join the Ganoksin community, you get the tools you need to take your work to the next level.

