
China Painting on Enamel Process
Although enameling is a new art form for me, I came to it with many years of china painting experience. Painting on porcelain is a time consuming process. Each firing requires several hours, and three or more firings may be needed to complete one painting. A while ago, a friend showed me how to apply enamel to a small piece of domed copper. I was fascinated with the process and very impressed with the speed of the firing, and decided to try it using a propane torch. Playing with this new media was very exciting and before long I wondered if I could use the same china paint materials and techniques on enamel that I had used on porcelain. Much to my delight I found I could...What follows is a description of the simple painting process I currently use.
10 Minute Read
Although enameling is a new art form for me, I came to it with many years of china painting experience. Painting on porcelain is a time consuming process. Each firing requires several hours, and three or more firings may be needed to complete one painting. A while ago, a friend showed me how to apply enamel to a small piece of domed copper. I was fascinated with the process and very impressed with the speed of the firing, and decided to try it using a propane torch.
Playing with this new media was very exciting and before long I wondered if I could use the same china paint materials and techniques on enamel that I had used on porcelain. Much to my delight I found I could!
What follows is a description of the simple china painting on enamel process I currently use. Although I began enameling with a propane torch, I now use a small furnace with an electronic temperature controller.
Enamel Preparation
Domed circles or ovals of 18 gauge copper are cleaned with penny brite, dipped in a weak sodium bicarbonate solution, rinsed again in water, and dried. Liquid BC-303L, a medium fusing clear enamel, is applied to the back of the copper and allowed to dry thoroughly. This is the counter enamel. Enamel is then sifted onto the front of the copper and the piece is fired on a triangular stilt for 2 to 3 minutes, or until the surface is nice and smooth. The temperature of the furnace is set at 1490°-1500°F for the enamel preparation firings. Additional layers of enamel are applied if necessary. The objective is to have a nice smooth surface for painting. The edges of the copper are cleaned with an alundum stone after each firing to minimize firescale. This completes the preparation of the 'canvas'. A variety of enamels can be used for this painting surface. Some I currently use are 1030 Foundation White, 1040 Quill White, and 2030 Medium Fusing Clear. Sometimes I add a thin layer of a transparent color over the white to add a little color in much the same way that an oil painter might 'tone' his canvas. The possibilities for variety and experimentation are large.
Painting Process
Traditional china painting materials and methods are used for creating the images. See Figures 1 and 2. To start, a small amount of dry paint is mixed with heavy mineral oil. Use a small palette knife and grind the paint and oil together on a piece of ground glass using the knife in a circular motion. Mix until the paint is smooth. The combination of dry paint and oil should be such that the final mixture has the consistency of toothpaste. Transfer the mixture to an airtight container. It will keep indefinitely. A covered glass palette holds small dabs of paint that are currently in use and also provides a surface on which to work. The cover keeps the paint free of dust between painting sessions.
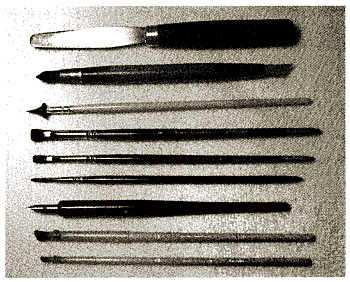 | 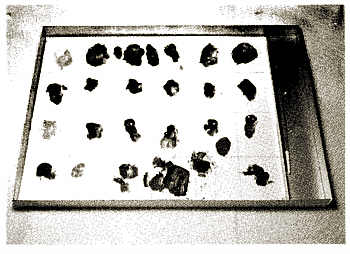 |
| Figure 1. Tools, from top to bottom: palette knife, two wipe-out tools, two square shaders, small pointed brush, crow quill pen. two deerfoot stipplers. | Figure 2. Aluminum palette with a glass insert. Not pictured: square grinding glass. painting and mixing oils. and vials of dry paint. |
The painting is done in several stages:
- Sketching the image.
- Blocking in hair, clothing, facial color, flowers, etc.
- Refining the painting.
- Adding detail.
- Application of gold.
Sketching the Image [Figure 3]
On the glass palette, mix a small drop of anise oil with a small amount of dark brown paint, using a clean brush. The ratio of paint to oil will greatly affect the handling of the paint. Too much oil and the paint will spread out, not enough oil and the paint will not flow. Begin by mixing one part oil to one half part paint and adjust as needed. Scoop up the paint/oil mix with the brush and deposit it to the underside of the crow quill pen. The loaded pen is used to sketch the image directly on the enamel 'canvas'. A good paint/oil mixture allows the paint to run off the nib of the pen using very little pressure, resulting in a very fine line that holds its shape. The rubber wipe-out tools are used to remove unwanted lines and to push the paint around the enamel surface. Blot the wipe-out tool on a paper towel after each use to keep it clean. I feel the initial sketch is of primary importance. The expression and gesture of the image is the focal point of the whole work. Part of the beauty of china paint is the ease with which the paint can be moved and manipulated with wipe-out tools. Unwanted paint can be wiped off with moistened toothpicks and cotton swabs, too. The initial sketch can be very loose, or very detailed, depending on your own personal preference. When I am satisfied with the image, the enamel is fired on a triangular trivet for 60 seconds with the furnace temperature set at 1470°F; this temperature setting is used for all the paint firings. After the enamel cools, clean the edge with a green nylon pot scrubber. Do this after every firing to minimize firescale.
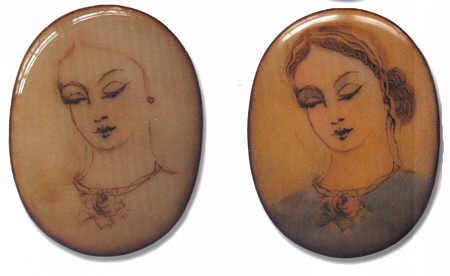 | |
| Figure 3. Initial sketch of the image. | Figure 4. Blocking in color. |
Blocking the Color [Figure 4]
Begin by putting a small amount of painting oil in a small shallow dish. Painting oil is a mixture of 8 parts oil of copaiba, 1 part clove oil, and 1 part lavender oil. Dip a square shader brush in the oil and then blot the oil out on a paper towel.
Use a soft quality towel to avoid excessive roughness to the brush hairs. Now use the brush to pick up any of the colors on the palette and transfer them to the enamel. If a new color is desired, the brush is cleaned by working it into the oil, and blotting on the paper towel as before. Paint edges can be softened with the tip of the square shader brush. Stipplers are good for softening paint edges, too. They are used dry, i.e. without using any oil. They are used with a pouncing motion on the paint to smudge it. The stipplers are cleaned by wiping them on a dry paper towel using a circular motion. The 'feel' of china paint is very different from painting with regular artist oils, acrylics, or watercolors. There is no 'grab' of the paint by the support. I describe china painting as sweeping glass beads on a glass floor. The floor corresponds to the enamel surface, the glass beads represent the china paint, and the broom is the brush. Every touch of a brush or tool moves and removes paint very quickly. Keeping this analogy in mind may help to understand the behavior of the paint. When I am satisfied with the blocking in of the color, the piece is fired again for 60 seconds. The 60 second firing does not fully mature the paint, but it is enough time to permanently secure the paint to the enamel so that additional painting will not disturb the previous work.
There will be some leeway in the firing time depending upon the size of the piece and individual furnace characteristics. The paint will appear a bit dull when slightly underfired. At full maturation, the paint will be glossy. Over firing will just burn off the paint. Paints that are rich in iron oxide will burn off and sink down into the enamel, leaving little dents in its surface. If you have overfired a piece, simply repaint and fire again, adjusting the time appropriately. Since my method uses very little oil, it is not necessary to burn extra oil off before firing.
Refining the Painting [Figure 5]
More color can be added now, anywhere you desire, each time firing for 60 seconds. Values can be deepened, background colors added, etc., depending on your own painting style. Remember that most of the paints are transparent and will shine through each other.
Adding Detail [Figure 6]
Finally, any additional lines are added using the crow quill pen as described earlier. The final paint firing is done for approximately 75 seconds, or until the paint has a glossy finish.
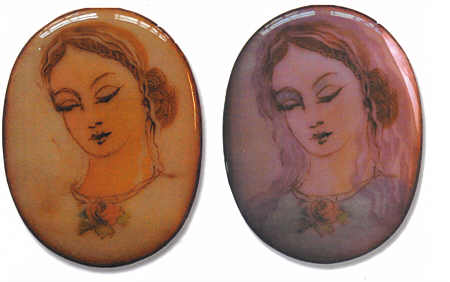 | |
| Figure 5. Adding more color. . | Figure 6. Adding final detail. |
Adding Gold [Figure 7]
Burnished liquid gold can be added if desired. It is applied with a crow quill pen or small brush reserved only for gold use. After the gold has dried, it is fired for 60 seconds at 1470°F. While the enamel is still warm, the gold is polished with a glass brush. Lavender oil is used sparingly to thin the burnished gold if it becomes too thick from standing open during use Gold can easily overpower a small painting. If I am not sure how it will work in the overall design, I use a gold craft pen first on the enamel to see how it will look. If I find it does not enhance the painting, it is easily cleaned off. If it looks good, I clean it off thoroughly and proceed with the real gold.
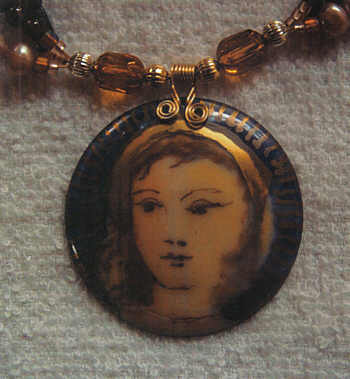 |
| Figure 7. Image with gold. |
Note: I have only had mixed success applying gold. I am still experimenting with the media to come up with a method that will yield consistent results. Before adding gold to a piece, I suggest testing its compatibility with your materials.
This Concludes the Painting Process
There are some things to keep in mind when using china paints. Some yellows, browns and reds contain cadmium or selenium. These chemicals don't mix well with other colors, and I suggest avoiding them when possible. Also, the high gold content colors, which include many pinks, purples and rubies, need a hotter and/or longer firing to mature. For those colors I use glass paints, which are formulated to mature at a lower temperature.
Occasionally, I find a paint that changes color completely after firing, or has some other undesirable effect. I just make a note of it and don't use it again. It is important to use good quality brushes designed for china paint. With proper care, they will last a long time. To clean stipplers, brush them perpendicularly across a good quality paper towel to remove any excess paint. I wash them about every 6 months, depending on how much they have been used, in a liquid grease-cutting detergent. Allow them to air dry and store in a dust free box. Other painting brushes are rinsed in painting oil, and finally, pure clove oil. The excess oils are blotted on paper towels. It is important not to store brushes in the painting oil, since the oil of copaiba will eventually harden and be very difficult to remove. The final rinse in clove oil removes it and keeps the brush nice for the next painting session. Store the brushes flat in a clean box in a manner that will not bend the tips. The method presented here is only one way to paint. Most china painters develop their own styles, which may be very different than what is stated here!
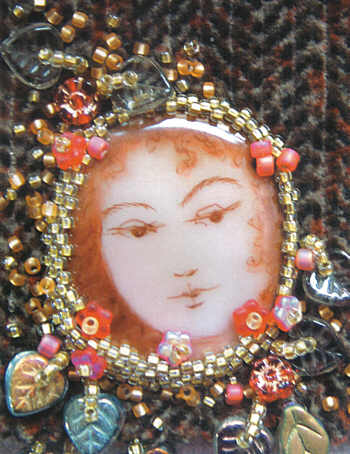 |
| Figure 8. Enameled piece with beadwork. |
In closing, I would like to say that combining china painting with enamel has been a lot of fun. I am able to employ a painting process I enjoy, on a surface that can be fired in seconds rather than hours! Perhaps there will be something of value here for other artists. Finally, I would like to thank Phil Roode, who is always there for me, Roman Orlik, who taught me to be an artist, and Tom Ellis, who gave me generous and unfailing enameling advice.
Editor's Note: This article should not be considered as a recommendation for using china paints on glass coated metal. The intent was to show that it is generally a workable procedure and a time saver for those who either normally paint on a clay base ceramic, or have inherited a supply of china colors. With the lower coefficient of expansion of china paints, the results are sometimes marginal.
Related Articles

Sansone Studio: Ancient Enameling Techniques

Josiane Tragesar’s “A Way of the Cross”

Portrait with Enamel Watercolors

Commercial Enameled Art Projects


The All-In-One Jewelry Making Solution At Your Fingertips
When you join the Ganoksin community, you get the tools you need to take your work to the next level.
