
5 Classic Casting Tips
7 Minute Read
These slow, quiet days of summer are always a good time to review your shop practices before the busy holiday season kicks into high gear. To help you prepare to successfully cast all of the pieces you hope will be big sellers this year, we've compiled some of the best casting tips that have filled these pages over the years. From easier wax carving to minimizing metal waste, these tips are bound to have you casting like a champ just in time for those holiday orders.
5 Classic Casting Tips Best Practices from Industry Experts
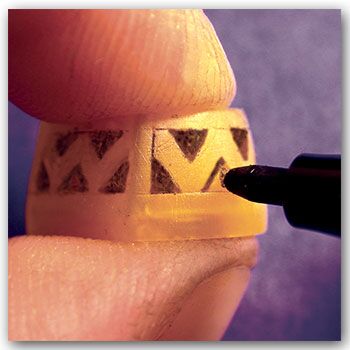
Brush Up: Drawing Patterns on Carving Wax By Kate Wolf
When drawing a layout on carving wax, I use black brush markers, which are available from arts and crafts supply stores: If I don't like the pattern, I can wipe it off and draw it again. However, a marker's ink will tend to bead up on the wax surface. To break this surface tension, I wipe the marker across a bar of soap before I begin drawing. Now the ink will evenly cover the surface of the wax.
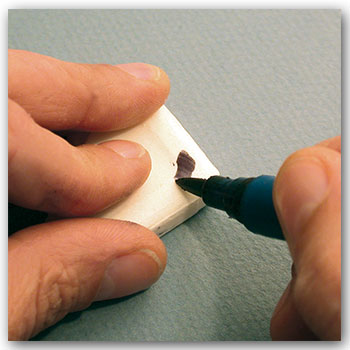
If you are working on darker waxes, instead of a marker, use white tempera paint with a drop of dish washing soap in it. However, make sure you wash off all of the paint before using a wax pen: Tempera paint, mixed into molten wax, can cause porosity. When the design looks acceptable, I scribe through the pattern into the wax, then fill the scribed line with the marker or paint.
Materials Matter By Linus Drogs III
Variances in the chemical composition of metals and water can ruin a casting. To establish some basic control, make sure you use de-ionized water, and always measure the pH balance. With a simple pH meter, you'll want to look for a consistent reading from your water supply—rather than a particular pH number—and adjust your casting processes in accord with that consistent pH level.
If the pH in your water source changes significantly from day to day, such as from 6.9 to 7.5, and you don't know it, you'll struggle with unexplained variances in your casting output. You should also take samples and analyze your raw materials. Do they have too much oxygen or trace elements that will affect the quality of the casting? The best way to know this is to have the supplier or an outside contractor do an X-ray fluorescence (XRF) test on a sample. (You can also invest in your own small XRF machine, which can now be had for around $15,000.) An XRF does not create a compositional profile, however. You tell the testing company what substances to look for, and it will tell you how much the metal contains in parts per million. For example, you might have sterling silver analyzed for oxygen and phosphorous content— both can contribute to poor castings. With purple gold, an extremely difficult alloy to cast, there's no room for variance in its gold and aluminum content.
An XRF for likely contaminants will also alert you to future adjustments that may be necessary as you reuse metals from previous castings. Contaminants may build up over successive castings, requiring higher ratios of fresh metal for each batch. At $20 to $30 per XRF test, the cost is cheap compared with the casting problems prevented.
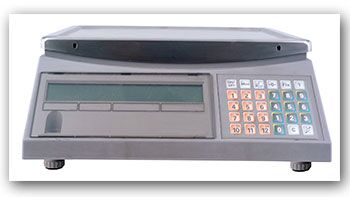
Investing, the Right Weigh By Daniel Grandi
Many companies use spring-operated scales to weigh their investment in pounds or kilos. However, these scales can often be inaccurate when measuring weights of 20lbs. or more.
In our shop, we use a large digital scale similar to the ones used by meat departments in grocery stores. These scales are very accurate and can easily accommodate the required weights necessary for most home and commercial casters. Place a simple plastic bucket on the scale and "tare" or zero the scale (to account for the added weight), then weigh your investment according to the investment manufacturer's guidelines.
When it comes to weighing water, most investment manufacturers tell you to measure your water in cubic centimeters (cc's) or milliliters. Most casters will buy a graduated cylinder for this purpose— not realizing that they can weigh the water. In the metric system, 1 cc = 1 gram, so if you need 182 cc's of water, you will also need 182 grams.We use an inexpensive digital postal scale to weigh our water, which will measure up to 10 lbs. (over 4,500 grams) and is perfect for small shops. Weigh the water in a large plastic container (again, account for the added weight). This way, you can use a sponge to easily add or reduce water as needed, without removing the container from the scale.
Hold and Flip By J. Tyler Teague
Properly cleaning and curing resin-based models, and using the right investment, are musts. After that, since resin-based models don't melt, but rather expand, shrink, and finally burn, it's critical to modify your burnout process to reduce ash and improve casting quality. Here are a few tricks I use:
- Air is required for combustion. To increase airflow in an electric oven, drill two to three small holes near the bottom of the oven door and elevate your flasks off the bottom.
- Start the burnout cycle around 250°F/121°C and hold at this temperature f or at least four hours. This allows enough time to steam out the wax portions of the sprue tree and dry out the flasks. Follow with the standard ramp of 4 to 5 degrees per minute.
- Since most RP materials start shrinking or burning somewhere around 500° F/260°C, which is also the point at which the cristobalite in most investment powders goes through a significant phase transformation (growth spurt), add a hold of 1 to 2 hours at 500°F/260°C to your burnout schedule.
- Once the flasks reach 500°F/260°C, turn them over so the buttons are pointing up, and leave them that way for the rest of the burnout process. Although these steps will extend the burnout cycle, the improved results are well worth the wait.
Buttons Are for Wimps By J. Tyler Teague
It doesn't matter whether you're casting large production trees or small ones, using vacuum-assist or simply gravity casting: The use of large buttons is a waste of money. It's pure superstition that a large button exerts enough pressure on a casting to improve fill. Fact is, the pressure in the flask is relative to depth and not to volume, and only the metal that is directly over the main sprue exerts any pressure at all.
Basically, depth rules. In Figure 1, the pressure at all points marked "P" are the same regardless of the shape or size of the container. This means that all that metal you throw into the button makes you feel secure but serves as little more than a heat source and money drain.
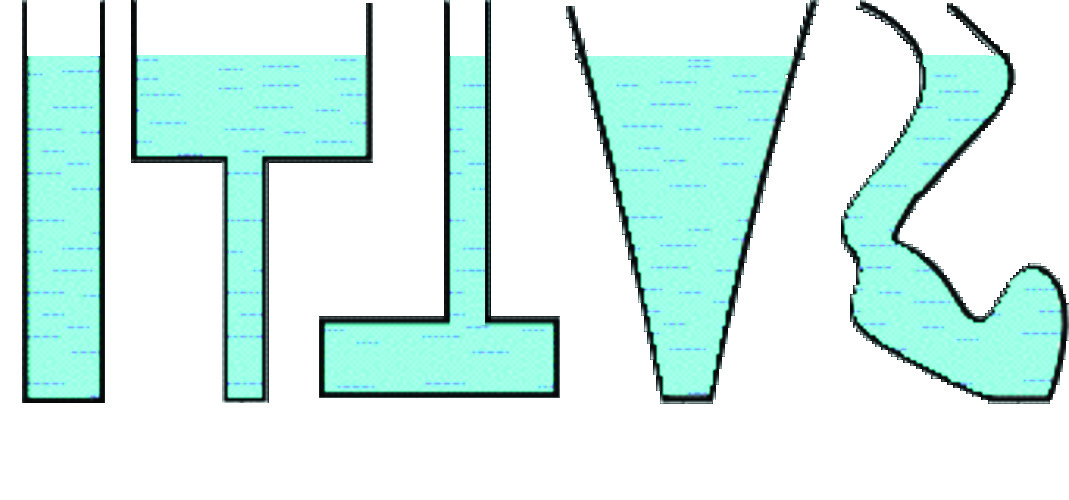
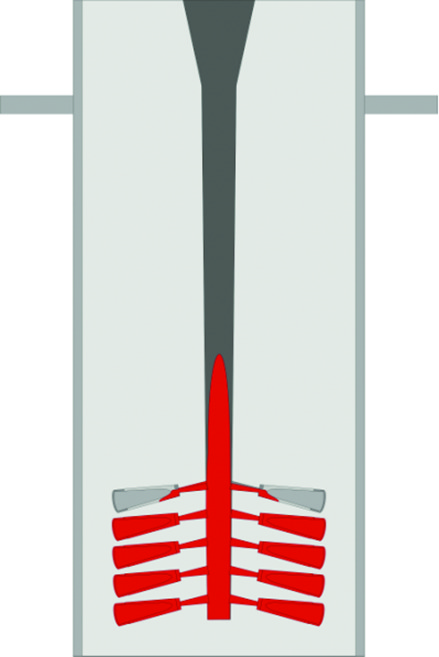
If you really want a good fill, use a tall main sprue with a funnel-shaped pour basin, as shown in Figure 2; the drop of the metal from the crucible to the bottom of the flask takes advantage of both the kinetic energy gained during the pour and the inertia of the molten mass, leading to a better fill. I prefer to use full-size sprues and flasks when doing this technique to ensure I get those added advantages. The couple of dollars for the extra investment is cheap compared to the cost of the metal for a button or a non-fill casting.
Remember, you want to cast only as much metal as you really need. To help you figure that out, here are my step-by-step instructions for the fearless casting of a buttonless tree, free of superstition:
- Weigh your base and your main sprue with no waxes. Record the weight and label it W1. When you finish putting the parts on your tree, weigh the tree and record that weight as W2. W2-W1 = wax part weight (PW).
- Measure the diameter of your main sprue in two places: at the top (D1mm) and 10 mm below the last part on the tree (D2mm). Add those numbers together and divide by 4. This will give you the average radius.
- Take the average radius and square it (i.e., multiply it by itself). This will give you the average cross sectional area.
- Measure the length of the tree from its top to that point 10mm below the last part, and label it L. Multiply the cross sectional area by that length.
- Multiply that product by 3.14 (Pi). You now have the volume in mm3 of the main sprue (Vmm3) that you want to cast: ((D1+D2)/4)2x L x 3.14 = Vmm3.
- Divide the specific density of the metal you are casting by 1,000 (i.e., move the decimal over three places to the left) and multiply that by the Vmm3. (See Figure 3.) This gives you the weight needed to cast the main sprue (SW).
- You can also just cut a piece of the same kind of main sprue wax to the length you intend to cast, weigh it, and add that to the PW (part weight). That is the easy but slightly wasteful way.
- Multiply the PW by the same specific density, then add that to the weight needed to cast the main sprue (SW). You now have the metal weight you will need to cast buttonless.
- Continue with fearless casting!
![]()
In association with
![]()
The award-winning Journal is published monthly by MJSA, the trade association for professional jewelry makers, designers, and related suppliers. It offers design ideas, fabrication and production techniques, bench tips, business and marketing insights, and trend and technology updates—the information crucial for business success. “More than other publications, MJSA Journal is oriented toward people like me: those trying to earn a living by designing and making jewelry,” says Jim Binnion of James Binnion Metal Arts.
Click here to read our latest articles
Click here to get a FREE four-month trial subscription.
Related Articles

Frequently Used Wax Tools

Casting an Orchid Flower
Wax Casting Burnout Cycles

Testing the Ultra-Vest MAXX Investment


The All-In-One Jewelry Making Solution At Your Fingertips
When you join the Ganoksin community, you get the tools you need to take your work to the next level.

