
How to Sharpen Drill Bits
Small, fine drill bits used for jewelry making will become dull with normal use. Worn cutting edges make tasks more difficult and time-consuming and can cause costly accidents, including damage to jewelry and gemstones or even injury. Maintaining the cutting surfaces on your tools will ensure clean, consistent work at the bench. This installment will teach you how to sharpen the cutting edges of a fine drill bit. There are different styles of bit tips, but this example features a chisel tip. Let's begin with a look at its anatomy.
1 Minute Read
Small, fine drill bits used for jewelry making will become dull with normal use. Worn cutting edges make tasks more difficult and time-consuming and can cause costly accidents, including damage to jewelry and gemstones or even injury. Maintaining the cutting surfaces on your tools will ensure clean, consistent work at the bench.
This installment will teach you how to sharpen the cutting edges of a fine drill bit. There are different styles of bit tips, but this example features a chisel tip.
What You'll Need To Sharpen Drill Bits
Buy List
Let's begin with a look at its anatomy.
A drill bit has two cutting surfaces, one on each side of its center axis, that are cut at an angle of approximately 60 degrees (Fig. 1).
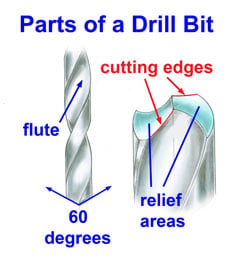 |
| Figure 1: The parts of a drill bit. |
Notice that each of these angled surfaces is also cut at a slightly narrower angle, creating another plane. This plane creates the cutting edge as well as a relief area behind that edge. This relief area prevents contact with the metal being cut as a hole is drilled, which reduces drag and friction.
The helical groove in the drill bit is called the flute. It acts as a channel to guide the cut material out of the hole created by the two cutting edges.
We will file each of the relief areas to sharpen the drill bit, maintaining the same angle as these planes, which is important for the drill bit to perform properly after sharpening (Fig. 2). The cutting edges will be honed by reducing a small amount of metal from each surface.
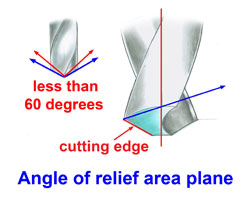 |
| Figure 2: The cutting area and the angle of the relief area plane. |
Begin by inserting and tightening a silicon carbide separating disk in a No. 30 hand piece of a flex shaft. Secure the worn drill bit in a screw mandrel and brace against the bench pin as you position the bit to be filed on the relief area.
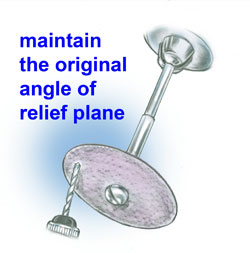 |
| Figure 3: Always maintain the angle of the relief area plane when sharpening. |
Carefully lower the separating disk to lightly touch the targeted surface. Without changing the angle, rotate the bit in the holding device and repeat on the opposite relief area plane (Fig. 3). Once this is complete, you will have a newly sharpened bit. This may take a bit of practice, but it's a valuable technique that can save time on the job.
Related Articles

Pitch Bowls and Alternatives for Jewelers

3 Jewelers, 4 Tools Testing

Green Bench Tips – Part 1

Foredom Redesigned Series SR Flexible Shaft


The All-In-One Jewelry Making Solution At Your Fingertips
When you join the Ganoksin community, you get the tools you need to take your work to the next level.
