
A Replica of the Sutton Hoo Sword
9 Minute Read
Considered to be one of the richest and most important archaeological finds in Great Britain, the Ship Burial known as Sutton Hoo was found near present-day Woodbridge, in Suffolk, in 1939. Coins from the burial mound date the site no later than 625 A.D. Since the original excavation, ongoing research has been supervised by the British Museum, where the most prominent pieces are now housed.
In 1985 a Viking-style sword I had made was seen by Leslie Webster, a scholar from the British Museum. She mentioned that the museum was interested in having the Sutton Hoo sword blade reproduced but had been unable to find anyone (crazy enough) to do the job. Other objects from the tomb had been replicated including the helmet, the harp, the purse and the shield. After nearly four years of correspondence across the Atlantic, the project was ready to begin.
For several months I had been living with the radiographs of the original sword, supplied by Janet Langar the British Museum Research Laboratory. Slides, enlargements and tracing paper were used to work out the possibilities of pattern.
In the end, I found myself mostly in agreement with Angela Care-Evans's interpretation:
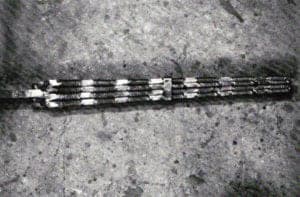
"The condition of the iron sword-blade in the Sutton Hoo burial was indifferent when found….The blade and its scabbard had corroded into one inseparable mass, but radiography has revealed that beneath the corrosion products the iron of the blade has survived sufficiently well in restricted areas for an interpretation of its structure to be possible….The radiographs suggest that it was built up of four bundles of seven rods twist-forged in an alternating pattern and lying back to back with four more bundles of seven rods. The bundles of rods twist alternately to right and left, forming a double band of the characteristic herringbone pattern that is one of the most distinctive features of such blades. The twisted bands alternate with straight bands along the length of the blade…. In broad terms, and remembering that any interpretation of radiographic evidence may be misleading in one way or another, the proportions of the pattern-welded blade appear to be as follows: the average length of both the twisted and straight areas is 5.3 cm, and the pattern repeats at least eleven times….The sword-blade has been sliced in the British Museum Research laboratory but the cut section contributed no additional information about the physical composition of the blade, although it confirmed the existence of a skin- or fur-lined scabbard."
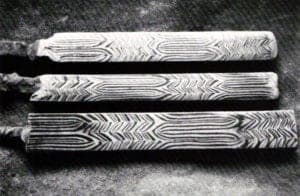
Once the general pattern was determined, it was time to start making samples in order to work out the specifics. The seven layers of each "interrupted twist" bar could be clearly counted in the radiograph. The exact number of revolutions of each twisted section was not quite as clear, but the average was four complete turns. This number turned out to be the maximum amount the bars could take without shearing. When forged to the final form, each twisted and straight section needed to be 5.3 cm long.

A sample cross-section taken at the British Museum Research Laboratory revealed that no metal remained that could be analyzed. The presence of phosphorus was detected, which indicates the use of phosphoric ores. The only iron material available with a significant phosphorus content is wrought iron, and this was chosen as one of the metals.
Although many old weapons have been analyzed to determine the materials used and the relative hardnesses achieved, there was no way to know the specifics of the Sutton Hoo sword because of its condition. The severe oxidation did, however, have one positive effect, namely, the fact that iron and steel oxidize at different rates thus producing the clear pattern of the radiographs. The radiographs showed that the edge consisted of a continuous laminate wrapped around the central core. These laminations could not be counted accurately. The steels chosen to make the edge were 1045 (80%) and 1018 (20%). The final edge billet had 180 layers.
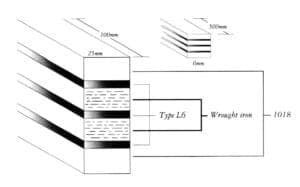
For the eight billets used to construct the core, two other steels, 1018 and Type L6, were selected to be combined with the wrought iron. These were chosen for their physical characteristics and for the contrast that they provided when the finished blade was etched.
I never intended to suggest that the materials available in 550 A.D. could be had in 1989 or that this modern sword could look precisely like the original. Instead, the original has provided the inspiration for this modern piece.
The first sample billet was prepared. The seven layers were forge-welded, drawn out, twisted, cut into eight pieces and rewelded into a bundle. This bundle was then drawn out, polished, etched and studied. Several of the samples were radiographed for comparison with the original. I repeated the process seven times, adjusting the variables as I went along and keeping close records, finally, I had a sample that very closely matched radiographs of the original.

The radiographs primarily show the central plane of the blade where the inner faces of the two sides of the core bundle meet. The original surface pattern of the blade was oxidized completely away, thus revealing that portion of the pattern that was protected within the center of the relic.
To make this type of "interrupted-twist" pattern, I took several things into account. One is that a twisted section of laminate will resist elongation at a substantially different rate than a straight section of the same laminate. Visually, when a person looks at an interrupted twist pattern, the eye tends to count the transition area as a part of the straight section. So, to make the two appear to be the same length, trial and error (lots of the latter) led me to make the twisted sections nearly twice as long as the straight sections. In the finished piece, both were very close to the same length. This was critical if the two-sided, juxtaposed pattern was to line up like the original did.
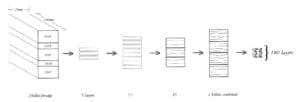
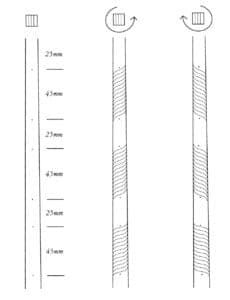
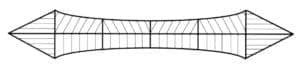
To begin the sword, 10 billets of the same proportion as the last sample were made. (See Figure 1). These were forge-welded and drawn out into slightly tapered square rods, 500mm long, 10mm at the big end and 6mm at the small end. It was critical to avoid forging a parallelogram that would skew the layers and ruin the pattern. The rods were then center-punched at the intervals shown in Figure 2. They were then divided into two groups, one group was twisted clockwise and the other counter-clockwise. The eight best rods were selected and joined as illustrated in Figure 3. The tapered rods produced a tapered core bundle. This was important because the pattern would become uneven and distorted, especially near the tip, if the sword's taper was forged later. This bundle was arc-welded together at the ends and a handle was added. It was then slowly heated in a large coal fire, fluxed with borax and returned to the fire. When an even welding heat was drawn, the rods were hammered together and fused.

The core billet was set aside and the billets to form the edge were made as shown in Figure 4. This 107cm bar was wrapped around the core billet, which had its tip rounded off. It was held in place temporarily by arc welds near the hilt, which would be removed later. The piece was heated, fluxed, brought up to welding hear and forge-welded. A spring fuller was made to forge the depression down the center of each side simultaneously. As the edges were forged, it became obvious that this sword wasn't going to measure up. It was getting too long to match the proportion of the original and the welding flaws were unacceptable. Even though it was now scrap, the blade was forged out and ground for practice and study. Later it would prove to be valuable as a test piece for heat treating and etching.
The second time I proceeded essentially as before, only with a bit more care. I was determined not to fail again. Ten more billets were made as in Figure 1 and given the same treatment as before. Interestingly enough, the day that this second core was welded into one was March 20, the Vernal Equinox, a day or balance. A collar was used this time to help hold the twisted rods together in the heat.
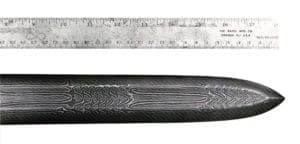
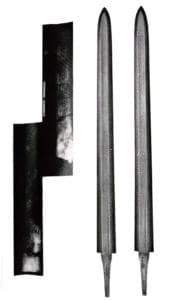
A new pair of edge billets were made as before (see Figure 4), Another collar was used to hold the edge to the core billet. No collars were used on the first sword attempt. This second try proved successful. The piece was worked into a gradually tapered blank. It began to look like a sword at last! The blade was fullered and the edges were forged out. This step alone took seven hours. It was hammered as closely to its final shape as possible. My blade ended up having the same measurements as the original, except at the hilt, where it was 8mm narrower.
After several days of grinding, filing, stoning and sanding up to 120 grit, the sword was ready for the final, critical step of hardening. A test was made on the first sword and I found it hardened nicely in oil. I laid a charcoal fire and slowly heated the chin blade. When the color was just right, the blade was pulled from the fire and plunged into oil. After it was tested for proper hardness with a file, it was tempered in the heated oil for an hour. It took about seven days to polish the sword up to 600 grit for etching. The first two etches in ferric chloride proved unsatisfactory. A test was made on the first blade using nitric acid and the result was much improved. The second blade was polished one last time and immersed in a 30:1 solution of nitric for five minutes.
In May of 1989, the sword was presented to Sir David Wilson, Director of the British Museum. It is now part of their permanent collection, displayed beside the original sword.
Acknowledgments
I would like to thank Bob and Audrey Engstrom for their help throughout the project, as well as the staff of the British Museum, Dr. Michael Tite, Janet Lanq, Leslie Webster and Angela Care Evans. Many others also provided help, support and advice, which proved invaluable. A special thank you is also in order to all of those who were close to me during this project and helped me see it through to completion.
Notes
- Rupert Bruce-Mitford, The Sutton Hoo Ship Burial: A Handbook (London: British Museum Publications), 1979; The Sutton Hoo Ship Burial, Vol. II, Arms, Armour and Regalia (London: British Museum Publications), 1978; and Angela Care Evans, The Sutton Hoo Ship Burial (London: British Museum Publications).
- , p. 307, and Jaap Ypey, Rekonstruktionsversuch der Schweklinge von Sutton Hoo, Archäologishches Korrespondenzblatt, 1983, pp. 495 - 498. Angela Care Evans is a member of the Deparment of Medieval and Later Antiquities at the British Museum and Editor of Volume III of the museum's definitive publication on the Sutton Hoo Ship Burial.
- Bernhard Salin, "La civilization Mérogingienne d'aprés les sepultures, "Les text le laboratoire, III: Les techniques, 1957, p. 311, and R. Tylecore and B. Gilmour, Ferrous Metallography of Tools and Weapons, BAR, 155, 1986, p. 251.
Scott Michael Lankton is a graduate of the International Teaching Center for Metal Design in Aachen, West Germany and a full-time blacksmith in Ann Arbor, MI.
Related Articles

The Cutting Edge of Blade Design

Fads and Fallacies: Pocket Knives

Toolmaker’s Tools of the Trade

Damascus and Pattern Welding


The All-In-One Jewelry Making Solution At Your Fingertips
When you join the Ganoksin community, you get the tools you need to take your work to the next level.
