
3 Ways to Use 2-Part Epoxy Resins
Available in a wide variety of formulas, epoxy resins are used in jewelry making as adhesives, as coatings, and for casting. This reference article outlines the safety requirements for mixing and working with epoxy resins and introduces how to use adhesive and coating epoxy resins to include images and found objects in your work. The three featured projects demonstrate how to capture images in open and closed bezels as well as how to make a three-dimensional collage by layering resin in a deep reservoir..
10 Minute Read
2-part epoxy resins are good to try as a first foray into using plastics in your jewelry. Epoxy resins are available at craft and art-supply stores as well as from online suppliers. The two-part formula has a liquid hardener that is added to a liquid resin and mixed to yield an epoxy resin that is easy to pour into bezels, molds, and forms.
Available in a wide variety of formulas, epoxy resins are used in jewelry making as adhesives, as coatings, and for casting. This reference article outlines the safety requirements for mixing and working with epoxy resins and introduces how to use adhesive and coating epoxy resins to include images and found objects in your work. The three featured projects demonstrate how to capture images in open and closed bezels as well as how to make a three-dimensional collage by layering resin in a deep reservoir.
Types of Epoxy Resin
Epoxy resins that were originally developed as adhesives, such as Epoxy 330 and Devcon 5-Minute Epoxy, harden quickly. They are used primarily for stone inlay but can be used for coating applications. The drawbacks to working with epoxy adhesives are their strong chemical odor and short cure time.
Epoxy resins that are used for coating, such as EnviroTex Lite and Colores, are formulations that are less viscous and have a longer cure time than adhesive epoxy resins. These products are self-leveling and yield a smooth, glasslike surface after they are cured.
Casting epoxy resins can be poured into molds to create three-dimensional plastic objects.
Safety with Epoxy Resin
The best safety precaution you can take when using any material is to get the Material Safety Data Sheet (MSDS) (either request one from the manufacturer or visit msdssearch.com) and read all safety instructions that accompany the product. The product packaging may also list a Web address with additional downloadable safety guidelines and information.
Most epoxy resins are nontoxic, organic compounds that, once cured, do not irritate the skin. However, in the liquid state, both the resins and hardeners are skin and eye irritants. Wear protective nitrile gloves and safety glasses, and work in a well-ventilated space when using the epoxy resins presented in this article. Always handle resins with care, and follow the proper use and disposal methods that are recommended by the manufacturer.
If you plan to use these materials regularly or advance to plastic casting using polyester resins and urethane, buy a respirator with the correct filters for the chemicals you will be using.
Working with Epoxy Resin
Epoxy resins come in two parts: resin and hardener. The two parts must be mixed in the precise ratio given in the manufacturer's instructions. Imprecise measuring and mixing prevents the epoxy resin from solidifying or curing.
To mix small amounts of one-to-one formulas, create a mixing template on a piece of cardboard. Draw two small, equal-sized circles on the cardboard. Place a piece of waxed paper over the cardboard, and fill one circle with resin and the other with hardener. Use a toothpick or craft stick to slowly and thoroughly mix the two parts.
When mixing large quantities or when incorporating color additives, use a digital scale to weigh the resin and hardener to ensure that you achieve the measurements called for by the manufacturer. Note that some liquid coloring agents must be weighed with the resin to calculate the proper ratio of resin to hardener.
Different brands of epoxy resin have different lengths of cure times and "pot life." "Pot life" refers to the amount of time during which you can pour or work with the epoxy before it starts to thicken. Cure time is the time it takes the epoxy to reach its full hardness and to be dry to the touch. Adhesive epoxy resins generally have a short pot life and cure time, which makes it challenging to fill a mold and remove any air bubbles before the resin begins to thicken. Coating epoxy resins have a longer pot life and cure time. Select an epoxy resin with the pot life and cure time that will allow you to get the results you want.
Vigorously mixing the resin and hardener will produce air bubbles. To pop the bubbles, exhale on them, pierce them with a pin, or pass a heat gun set on low over the surface of the epoxy resin.
A Brief History of Plastics
- Contrary to popular belief, plastics are neither new nor are they all man-made.
- Examples of natural plastics include horn, amber, beeswax, and tortoiseshell.
- Semisynthetic plastics are made by using chemicals to modify natural polymers such as cellulose or milk protein.
- In 1855, French inventors Lapage and Talrich patented a heat-setting semisynthetic plastic they called "Bois Durci." It was reinforced with wood dust and molded into household objects and jewelry.
- Synthetic plastics are derived from polymers made from hydrocarbons extracted from crude oil.
- Leo Baekeland patented the first synthetic plastic in the early 1900s. Items that were made with this Bakelite material are now desirable antiques.
Materials
- Two-part epoxy resin
- Bezel cup
- Images on paper
- Flat object with two-sided opening
- Object with deep cavity
- Inclusions
Tools & Supplies
- Work space with good ventilation
- Nitrile gloves
- Safety glasses
- Respirator with corresponding filter canister (optional)
- Craft knife
- Glue: decoupage, cyanoacrylate
- Acrylic matte medium (optional)
- Paintbrush (optional)
- Burnisher
- Waxed Paperor Aluminum Foil
- Toothpick or craft stick
- Digital Scale (optional)
- Pin
- Heat gun (optional)
- Tape: clear packing, duct
- Syringe
- Box
- Tweezers
- Sandpaper: wet/dry, various grits
- Buffing stick with plastic-polishing rouge
Freeze Frame
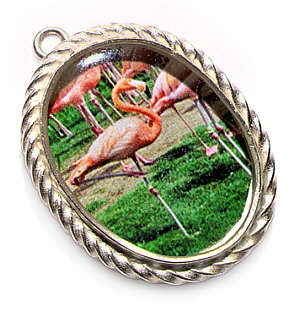
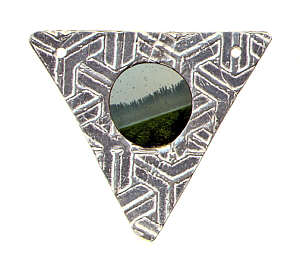
Capture an image in a bezel cup with a little help from epoxy resin. Purchase or make your own bezel cup.
For very small images, you can use Devcon 5-Minute Epoxy resin. For large images, use Colores clear epoxy resin with Colores thin hardener. To magnify an image, use Colores doming resin and hardener.
Make a template and cut out your image. Use a pencil to trace the outer edge of a bezel cup onto your selected image, and then cut out the image using scissors or a craft knife.
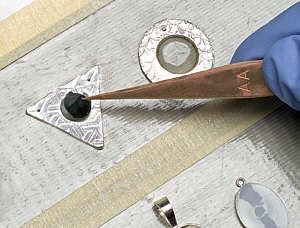
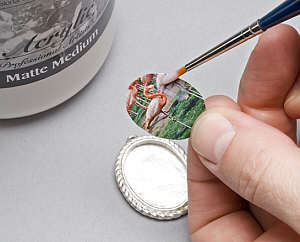 | [1-2] Seal the image with either tape or an acrylic medium. To prevent your image from blurring or breaking down due to direct contact with the epoxy, seal the image with decoupage glue, acrylic matte medium, or clear packing tape. If you use glue or matte medium, use a paintbrush to coat the front, back, and edges of the image [1]. If you use tape, cover both the front and back of the image, burnish it with a burnisher [2], and then trim the image to fit into the bezel cup. |
 | |
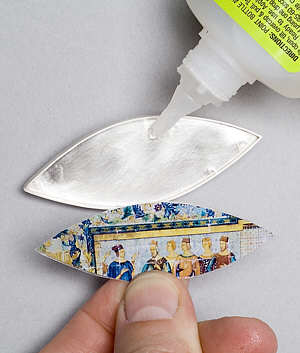 | [3] Glue the image to the bezel cup. Place a small drop of cyano-acrylate glue, or Super Glue, on the inside of the bezel cup. Press the image inside the bezel cup, and smooth it with a burnisher. This prevents the image from floating or becoming displaced when you add the epoxy resin. |
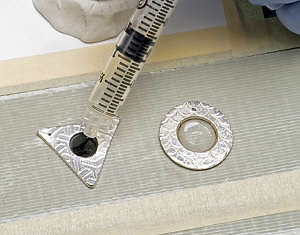
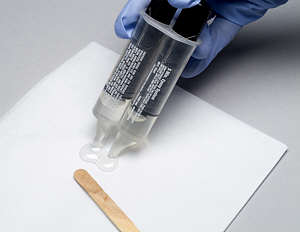 | [4] Mix and pour the epoxy resin. Pour the proper ratio of resin and hardener on a sheet of waxed paper or aluminum foil [4]. Use a toothpick or craft stick to slowly and thoroughly mix the resin and hardener. When the epoxy resin is completely mixed, use the toothpick, craft stick, or a separate syringe to transfer the epoxy resin into the bezel cup. |
When using epoxy resins that have a short pot life, minimize air bubbles in deeper, larger bezels by filling the bezel cup in stages. Apply a level layer of epoxy resin, pop any bubbles, wait about 2 hours, and then add another layer of epoxy resin. Repeat until the bezel is filled. Allow the epoxy resin to cure completely. - JS
Window of Opportunity
Take advantage of the transparent quality of epoxy resin by creating a "window" to encase all types of inclusions.
With this technique, you can use just about any flat object with a two-sided opening deep enough to hold a layer of epoxy resin. Thin inclusions such as snippets of acetate or 35mm slides work well if you are filling shallow reservoirs. An object with a deeper cavity can be used to hold a more dimensional inclusion.
Follow these steps to make an epoxy resin pane
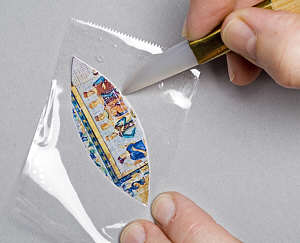
 | Place the flat object on tape. Position a piece of duct tape sticky-side up on a level work surface. Place one side of your flat object on the tape, and press it to form a tight seal, leaving no gaps. Mix the epoxy resin. Mix the resin and hardener according to the manufacturer's instructions. |
 | [1-2] Add a thin layer of epoxy resin. Use a syringe to add a thin layer of epoxy resin to the opening of either a deep [1], or shallow [2] flat object. Cover the piece with a cardboard box to prevent dust from collecting on the epoxy resin as it sets. Allow the epoxy resin to sit undisturbed for 4 or more hours. |
 | [3] Add an inclusion. Once the epoxy resin is no longer fluid, use tweezers to place an inclusion in the opening. |
 | [4] Top off the opening with epoxy resin, cure the piece, and remove the piece from the tape. Use a syringe to fill the remaining depth of the opening with epoxy resin, completely covering the inclusion. Cover the piece with a box, and allow the epoxy resin to cure according to the manufacturer's instructions. Carefully peel the cured piece from the tape. |
 | Complete the finishing. Wet sand the epoxy resin on the back of the piece to remove any unwanted texture made by the tape. Wet sanding will give the piece a frosted look. To learn how to bring the epoxy resin to a polished, clear look, see steps 2 and 3 in "Layered Montage" - JE |
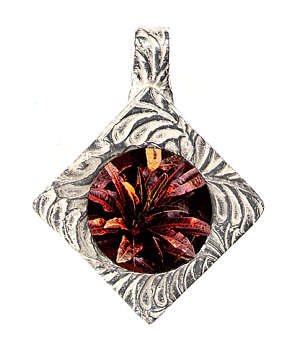
Layered Montage
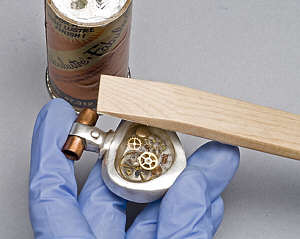
Use epoxy resin to layer inclusions in a deep metal clay frame to create visual depth. This technique can be used to accentuate a sense of perspective or, to support a sequential motif.
An epoxy resin with a longer pot life, such as Colores epoxy resin with Colores thin hardener, works well for this project.
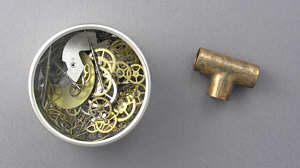 | [1] Select inclusions to make a layered design. Experiment with different compositions and combinations until you have a design that will work well in your frame. Mix and pour the first layer of epoxy resin. Mix just enough epoxy resin in a cup to fill the frame. Pour a very thin layer of epoxy resin into the frame, and pop any air bubbles. Cover and store the epoxy resin. Cover the cup containing the remaining epoxy resin, and store it in the freezer to extend its pot life. Add a layer of inclusions and a second layer of epoxy resin. Once the epoxy resin in the frame is tacky but not completely cured, place a few inclusions in the frame, lightly pressing down on them. Remove the stored epoxy resin from the freezer, and pour a second layer of epoxy resin over the inclusions. Pop any air bubbles, and cure the layer until it's tacky. Continue to layer inclusions and epoxy resin, and then cure the piece completely. Continue layering the inclusions and epoxy resin until the frame is filled. Make sure the epoxy resin is level with the frame edge. You may need to mix a new batch of epoxy resin to complete each layer. Allow the epoxy resin to cure completely according to the manufacturer's instructions. |
 | [2] Sand the surface of the epoxy resin. You can sand the surface of the epoxy resin if it is uneven or a bit cloudy. Use 180-grit wet/dry sandpaper, and sand the surface under water. Progress to finer grits up to a 1500-grit wet/dry sandpaper. |
 | [3] Polish the epoxy resin. Bring the epoxy resin to a shiny finish by rubbing it with a buffing stick and plastic-polishing rouge. - HJ
|
References
- Codina, Carles. The New Jewelry: Contemporary Materials & Techniques. New York: Sterling Publishing Co., Inc., 2006.
- Haab, Sherri. The Art of Resin Jewelry. New York: Watson-Guptill Publications, 2006.
- Murphy, Kathie. Resin Jewelry. London: A & C Black Publishers Ltd, 2002
Related Articles

Kemal Simsek: In The Sign of the Acacia

950 Palladium: Unique Manufacturing Process

Wolf-Peter Schwarz: When It’s Night in Helsinski

Ken Vickerson: Mind and Matter


The All-In-One Jewelry Making Solution At Your Fingertips
When you join the Ganoksin community, you get the tools you need to take your work to the next level.
