
Basic Spiral Braiding
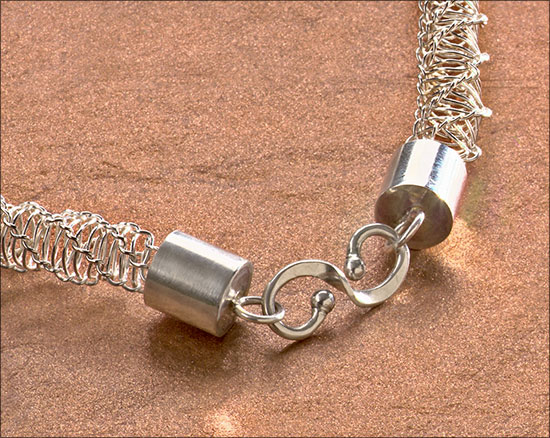
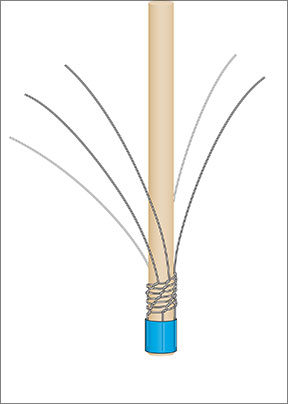
[Step by Step] This five-strand spiral braid is made using one of the many textile techniques that Professor Arline Fisch demonstrated at the "Textile Techniques in Metals" workshop at the Bead'Button Show in June 2006. The simplicity of this technique offers quick and beautiful results even for a beginner metalsmith. To make the braid wearable, you will learn how to fabricate end caps and how to forge an S-hook clasp.
7 Minute Read
This five-strand spiral braid is made using one of the many textile techniques that Professor Arline Fisch demonstrated at the "Textile Techniques in Metals" workshop at the Bead&Button Show in June 2006. The simplicity of this technique offers quick and beautiful results even for a beginner metalsmith. To make the braid wearable, you will learn how to fabricate end caps and how to forge an S-hook clasp.
What You'll Need To Do Basic Spiral Braiding
Materials You'll Need To Do Basic Spiral Braiding
Buy List

Sterling Silver Tubing
Budget
Clasp
Budget
Buy List
Budget
Budget
5 Twist Ties
Budget
Leather work gloves (optional)
Budget
Scrap wood: 1 x 4 in. (25.5 x 102mm)
Budget
Roundnose
Budget
fire-resistant surface
Budget
Part 1: Braid

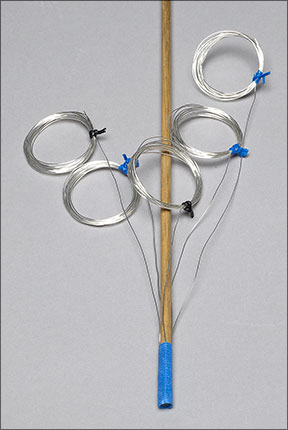
Use a 1/4-in. (6.5mm) wooden dowel as the base around which to braid 24-gauge (0.5mm) fine-silver wire.
Measure and coil the wire. Measure the wire into five 2-yd. (1.8m) lengths. Wrap each length into an individual coil. Use twist ties to keep each coil neatly wrapped. The coils keep the wires manageable while braiding.
Apply furniture wax to the dowel. Apply a coat of furniture wax to the dowel so it's easier to remove the finished braid.
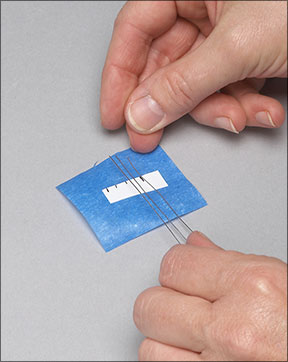
Position the wire ends on a strip of paper. Wrap a strip of paper around the dowel. Mark the point where the strip overlaps to indicate the dowel's circumference.
Lay the strip flat, and use a ruler to make four equally spaced marks between the end of the strip and the circumference mark. Place the strip on some tape, and lay one wire end at each of the five marks.
Attach the wires to the dowel. Tape the strip 1 in. (25.5mm) from one end of the dowel so that the coils will unwind along the length of the dowel.
Check that the wires are equally spaced; this will help to create a braid with an evenly spaced, uniform spiral.
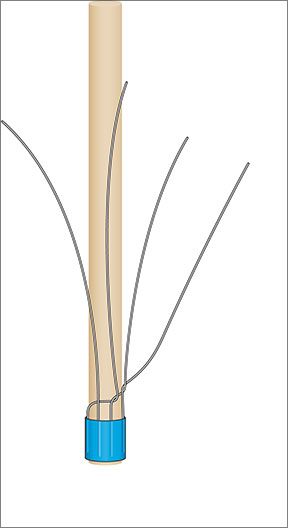
Braid the wire. To begin the braid, pick up any one of the wires. Pass this first wire between the dowel and the next two wires. Make a single twist where the first and third wires meet against the dowel.Drop the first wire.
Pass the third wire between the dowel and the fourth wire, and make a single twist where the third and fourth wires meet against the dowel.
Drop the third wire. Pass the fourth wire between the dowel and the fifth wire, and make a single twist where they meet against the dowel. Drop the fourth wire.
To continue braiding, repeat this pattern without skipping any wires. Keep the twists taut against the dowel and the tension on the wires consistent to create a uniformly braided spiral.
The 2-yd. (1.8m) coils will yield approximately 14 in. (35.6cm) of braid. To finish the braid, twist the wire ends around each other.
Remove the dowel. Use wire cutters to clip the wires at the taped base. Twist the wire ends together. Grasp the braid, and twist it slightly to remove the dowel. Be careful not to crush the braid.

Draw down the braid.
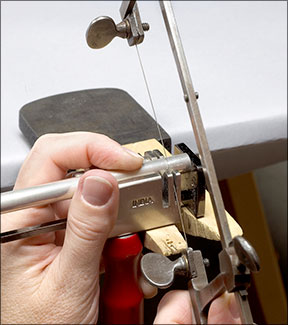
Using a drill with a 5/16-in. (8mm) woodworking drill bit, drill a hole in a 2 x 4-in. (51 x 102mm) piece of scrap wood.
Place the wood in a vise. Using your fingers, pull the braid through the hole a few times to lengthen and even the braid.
Part 2: End caps
Cut tubing. Cut two 13mm (1⁄2-in.) pieces of 8mm (5/16-in.)-inside-diameter (ID) sterling silver tubing.
Using firm figure 8 motions, sand the ends of the tubing flat on a piece of 220-grit sandpaper laid on an even surface. Or, use a flex shaft with a snap-on sandpaper disk. Progress through finer grits of sandpaper to 400 grit.
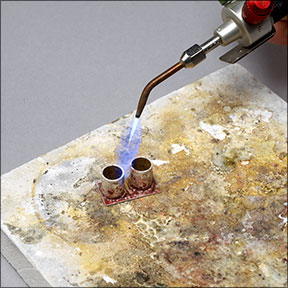
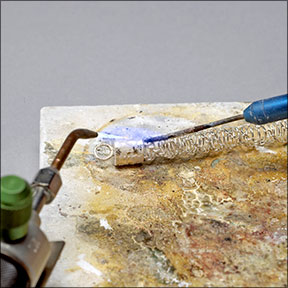
Solder the tubing to a base plate. Place a 25.5 x 13mm (1 x 1/2-in.) piece of flat 24-gauge (0.5mm) sterling silver sheet on a soldering pad. Place the two pieces of tubing on end on the base plate so the pieces do not touch.
Flux the metal, and place several pallions of hard solder around the outside of each piece of tubing so that the solder touches both the tubing and the base plate. Heat the assembly until the solder flows. Re-move the heat, quench the assembly in water, soak it in pickle, and rinse and dry it.
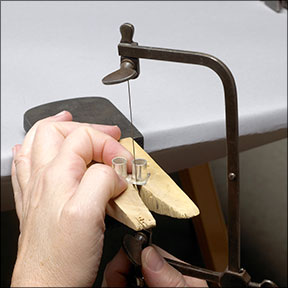
Cut out the end caps.Use a jeweler's saw with a 2/0 blade to saw around each piece of tubing.
File and sand the sawn edge so the base plate is nearly flush with the wall of the tubing.
Attach a jump ring to each end cap. Either make or purchase two 18-gauge (1.0mm), 5mm ID sterling silver jump rings. Place an end cap on a soldering pad with the closed end facing up, and flux it. Close the jump ring, and use cross-locking tweezers to hold the jump ring opposite its seam. Flux the jump ring, and sweat a small pallion of medium solder onto the seam.
Center the jump ring on the end cap. Carefully heat both the jump ring and the end cap until the solder flows. Remove the heat, and then quench, pickle, and rinse the end cap. Sand the excess metal from around the closed end of the end cap. Pre-polish the end cap (see "Polishing Sequence," sidebar, and repeat with the second end cap.
Install the end caps on the braid. Sweat solder easy solder to the interior wall of each end cap. Pickle, rinse, and dry the end caps.
Fit one end of the braid into each end cap. Flux the end caps and the braid ends.
Working with one end cap at a time, melt a pallion of easy solder, and bring it to an end cap on a soldering pick. Using a soft, bushy flame, focus the heat on the end cap.
Place the ball of solder on the inside edge of the end cap so that the ball touches a piece of the braid. Heat until the ball of solder flows, which indicates that the rest of the sweat solder is also flowing. Repeat for the other end cap.
Quench the necklace in water, and soak it in pickle to remove flux residue. Gently brush it with a brass brush and soapy water, and dry it with a polishing cloth. Do not use a motorized polishing wheel to polish the necklace, as it might catch, causing injury and damaging the piece.
Make and attach a clasp, see "Forge an S-hook Clasp," sidebar, or use a purchased clasp.
To lengthen the necklace, you can attach 18-gauge (1.0mm), 5mm ID sterling silver jump rings to the end caps before attaching the clasp.
Polishing Sequence
In many jewelry-making projects, there is a delicate element, such as the braid in this project, that could be damaged by heat, pressure, or mechanical polishing methods. In these situations, the sequence of assembling each part of the jewelry project should be considered in order to avoid damaging that delicate element.
You may need to bring component parts of your project to a finished polish before assembling the final piece. This is referred to as "pre-polishing."
In this project, pre-polish the end caps after the easy solder has been sweat soldered to the inside of the end caps but before the braid is soldered in place. To do this, tumble them, or use a buffing machine. After the braid is soldered in place, you can bring the bright polish back to the end caps by using a polishing cloth or with a tumbler without risking damage to the delicate braid.
Forge an S-hook Clasp
Cut and ball the wire. Cut a 64mm (2 1/2-in.) piece of 14-gauge (1.6mm) sterling silver wire. Ball each end of the wire. Substitute a compressed-gas-and-oxygen torch for the handheld butane torch.
Shape the wire. Use roundnose pliers to make a gentle U bend in the center of the wire. Smooth and round the ball at each end, using a cup bur in a flex shaft and working in a rotating motion.
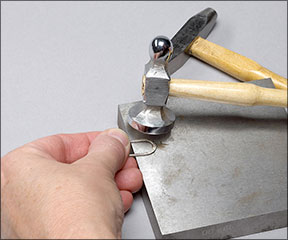
Forge the U bend. Place the U bend on an anvil, and use the narrow end of a cross-peen hammer to forge only the bend.
Anneal the U, and then use a planishing hammer to smooth out the marks left by the cross-peen hammer. Anneal the wire, and then rinse and dry it.

Open the U bend. Hold one end of the wire in each hand. Pull the wires past each other as you would open a jump ring.
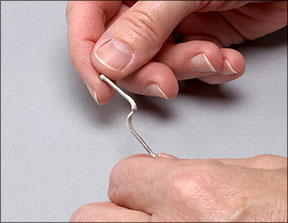
This creates an S bend in the center of the wire.
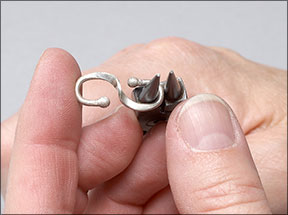
Bend the curves. Use forming pliers to bend the ends of the wire back toward the center of the wire. Tumble-polish the clasp to work-harden it.
Related Articles
Chain Repair Paste Solder Method
Chain Making Project

Pulse-Arc-Welder: Closing Chains

Production Methods for Palladium Chain Making


The All-In-One Jewelry Making Solution At Your Fingertips
When you join the Ganoksin community, you get the tools you need to take your work to the next level.
