
Wire Drawing Hints
The trick to drawing wire by hand is to grasp the tapered end that sticks out the front of the drawplate with the pliers in such a way that there are some 5 mm of play; of movement back and forth to the drawplate. Push the draw tongs up to the plate so that when you start to draw there is a little movement before the wire begins to go through the plate.
4 Minute Read
The trick to drawing wire by hand is to grasp the tapered end that sticks out the front of the draw plate with the pliers in such a way that there are some 5 mm of play; of movement back and forth to the draw plate. Push the draw tongs up to the plate so that when you start to draw there is a little movement before the wire begins to go through the plate.
If it starts drawing with a jerk the inertia carries the wire on and as long as you keep on moving it will not break easily. If you don't start by using this jerk (usually obtained by bending the elbows and throwing your body back until it's weight going backwards starts the wire moving) it can be hard to start it. To find the correct hole to put the wire in next take the back end of the wire and test it in the front holes of the drawplate. When you find the hole it will not fit into then the correct hole is the next one down.
To make the taper on the end of the wire one may file a tapered groove into a flat slope on the bench pin, lay the end of the wire in it and rotate it while one files the wooden slope. This automatically generates a smooth and even taper and is how pinstems are tapered when one only has to do one or two.
An easier method of tapering which simultaneously hardens the point somewhat and prevents its breaking off easily during drawing is to step roll the point in the wire rolls of a hand rolling mill. Roll the end in slightly, back it out and put it in again at 90o to the first direction, then go to the next smallest hole and do the same thing only not as far in on the wire. Continue in this way until you have a smooth tapered point. Tubing too can be step rolled to get a taper on the end for drawing it. One can solder the tapered end for more strength.
People use either beeswax or oil as lubricants. I prefer oil.
If you need only a few holes of an odd shaped drawplate one can be made from an old file, annealed, drilled and burred and filed to shape. The holes must taper to the back and be as polished as possible. A flex shaft is useful for this work. One can however buy drawplates from companies such as TSI (see list) for 10.00 and less which with a little work with a toothpick in the flex shaft and some steel polishing compound can be made acceptable. Eventually one is better off buying a well made one. For larger sizes of tube a hard wood, nylon or Delrin® drawplate can be made for drawing down just a few holes.
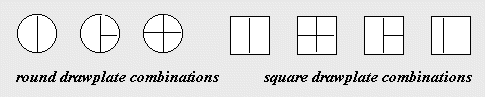
One can obtain various shapes by using a square and round drawplate. The wires start out as either round or square and are drawn together with frequent annealings until the proper shapes are achieved. For example a square or round wire is flattened, folded over, soldered to close the 'loop' and drawn through a square hole in the drawplate to produce two triangular wires. One has to work with care to make this technique work well. One can make half round wire by rolling a round wire into a thick sheet of copper on the mill, the round wire then becomes a half round wire albeit with a slight texture to the surface.
The back of a drawplate also serves as a tool for shaping tubing to tapers, both square and round if one makes an appropriate mandrel for the hole. Note that the tool is not hammered in but pushed. Your drawplate is worth more than a bezel forming tool so don't hammer into it. One can also "step draw" both wire and tubing by drawing to a certain point, pulling it back out the way it came in from and then going to the next smallest hole and repeating the process. Richard Mawdsley uses this technique to very good effect in producing stepped tubing for his complex constructed pieces.
A simple wooden device may be constructed for holding draw-plates on the end of a workbench or it can be as simple as two steel rods inserted in the bench to pull against. This frees the vise for other uses.
In many cultures one sits on the ground, draws the knees up, places the drawplate against your feet and then straightens ones legs to draw the wire. Leg muscles are much stronger than arm muscles and it is quite effective.
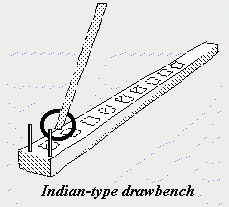
A draw bench is extremely useful and one may be constructed from wood and canvas or with a boat winch and board. If using steel cable instead of canvas or leather belting steps should be taken to secure the end of the cable from flying up loose and injuring someone if it is accidentally released. An Asian Indian version uses leverage and a ratcheting motion to draw wire on a carved plank on the ground.
Related Articles

Wire Wrapping Enamel Pieces

How to Make a Carrick Mat Knot

Mary Lee Hu: The Purpose and Persistence of Wire

Making a Filigree Wire


The All-In-One Jewelry Making Solution At Your Fingertips
When you join the Ganoksin community, you get the tools you need to take your work to the next level.
