
Platinum Wire Filigree
7 Minute Read
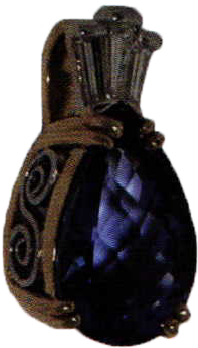
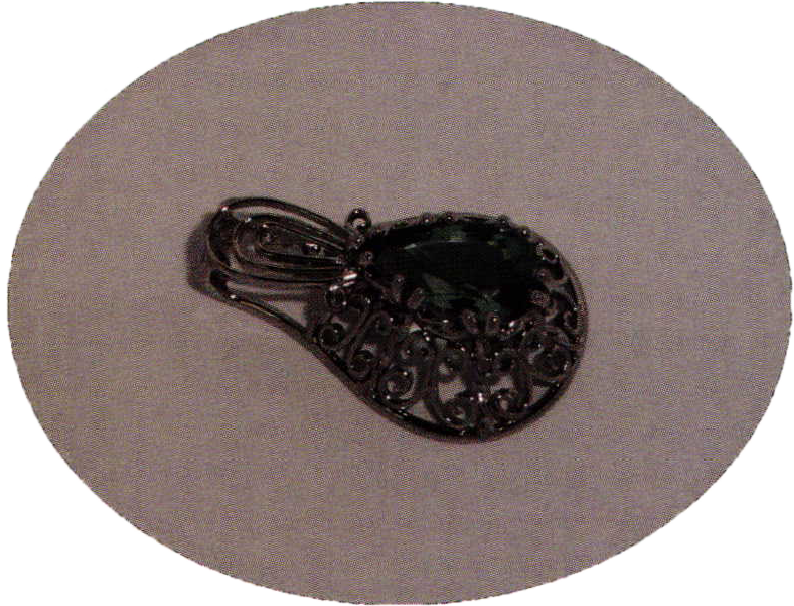
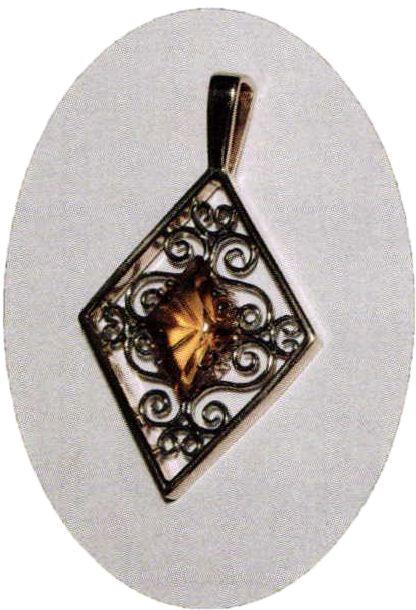
Platinum wire filigree can be easily added to an article of jewelry providing a unique design element. The filigree can be a simple scroll filling an airline to the predominant design component in the article of jewelry.
Whether the platinum wire filigree is a section placed into a gold or platinum article, or the entire piece of jewelry fabricated from the filigree wire, the same techniques are applied. Learning these techniques will provide the jeweler another instrument to use in their design arsenal.
To make the filigree wire, begin with a piece of round platinum wire. The diameter of the wire depends on the opening in the jewelry to be filled with the filigree. Generally, I use between 0.6 mm to 0.8 mm wire.
Next, roll the wire through a rolling mill to approximately 60% of the wire's thickness. This will create a flat wire with rounded edges. Looking from the edge, this wire has the illusion of fine round wire needed for fine filigree work. However, being flat gives the wire extra depth, providing strength to the filigree work, and it makes soldering easier. Before rolling the wire make certain the rollers are clean and smooth. Any marks the rollers put into the wire will be difficult to remove.
Next, polish the wire. To do this use Tri-M-Ite Polishing Paper manufactured by 3M. Hold one end of the wire firmly in one hand. Fold the paper around the wire and grasp with your other hand. Then, pull your hands apart running the wire through the Polishing paper. DO NOT run the paper back and forth, as this will kink the wire. Pulling the wire through the paper 5 or 6 times for each grit will generally suffice. What grit of paper you need to begin with depends on the condition of the wire after rolling. If the wire is smooth and clean, you can start with 4000gritpaper then proceed to the 6000 grit and put on a final polish with the 8000 grit paper. These Tri-M-Ite Polishing Papers are clean and do not leave any residue behind. This allows you to move from one grit to the next without cleaning the wire between steps.
Next, cut off a section of the wire to form the scroll. The length depends on the size of the area you are filling, and how tight you want to make the scroll. Trial and error will provide the best guide - 2to 2 ½ times the finished length is a good place to start, or 3 times the length if you want a tight spiral. If you are making several identical pieces, you may want to make a pattern with round copper wire the same diameter as the thickness of the platinum wire. The copper is soft and easy to bend. Then once the pattern is established, you can straighten the wire and measure the length needed.
To cut the wire you can use a pair of cutters and then file the end flat or use a saw to cut the sections of wire. I use end cutters and have altered them by marking lines using a cutoff disk at 5-millimeter increments down the side of the cutters. This allows me to measure and cut the wire in one step.
Then use a#6 cut needle file to taper the ends of the wire to one half its thickness. This tapered end will allow you to form a tighter curl to begin the spiral. Use silicon-polishing wheels in your flexible shaft to remove the file marks. A brown wheel is adequate to remove the marks and a green wheel will restore the polish. If you are forming a single scroll, you need to file only one end. However, both ends need to be tapered when forming an 'S'or 'C'scroll.
Modify a pair of chain nose pliers by rounding the inside edges of the jaws. This prevents nicking the wire while bending. In addition, thin one jaw by grinding the outside of the jaw. This allows you to form a tighter spiral around it. After grinding, smooth with emery paper and polish. Any nicks or abrasions in the pliers' jaws are transferred to the platinum wire while bending.
For most of the bending you can hold the wire with your pliers and bend the wire using your fingers. However sometimes it is necessary to use two pairs of pliers, especially to touch up and even out the scroll. For the second pair of pliers use a pair of bent nose pliers. Hold the scroll with the first pair from underneath and use the bent nose pliers from the top. The bent nose pliers allow you to keep the body of the pliers and your hand out of your line of sight. This makes it easier to see the adjustments you are making and to observe your progress.
There are three basic shapes you can make:
- An 'S' scroll
- A'C' scroll
- A single spiral

Numerous variations can be made from these three basic shapes. For example, bending a point in the curved backside of a C spiral will form a heart shaped scroll. Combining several scrolls together allows different patterns to be developed.
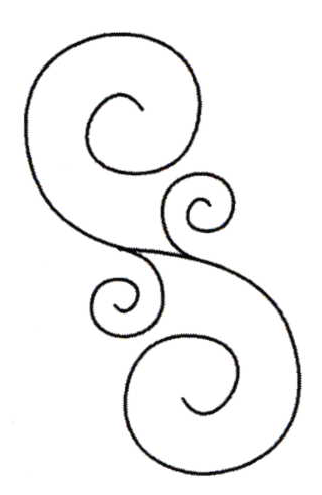
An interesting pattern is made by adding several single spirals to flow outward from an S scroll. First, file ataper on the outside end of the single spirals. This will help create the illusion that the spiral is flowing out from the center stem. Then solder in place with at least 1500 solder. The higher melting point solders are needed at this point to help keep the solder joint from showing.
To hold the parts in position while soldering use a product called 'Place-It 2'. Place-It 2 is a thick paste that you smear on your solder pad. Then place the parts to be soldered into the paste. The paste will harden as it is heated and it will hold the parts in position while soldering. Place- It 2 will withstand the high temperatures needed for platinum soldering. Although 1700 solder can be used, I prefer the 1500 or 1600 solders. The Place-It 2 paste acts as a heat sink, and it is easy to melt the platinum wire while trying to melt the higher temperature solder. If you are making just this single section, use 1500 solder. If however, you will be soldering this section to others, use 1600 solder at this point, then use 1300 solder for the subsequent joints. Be certain to use a minimum amount of solder, as removing excess solder is difficult and will leave an undesirable appearance.
Next, use a #6 needle file to blend the wires together and to remove any excess solder if present. Use a light touch and do not over file. Remove the file marks with a brown silicone wheel in your flexible shaft and restore the polish to the area you filed with a green wheel. Silicone wheels are hard enough to keep from drawing solder out of the seams yet will provide a good polish on the platinum.

The last step in making the filigree sections is to apply the final polish. To do this use a bristle brush mounted on a flexible shaft mandrel using platinum tripoli. On solder joints between sections where 1300 solder was used, polish WITH the solder seam. This will cause some of the solder to 'pull' from the seam. Generally, this is an undesirable situation. However in this case we are using this property of platinum solder to our advantage. By allowing the solder to drag from the seam, it will look from the surface as if there is no solder present. The remaining solder will hold the pieces together. When finished with the tripoli, clean the platinum in your ultrasonic cleaner and polish with rouge using a soft bristle brush mounted in your flexible shaft. There are a number of good platinum rouges available today and the choice is entirely personal preference. I favor the final color of the platinum obtained from using carrot rouge.
Once the platinum wire filigree is polished and cleaned, you are ready to solder it to the article of jewelry. To solder it to a gold item use cadmium free solder matching the karat and color of the gold. For platinum, use 1400 solder. When attaching the filigree to a platinum article you may solder it first, and then do the final polishing of the filigree. However, I prefer to always pre-polish the filigree before attaching it to the jewelry.
Making Platinum Wire Filigree in this manner is not difficult to accomplish. Once you have mastered the techniques involved, you will be able to add interesting design elements to your jewelry easily and quickly.
Bradney W. Simon is a JA Certified Master Bench Jeweler, and has over 26 years experience on the bench. He writes and publishes E-BENCH, and BENCH Magazine. He conducts seminars and workshops through Simon Sez Seminars on shop management issues and bench techniques and has published two books on jewelry shop management. You can reach him at 864-680-4416 or visit him on the web at www.BWSimon.com
Related Articles

An Interview with Leila Tai

Making a Filigree Wire

Making an Alternative Filigree Jig

Introduction to Weaving Metal


The All-In-One Jewelry Making Solution At Your Fingertips
When you join the Ganoksin community, you get the tools you need to take your work to the next level.
