
Two Trial Pieces
8 Minute Read
The article titled 'The Enamels of Alan Mudd' in Glass on Metal Vol. 28-2, Apr. 2009, pp 28-30, featured his pieces made in champlevé and basse taille techniques, as perfected for luxury objects. Alan Mudd's art work is more extensive and he can draw on an exceptionally wide spectrum of direct experience in certain engraving and enamelling processes. These include some techniques that are now rarely continued, and scarcely documented in published sources. As a teacher he has shared his expertise on traditional processes. As an artist, he is also an innovator, and interested in exploring how earlier enamelling techniques were implemented. This has recently resulted in the making of two notable experimental pieces.
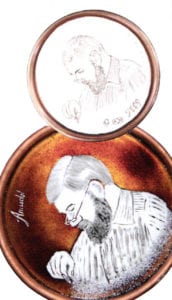
To help me, as often before regarding certain enamelling processes, we discussed grisaille painting with enamels in the Limoges traditions. That discussion began in 1999. The idea being fostered (of course I did not nag!) Alan was curious enough to plan a sample plaque in this way. At that time he made a preparator sketch, but this plan had to wait for almost ten years, until time allowed, and the actual working drawing was made (Pic. 1) and from this the grisaille enamel plaque was completed (Pic. 3) in December 2009. To my enormous delight, this was presented to me.
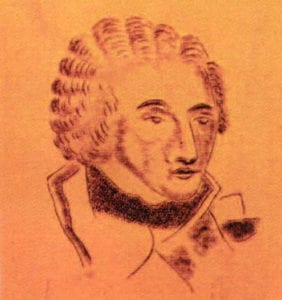
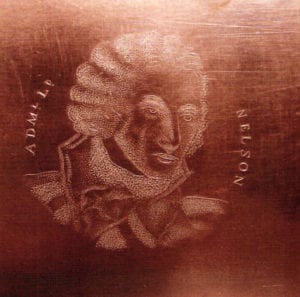
The second trial piece arose from a very different consultation with Alan: on processes for eighteenth century English painted enamels (see Glass on Metal Vol. 26-5, Dec. 2007, 'English Painted Enamels' and Glass on Metal Vol. 27-1, Feb. 2008, 'English Enamels - Part 2'). On page 14 of the Feb. 2008 article, there is an illustration of the portrait medallion from about 1815, of Admiral Lord Horatio Nelson, and created by a method of transfer printing beginning with a stipple engraving.
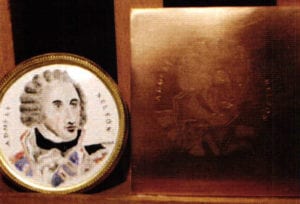
For the discussions on stipple engraving, Alan Mudd explained and demonstrated the process: including details of making of the punches needed and their use in creating an image in a copper plate, which could then be used to recreate the design with fusible pigments applied to an enamel ground. Alan Mudd took the 1815 Nelson portrait as the model, and made a demonstration piece. Recreating the original image but scaled up to double size on a polished copper plate (Pic 4) that showed the manner of creating contour effects with stippling within engraved outlines. The second plate was then made to the smaller format of the original Nelson portrait, and keeping the depth of cut quite shallow to suit the transfer process. This finished Nelson medallion was also presented to me in December 2009, together with the copper plate (Pics. 7 and 8).

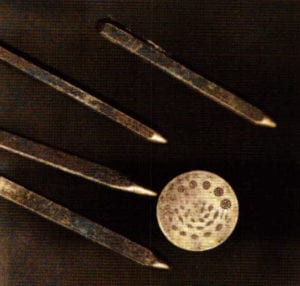
To complete this archival set, AIan Mudd also added a selection of punches as used for such stipple effects and one of the dies from which such punches are made (Pic. 9), with his explanatory sketch (Pic. 10).
Saying 'Thank you' to Alan for all this was scarcely adequate; but all I could manage to add was that these were truly important historic demonstration items - showing continuation of traditional techniques with modern craftsmanship. 'So, am I historic already?' was Alan's response with an acerbic laugh. He added too, more seriously that this was a sort of closure of his long career as an enameller, as he will now focus chiefly on engraving and water colour painting. I reminded him that this may give him time to write his manual on enamelling - and knowing my persistent ways - it dawned on him that I meant that, and that I will not fail to keep on encouraging this.
The grisaille portrait in Limoges style
The grisaille portrait shows Alan Mudd with his gaze angled downwards as when working in metal, holding a symbolic engraver in his right hand.
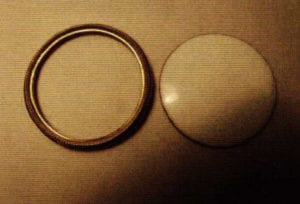
The diameter of this is 5 inches (13 cms) and an interesting innovation is that the whole piece is of spun copper, leaving the narrow frame as an integral rim surrounding the portrait (Pic. 2). This solved the problem of edging for the piece, while increasing rigidity. The translucent dark brown ground and counter enamel layers were applied over the cleaned copper surface within the rim for top and counter sides, and fired.
Following the working drawing, and using grisaille white enamel (prepared as a very fine paste with lavender oil as the medium) the silhouette was applied over the ground. The depth of the grisaille layer was left thin for shading, and while still moist, this was scribed through to the ground for major outlines. When dry and warmed, the piece was fired. A further layer of white was laid for highlights and fired. Fine surface details were applied next with prepared black oxides (painting enamel) and fixed with the next firing. This treatment, showing in close up view with strongly emphasised outlines, produces the Limoges-style grisaille effects. This ensures that when seen in normal viewing position and even from further distances, the portrait shows with great strength and depth: giving strong visual 'carrying power' that is not possible with other art enamelling techniques.

The Nelson portrait
The copper medallion, two inches across (5.08 cm), was slightly domed, and coated on both sides with high firing white enamel (Pic. 5). The transferred monochrome image, produced and applied as described below, was fused briefly at medium temperature and completed with prepared oxides as for standard painting on enamel. This took altogether five firing stages. This contemporary Nelson portrait is a single demonstration piece, but of course, in the past, for commercial production of transferred images (with prevailing processes), each such intricately engraved copper plate served for up to 200 transfers to enamel, notably for ornamenting display pieces in the genre of English enamels.
Transfer from engraving to enamel:
The engraved copper plate was charged [inked] with black oxide prepared with lavender oil as the medium: this was applied as an even infill of the recessed lines and dos, with all excess material carefully wiped off. Next this image was transferred by means of a suitably wide sticky cellulose tape (trade name Sellotape). Picture 6 shows how the image is pulled from the charged plate by this tape method: the lifted film of oxide is so delicate and ethereal that it is scarcely discernable on the photo.
Prior to applying the transferred image, the enamel ground has to be prepared with a coating of varnish to give a key to the pigments that are applied, ensuring good adhesion. The varnish was prepared with a mixture of pine resin and pure turpentine, combined by heating, and brushed thinly over the white enamel ground. While this layer was still sufficiently sticky, the tape with the impression was applied and rubbed gently with a spatula, to give even deposition of the pigment. When the tape was lifted clear the faint image was left adhering to the ground, and the piece was dried, warmed and fired. The coloured enamel paints were applied by brush over two further firings.
The punches used for stipple work:
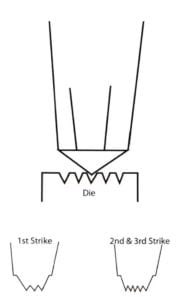
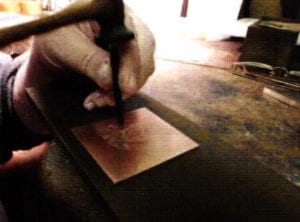
Alan had served a two year apprenticeship in die sinking [such as needed for example in the making of badges]. Picture 9 shows the working end of a die, one inch across. Several groups of indents are worked into this polished surface of the die and individual punches can be made from these. The die is formed from annealed steel, (which softens the metal) allowing the indents to be sunk in, and it is then hardened by heat treatment. The punches, made from annealed steel rods of about 3 inches long, are prepared with cone-shaped ends: each punch is then made by tapping over the selected pattern in the die, to give the raised pins, and it is then hardened. The diagram in picture 10 (see previous page) indicates the main stages of preparing such a punch. The punch, with the selected patterning of raised pins is then ready to be tapped over the copper plate using a chasing hammer (Pic. 11), to produce the design (Pic. 12).
Related Articles

Claus Bury Architectonic Propositions

Phillip Fike

Makriyanni: Symbolic and Narrative

Off the Centerline


The All-In-One Jewelry Making Solution At Your Fingertips
When you join the Ganoksin community, you get the tools you need to take your work to the next level.
