
Tooling Around
15 Minute Read
A look at a few jewelers who refuse to use tools the way they were designed
Jewelers love their tools…but they're rarely content with using them without alteration or even for the original intended purpose. They file and grind and shape and cut until the tool will do what they need and want it to. This month, we spoke with jewelers about the tools they've modified and their reasons for doing so. From gravers and pliers to files and flex-shafts, these transformations left no tool unchanged. Discover the ways these jewelers have found to increase their efficiency and comfort with a few quick modifications—they're bound to have you looking around your own shop for tools to transform.
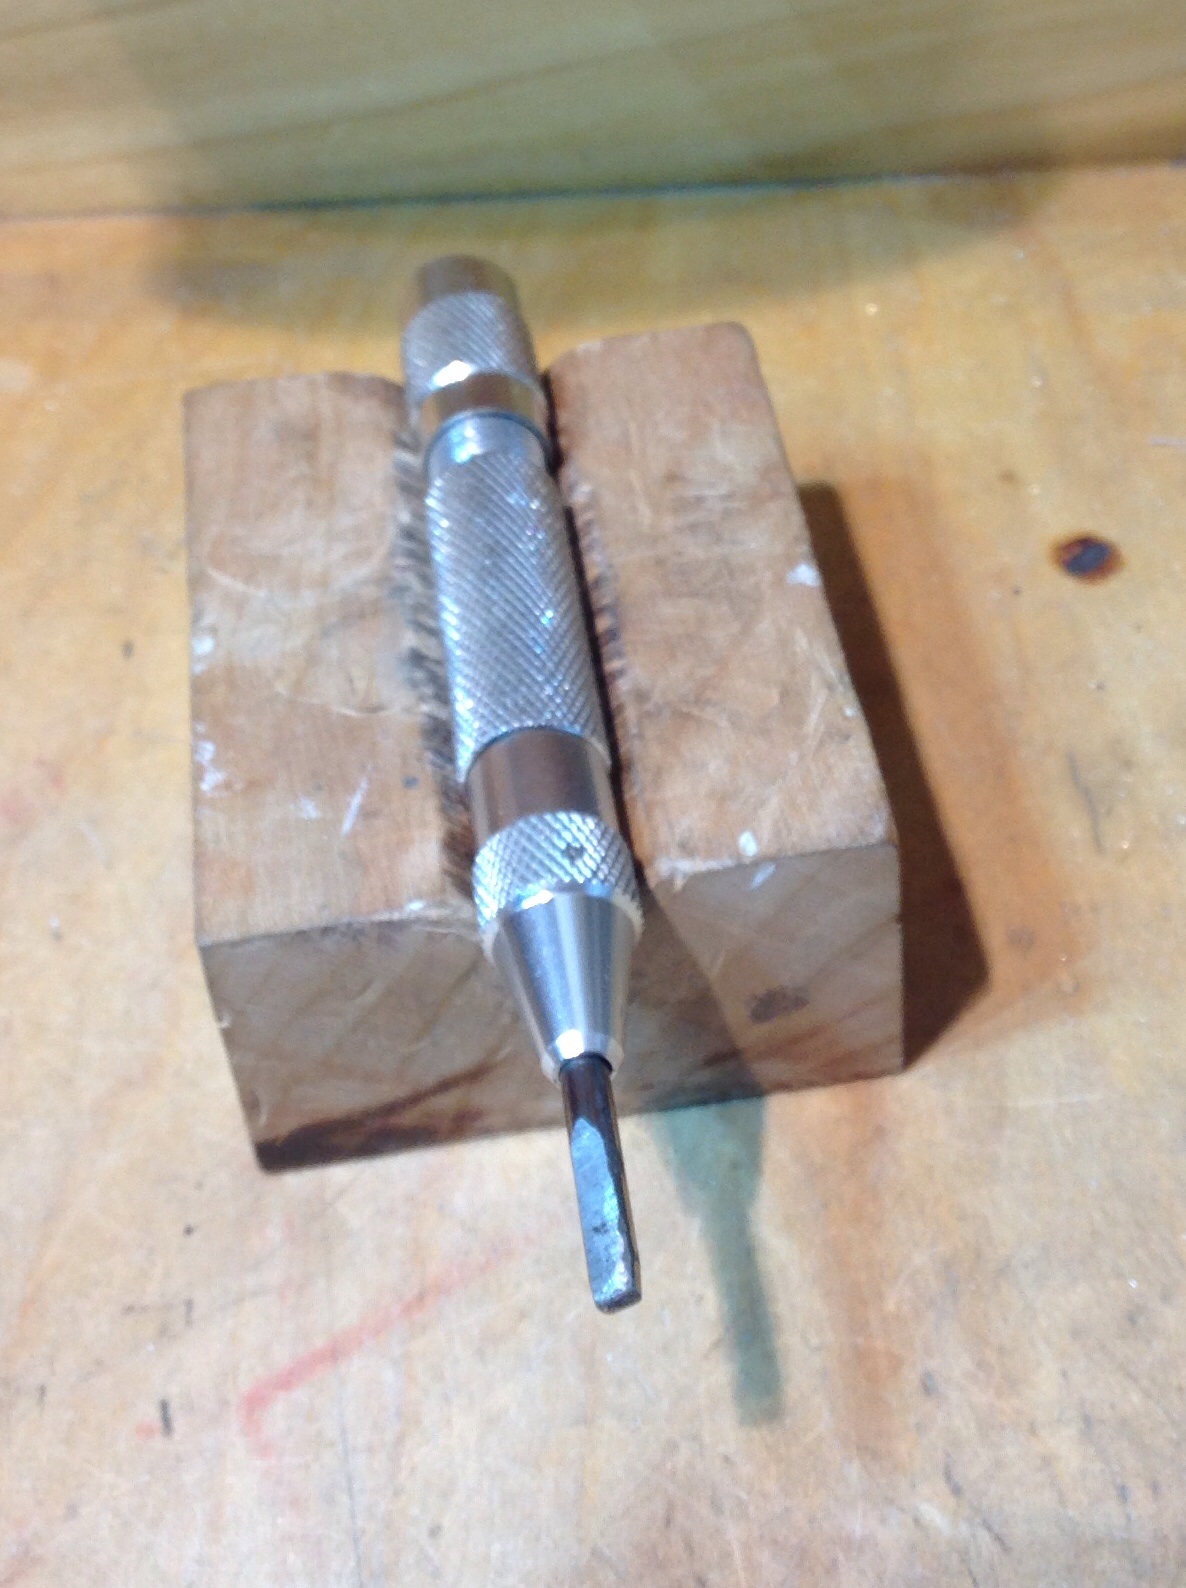
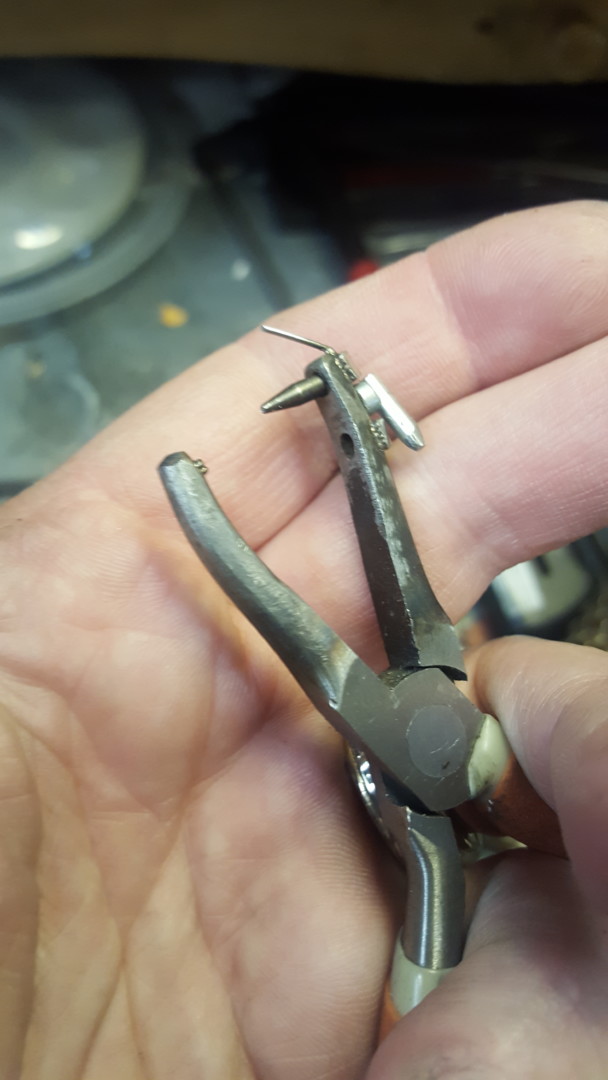
From Center Punch to Setting Punch
Having spent much of his life working with his hands crafting furniture, building houses, or making prosthetic limbs, Mike Brenner in upstate New York wanted to seek a creative outlet during his retirement. He's always had an interest in jewelry, and now spends his days working with silver. Much of what he's learned has been self-taught, and so when he approaches his work, he does so from an open-minded perspective that also applies to the tools he uses.
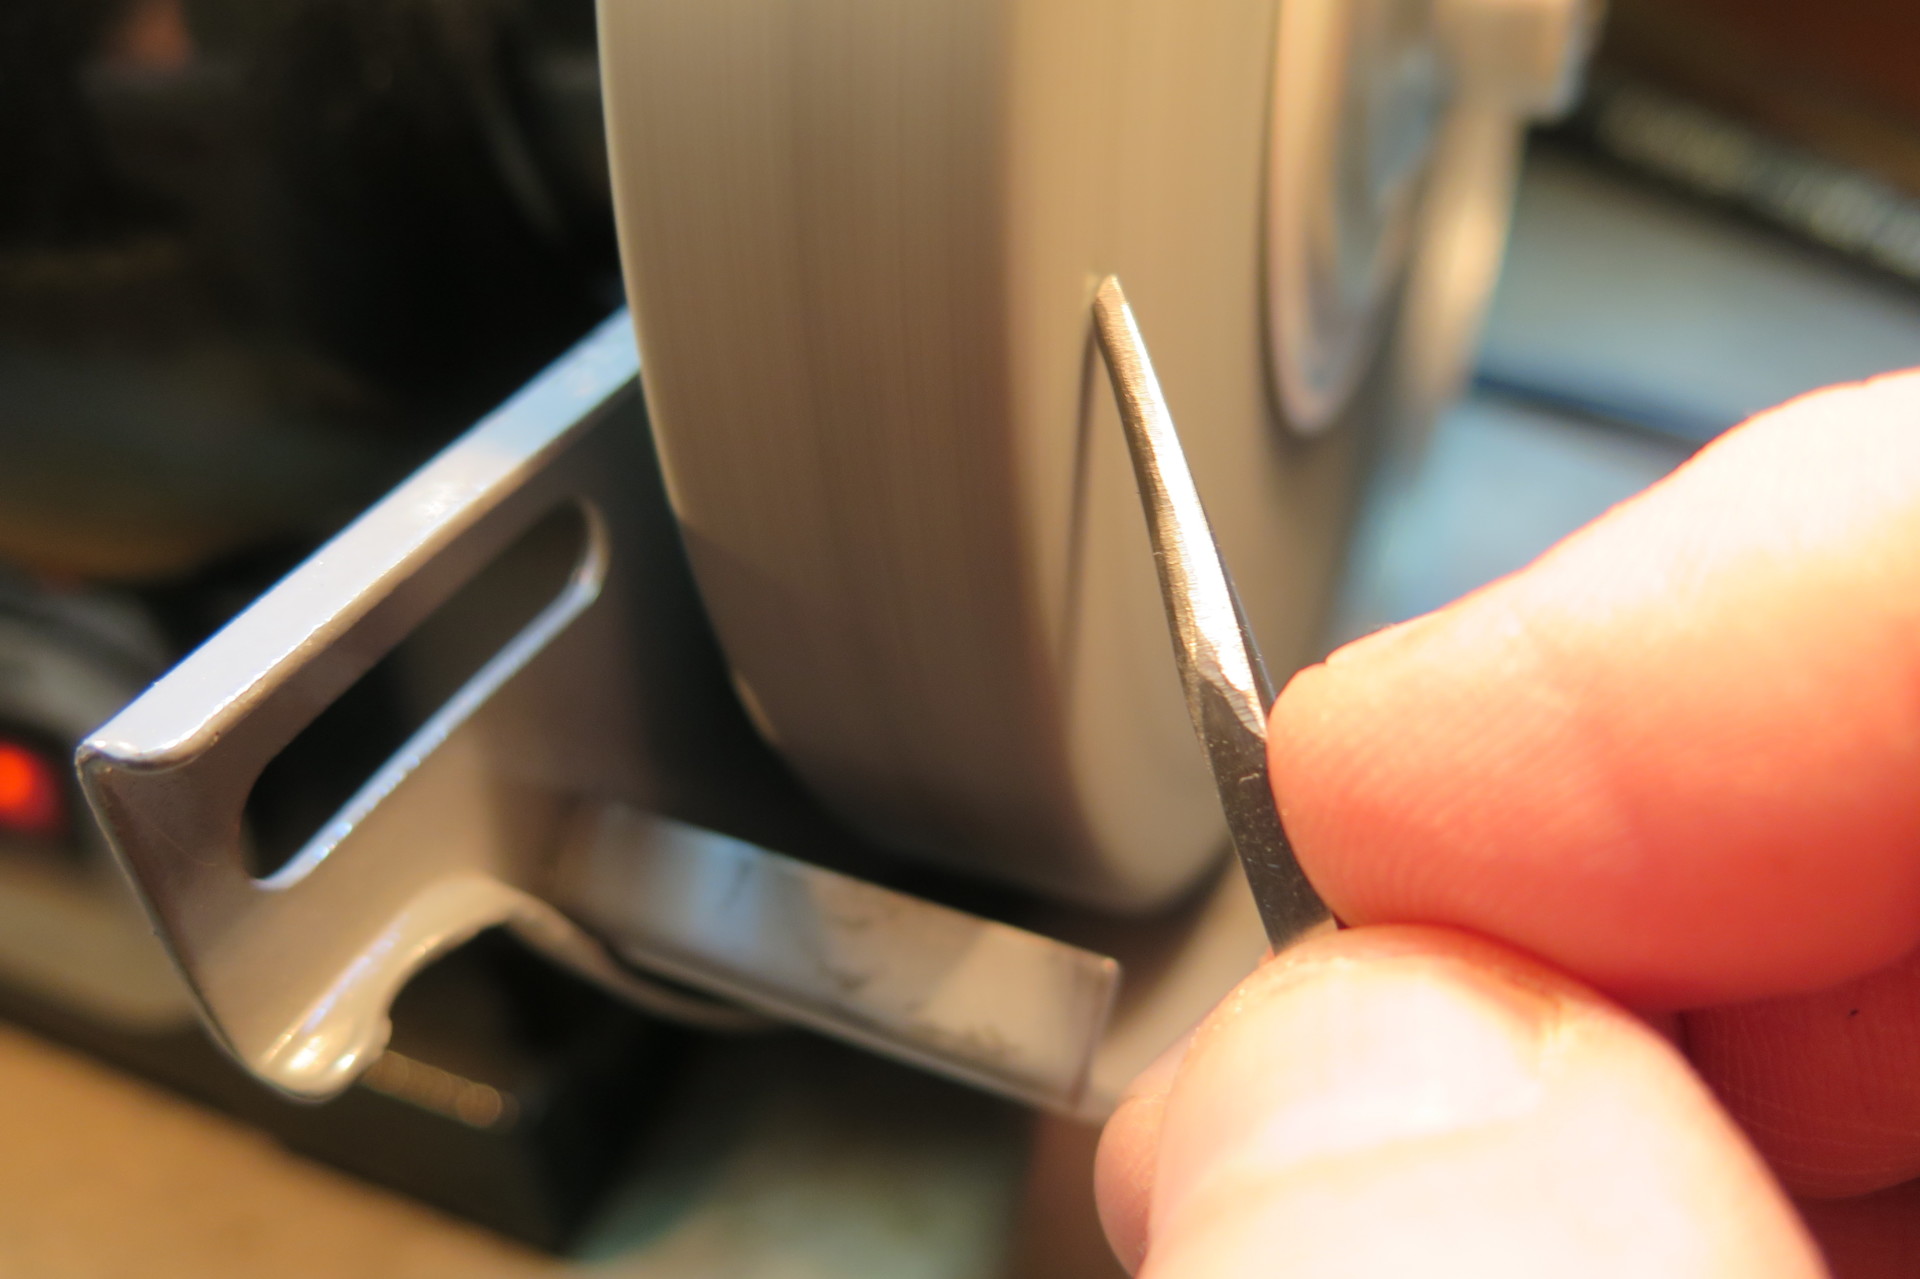
When he decided to begin incorporating faceted and cabochon gemstones in his pieces, he wanted to find a tool that would help him create bezel settings for them. Although an automatic center punch was originally designed to mark spots in metal prior to drilling, Brenner knew that, with a few modifications, the tool would be suitable for his purposes.
Because the punch was designed to punch and mark hard metals, such as steel, Brenner suspected that its internal spring would be too strong to use on the fine silver with which he works. He removed the punch's original spring and replaced it with a similar sized spring that had less tension. In addition to replacing the spring, Brenner modified the punch's tip, which was originally shaped in a point. He filed the tip so that it formed a flat oval and then rubbed it with 220-grit sandpaper to give it texture.
"This removes any roughness left by grinding and still leaves some 'tooth' for a slip-resistant surface," he explains. "If I left the surface polished, it's more likely to slip."
Now when he needs to set a stone in 22-gauge or thicker metal, Brenner relies on his modified punch to secure the stone. "I push it with my palm around the outside of the bezel," he says. "I keep the pressure light enough to require a few hits to accomplish the job without crushing the silver."
Aging in Comfort
With age comes wisdom…and aches and pains. As Jo Haemer of Timothy W. Green in Portland, Oregon, has gotten older, she's developed arthritis that has made holding onto her flex-shaft hard on her hands. To be able to continue doing what she loves, she knew some changes were in order.
While visiting a cooking supply store, Haemer noticed that a lot of cooking gear comes with big, soft handles on them, and she began looking for a similar solution for her flex-shaft. She searched out Styrofoam pipe insulation, which comes in long tubes and in a variety of sizes. When she found one that fit her flex-shaft, she slid on a piece of the tubing and attached it with tape. "It gives me a nice cushion to hold onto," she says, noting that her hands thank her.
Within Easy Grasp
Before he became a bench jeweler 10 years ago, Steve Cook of Moser Jewelers in Tipton, Indiana, spent 30 years working as a tool and die maker. It's safe to say that he knows his tools…and how to modify them.
Since he specializes in jewelry repairs, Cook deals with a lot of ring sizings. He admits most are easy to do. But when it comes to sizing down large rings with heavy shanks, he looked to a pair of vise grip pliers for help.
Because of the way the pliers are designed, they offer the mechanical advantage of letting the lever do the bending. But before he could use them to squeeze precious metal rings closed, he had to make a few modifications.
Cook used several separating discs to ground down the teeth in the pliers as well as to shape the jaws, so they matched the curvature of a ring shank. He then gave the jaws a high polish and, to prevent the pliers from marring the rings, adhered strips of leather to the inside of the jaws using SuperGlue Gel. "I liked the gel because it seems to stay alive longer on porous surfaces," he explains.

Safety First
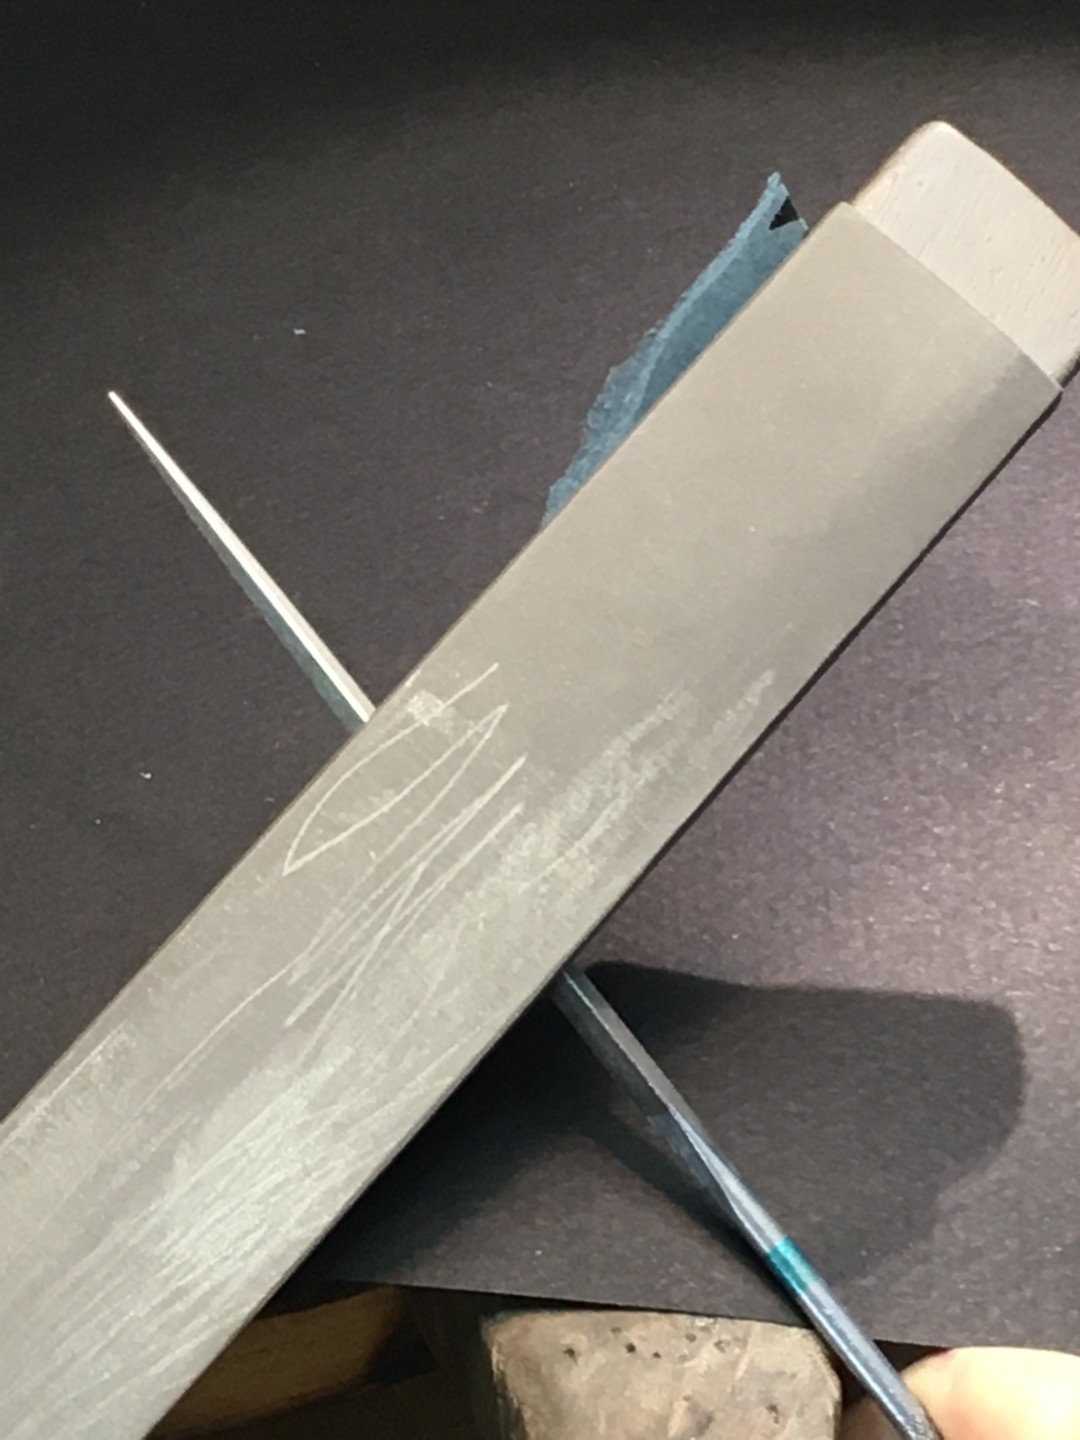
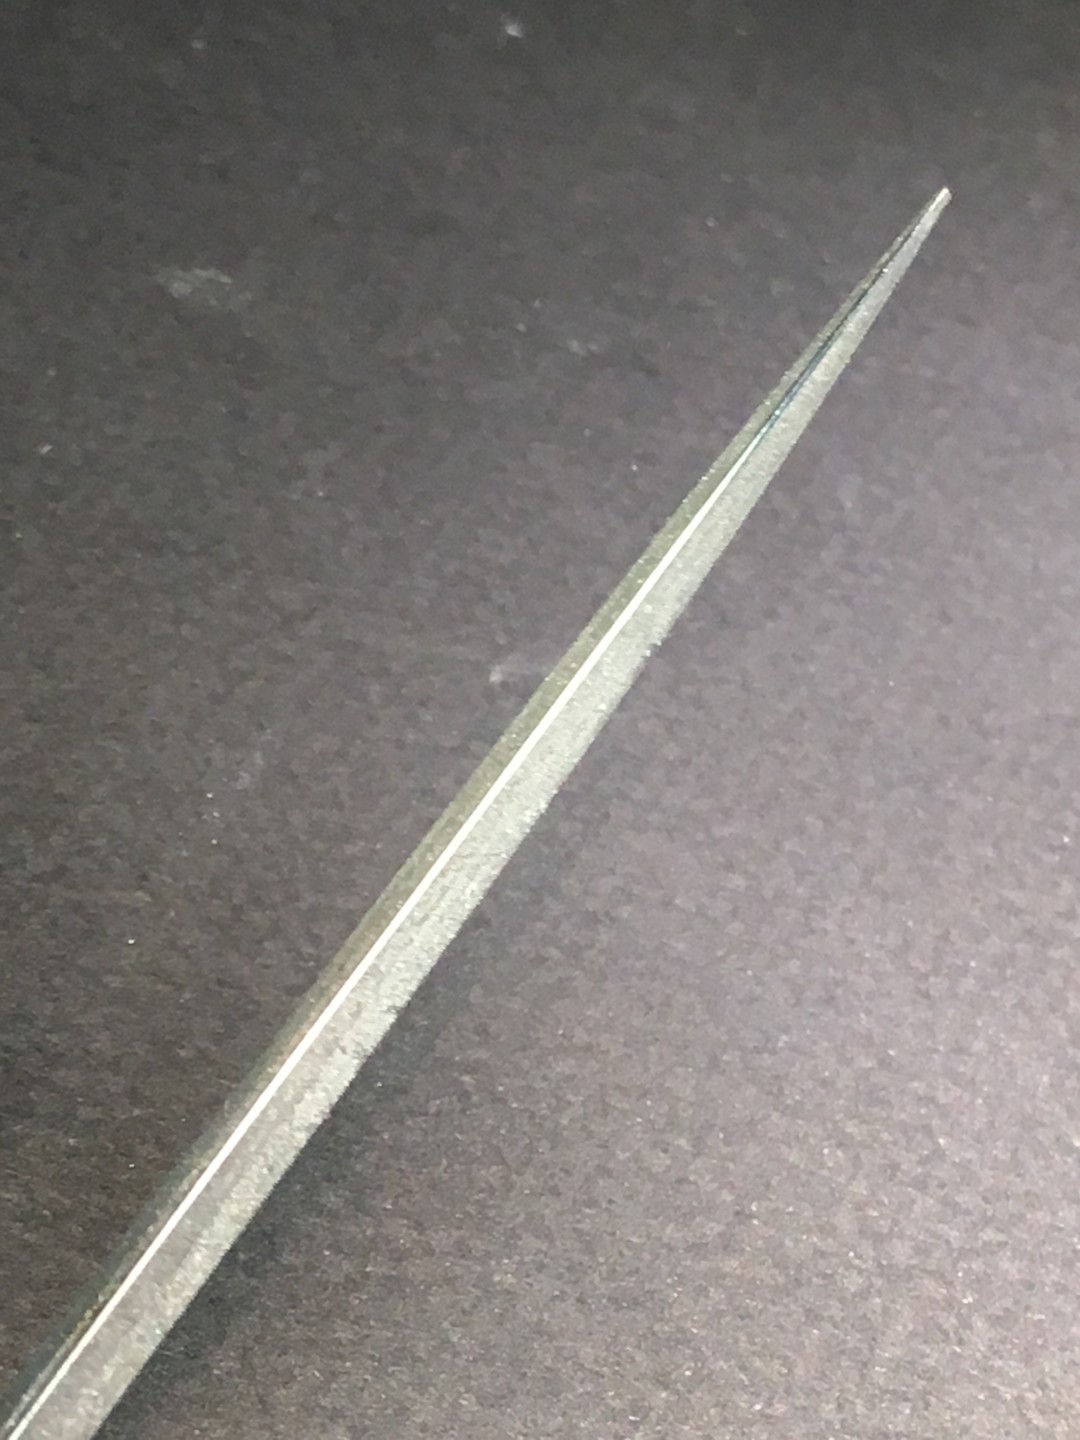
According to Haemer, traditional #6 cut triangle and barrette needle files are ideal for stone setting. "Their pointy ends are perfect for getting in between close prongs, allowing you to work your way around the stone," she says. There's just one little problem: Teeth. Specifically, the little sharp ones along the edges of the file.
"If you run your finger down the edge of the file, you can feel the teeth," she says. "It's so very easy to chip, scratch, or ruin a valuable stone with an unfinished edge on a needle file."
To prevent that from happening, Haemer uses various grades of emery, from coarse to very fine, to file down the ridges along the edges of her triangle files. She then finishes the edges with a super fine Arkansas stone. "You want that edge to be polished and smooth."
In addition to using the modified file around stone prongs, Haemer uses it to clean up the solder joint after she joins two rings together. "Using the file with the safety edges, I can get in between the grooves and leave a perfectly smooth and polished finish in there," she says. "It's often easier to move and burnish the metal than it is to remove it."
For anyone looking to try this at home, she recommends investing in two needle files—leaving one as is while filing the three edges of the other.
"Originally, I put a safety edge on two of the three sides of my file so I could still cut grooves with it," she says. "Within a matter of days, I grabbed it quickly and used the wrong side of the file. So now I keep two, one with safety edges and one without."
Getting Out of Your Own Way
Being able to see his work clearly and easily is important to Shannon Dalton of Wickersham Jewelry in Wausau, Wisconsin. "When bead setting with traditional tools, your hand is often in the way," he says. He found a better solution in an inexpensive pair of long needle nose pliers.
Dalton first used a cutting disc to shorten the jaws. He then drilled into one of the jaws a hole just large enough to fit the end of a beading tool. He inserted the tool and, to secure it, attached a magnet to the backside of the jaw. "The magnet holds it in there, and allows me to quickly switch it out depending on which beading tool I need." A second hole was drilled for increased versatility.
He also soldered a stainless-steel welding wire to the end of the jaw that acts as a stone probe. "When tightening diamonds, I need to check them for tightness, which usually includes picking up a small-enough pick to touch each side of the stone to see if it moves in the setting," he explains. "That is time-consuming and monotonous. This tool has the little point at the end so I can check the tightness very quickly."
On the opposite jaw, Dalton welded a small piece of steel to act as a pusher. "This allows me to get up inside the bead and isolates where I am pushing against," he says.
Now when he's bead setting, he can do everything under his microscope and see exactly what his new beading tool is doing—without his hand being in the way.
A Good Grip
Because vise grip pliers can lock, they're great for holding onto things securely. "I use them all the time for things like holding metal while I'm sawing," says Dalton. "The pliers grip whatever they're holding tight, and you don't have to strain your hand."
Dalton found himself wondering if the pliers could be put to other uses, such as moving prongs while stone setting. But first, they would need some modifications.
The pliers come with large, serrated jaws so Dalton used a bench grinder to narrow the jaws and remove the serrations. "You don't want the serrations because they'll leave marks in the jewelry," he explains.
Once he had the jaws smooth and narrow, he was ready to put them to use setting stones. "I use them to pull prongs together or down over the stone and even for pressing down channel walls," he says. "The cam action of the vise grip amplifies your hand strength, so you don't have to strain your hand."
Getting Comfortable
Frustrated with having to contort himself into uncomfortable positions while working on his bench pin, Dalton began to think of a better way to position his pin. Rather than leave his bench pin mounted in the GRS plate secured to his bench, Dalton decided to mount it in his GRS ring clamp.
He took a piece of aluminum and crafted it into a T-shaped tab that he then glued to the base of his bench pin. He planned to secure the tab in his ring clamp but first used a hacksaw to score a cross-hatch pattern on the aluminum. "I wanted to roughen up the aluminum surface so it wouldn't slip," he explains.
Dalton has realized several advantages to the new arrangement. "The pin rotates around in the clamp so I don't have to saw at funny angles anymore, and I can move it to where I want it," he says. "It's also a little bit higher now, which is a more comfortable position." And because he no longer has to keep taking the ring clamp off to put the bench plate on, he's saving himself time and convenience.
Additionally, Dalton decided to modify his bench pin to make sawing rings even easier now that he could control the position of the pin. He took a piece of round plastic and carved spaces onto which he could hook rings. He then screwed it into the back of his bench pin.
"It's made things faster for me," he explains. "It can be tough to hold things still on the bench pin, but this holds rings steady. Now if I'm sawing a ring for sizing, I can move it to whatever angle I want to get myself into a comfortable position, which is a big deal if you're doing it all day long."
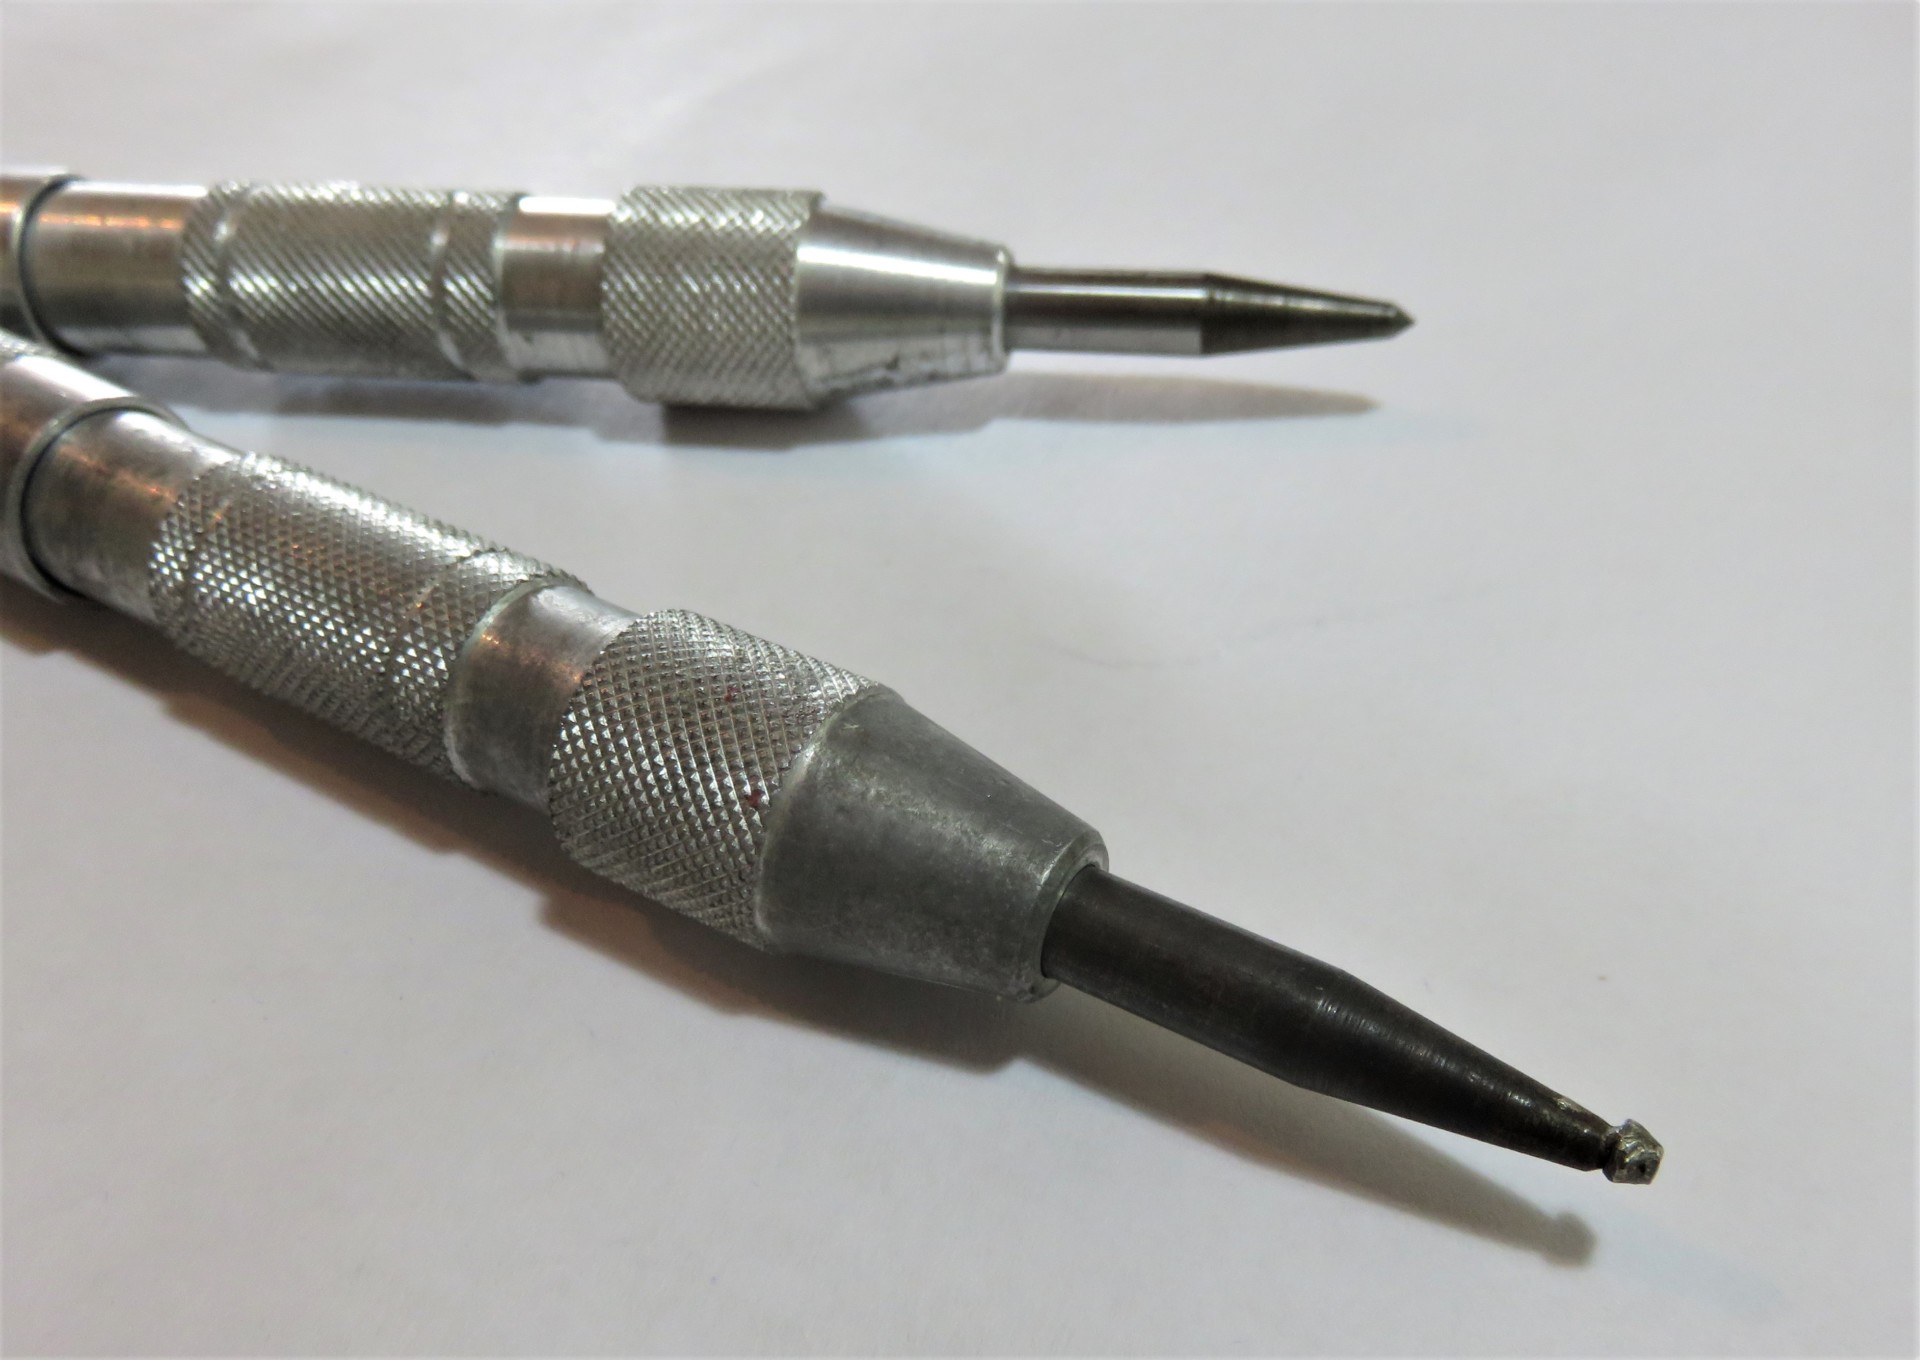
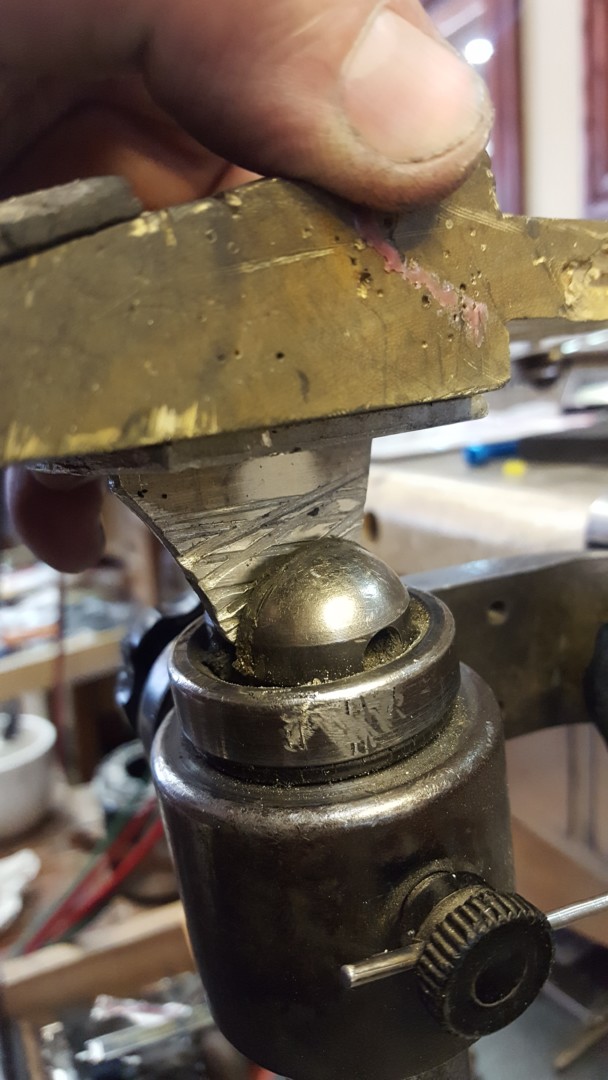
A Dab of Nickel Will Do
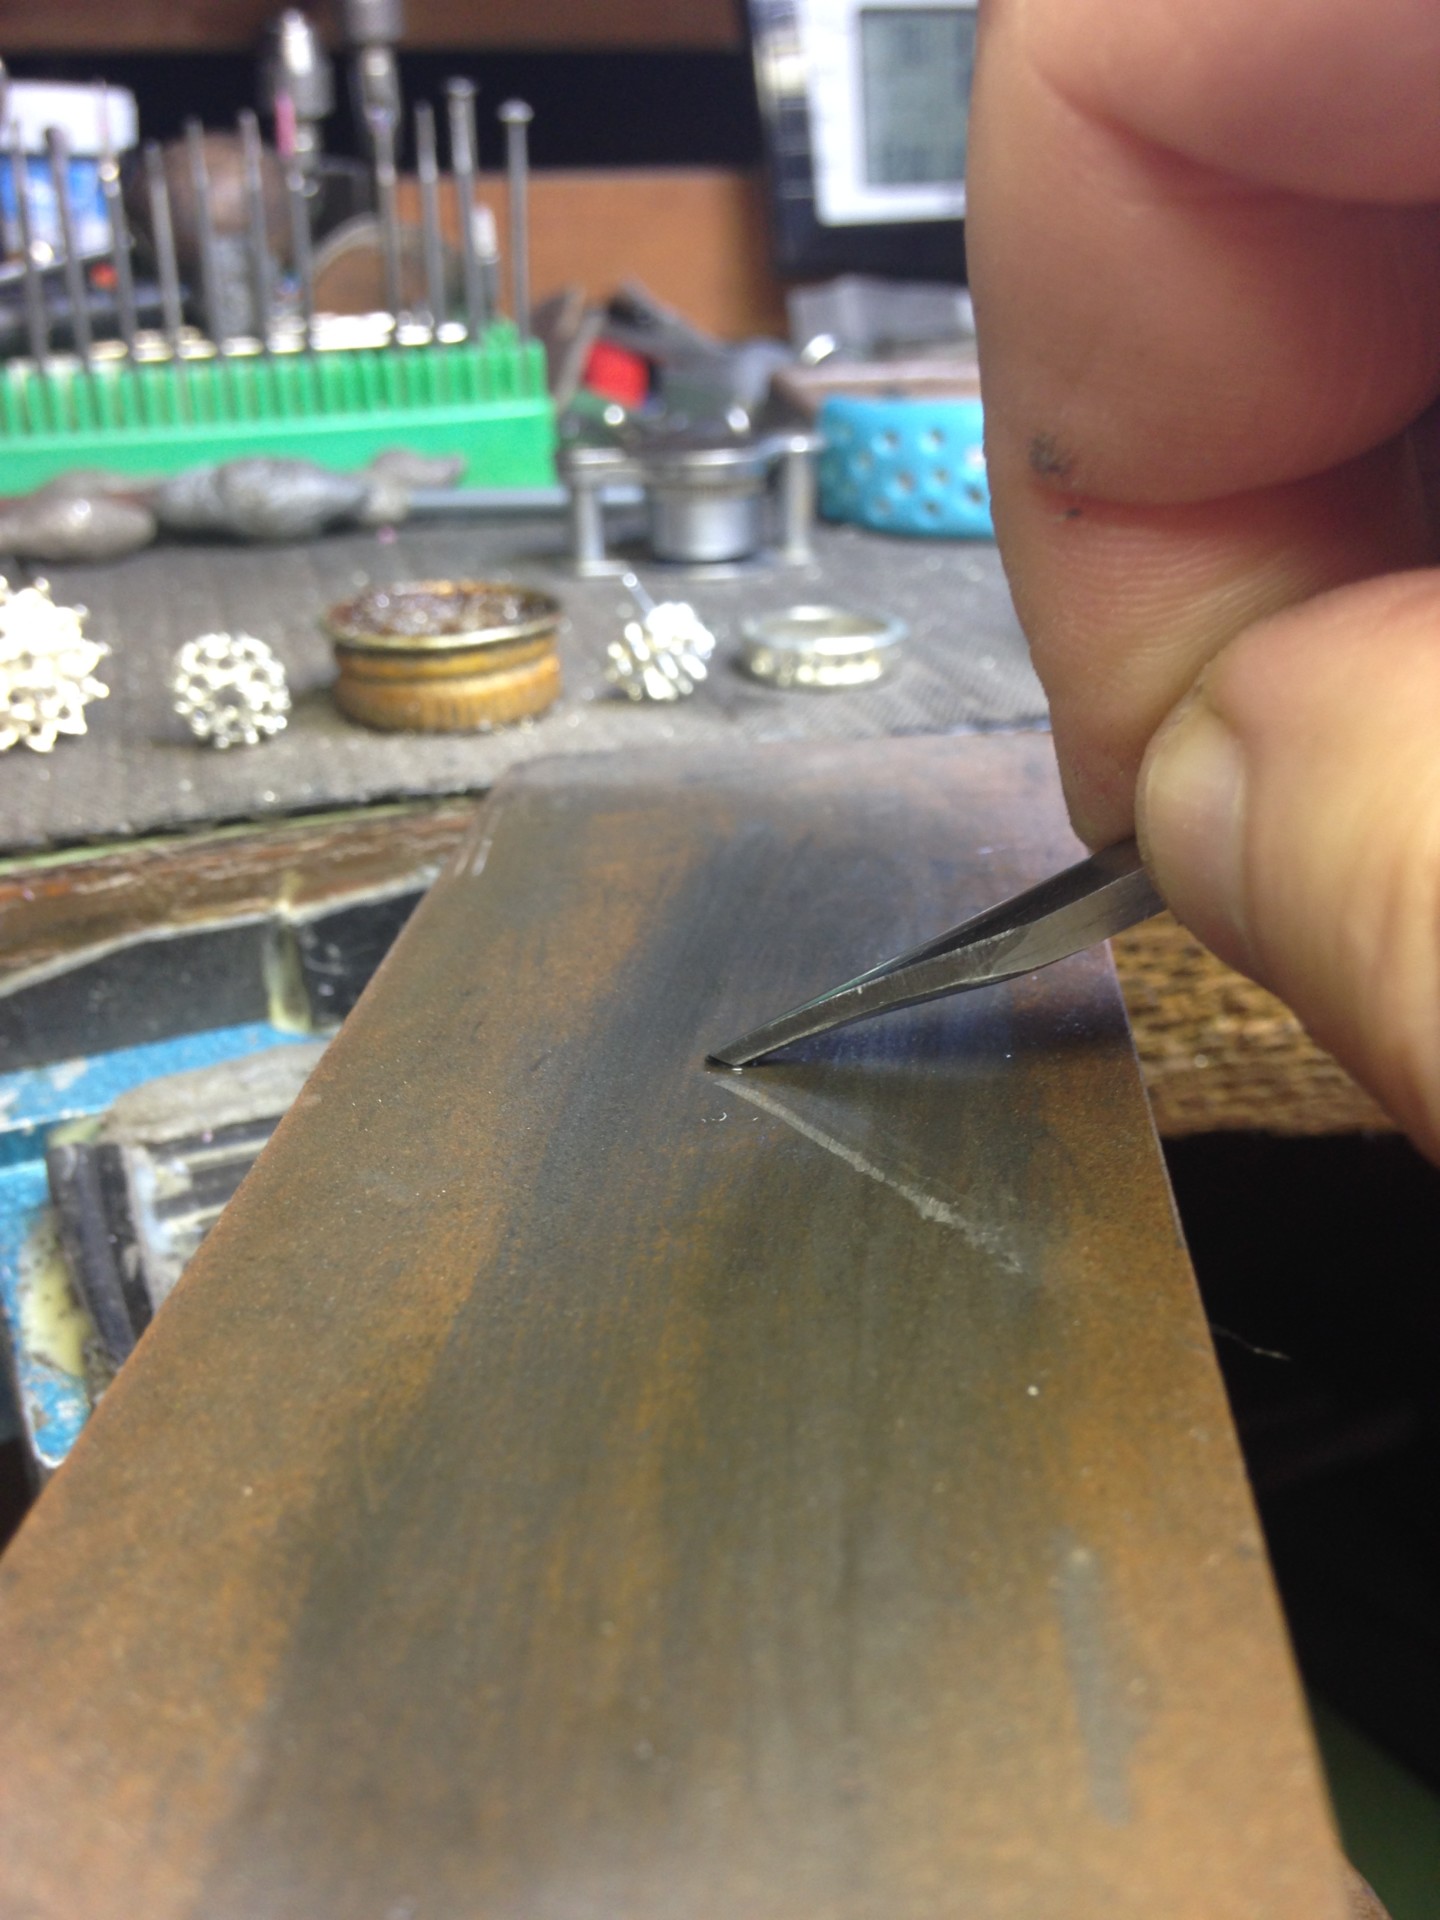
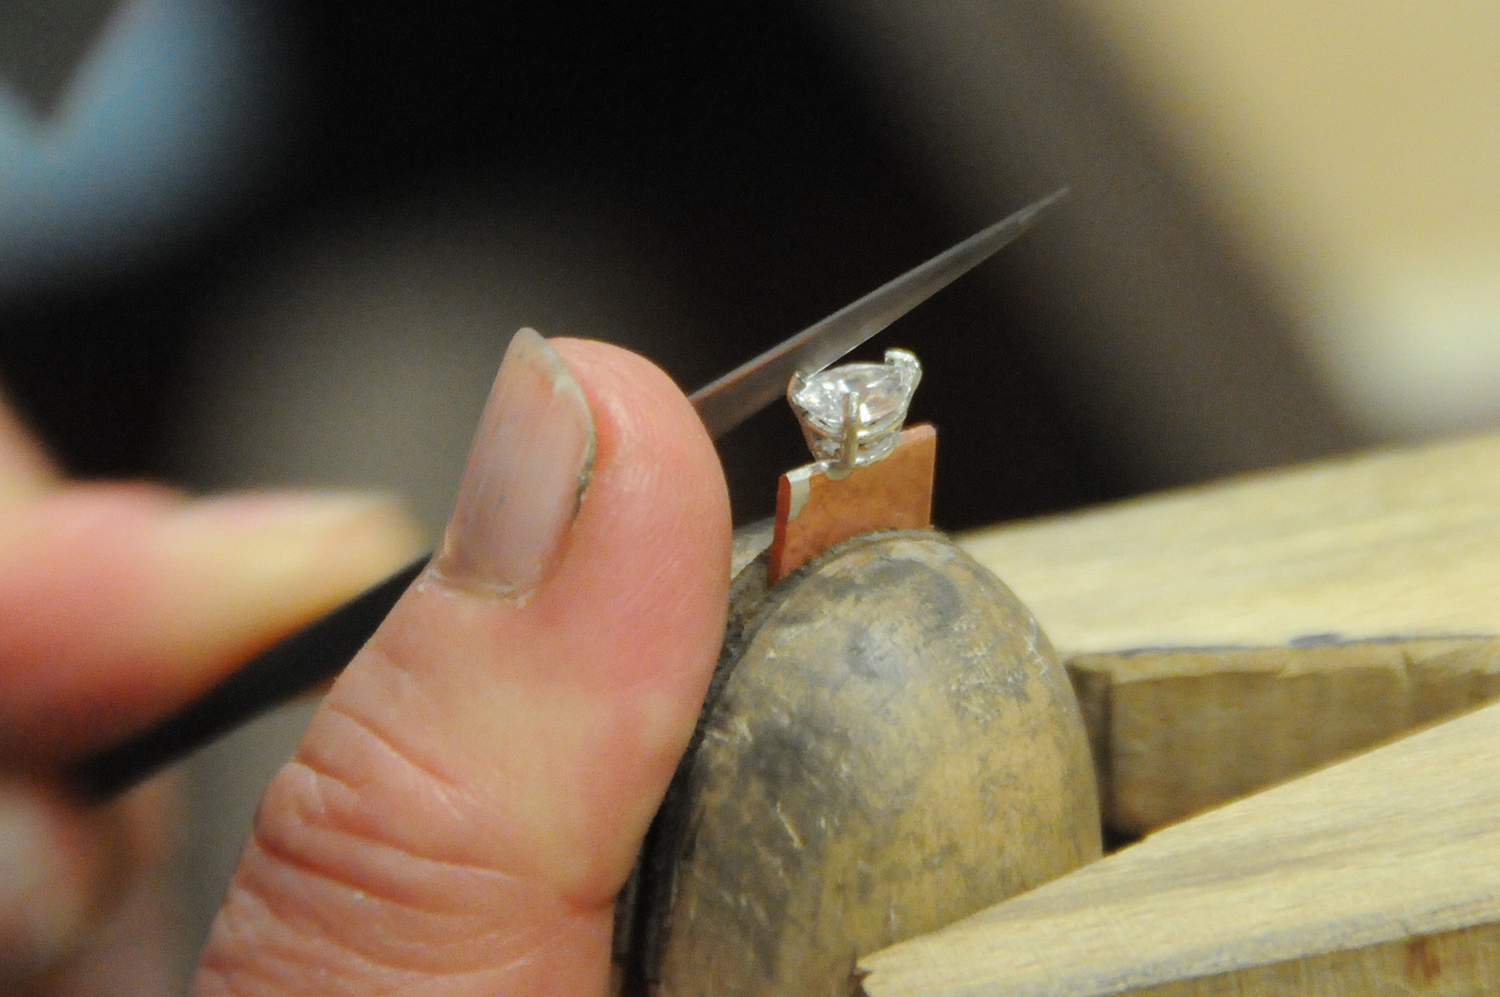
When Lena Marie Echelle of Anillaco, La Rioja, Argentina, wants an easier method for her stone setting and riveting work, she turns to an automatic center punch. "It's similar to using a hammer and punch, without the hammer," she says, "and it's convenient to use because it requires only the use of one hand to operate, leaving the other free to hold materials in place."
However, because the tool was originally designed to make marks in hard metals such as steel, Echelle modifies the end of the steel tip to make it more amenable for setting. "I solder a bit of nickel to the end of it, then use a file or flex-shaft to give it the shape I want," she says. "I like nickel because it doesn't mar soft metals as much as the tool's steel tip would." For stone setting, Echelle aims to form the nickel into a large, flat shape. "Then I can go around the stone and punch it, pushing the metal onto the stone."
Echelle also relies on the modified punch for her riveting work. "When I am riveting the hinge pin on a locket, I can hold the piece with one hand and hit it with the punch in my other hand," she says. "It can get in spaces that are really small without the danger of hitting the side of the locket."
Heavy Lifting
A good stone setter knows that just as much care is needed when removing stones from a setting as when putting them in place. That's why Joel McFadden of The Art of Jewelry by Joel McFadden in Red Bank, New Jersey, was never happy with the traditional tool used to lift up prongs. "It was just a bar with some notches cut into it," he says. "It was inaccurate and had the habit of snapping prongs off because you didn't have enough control over it."
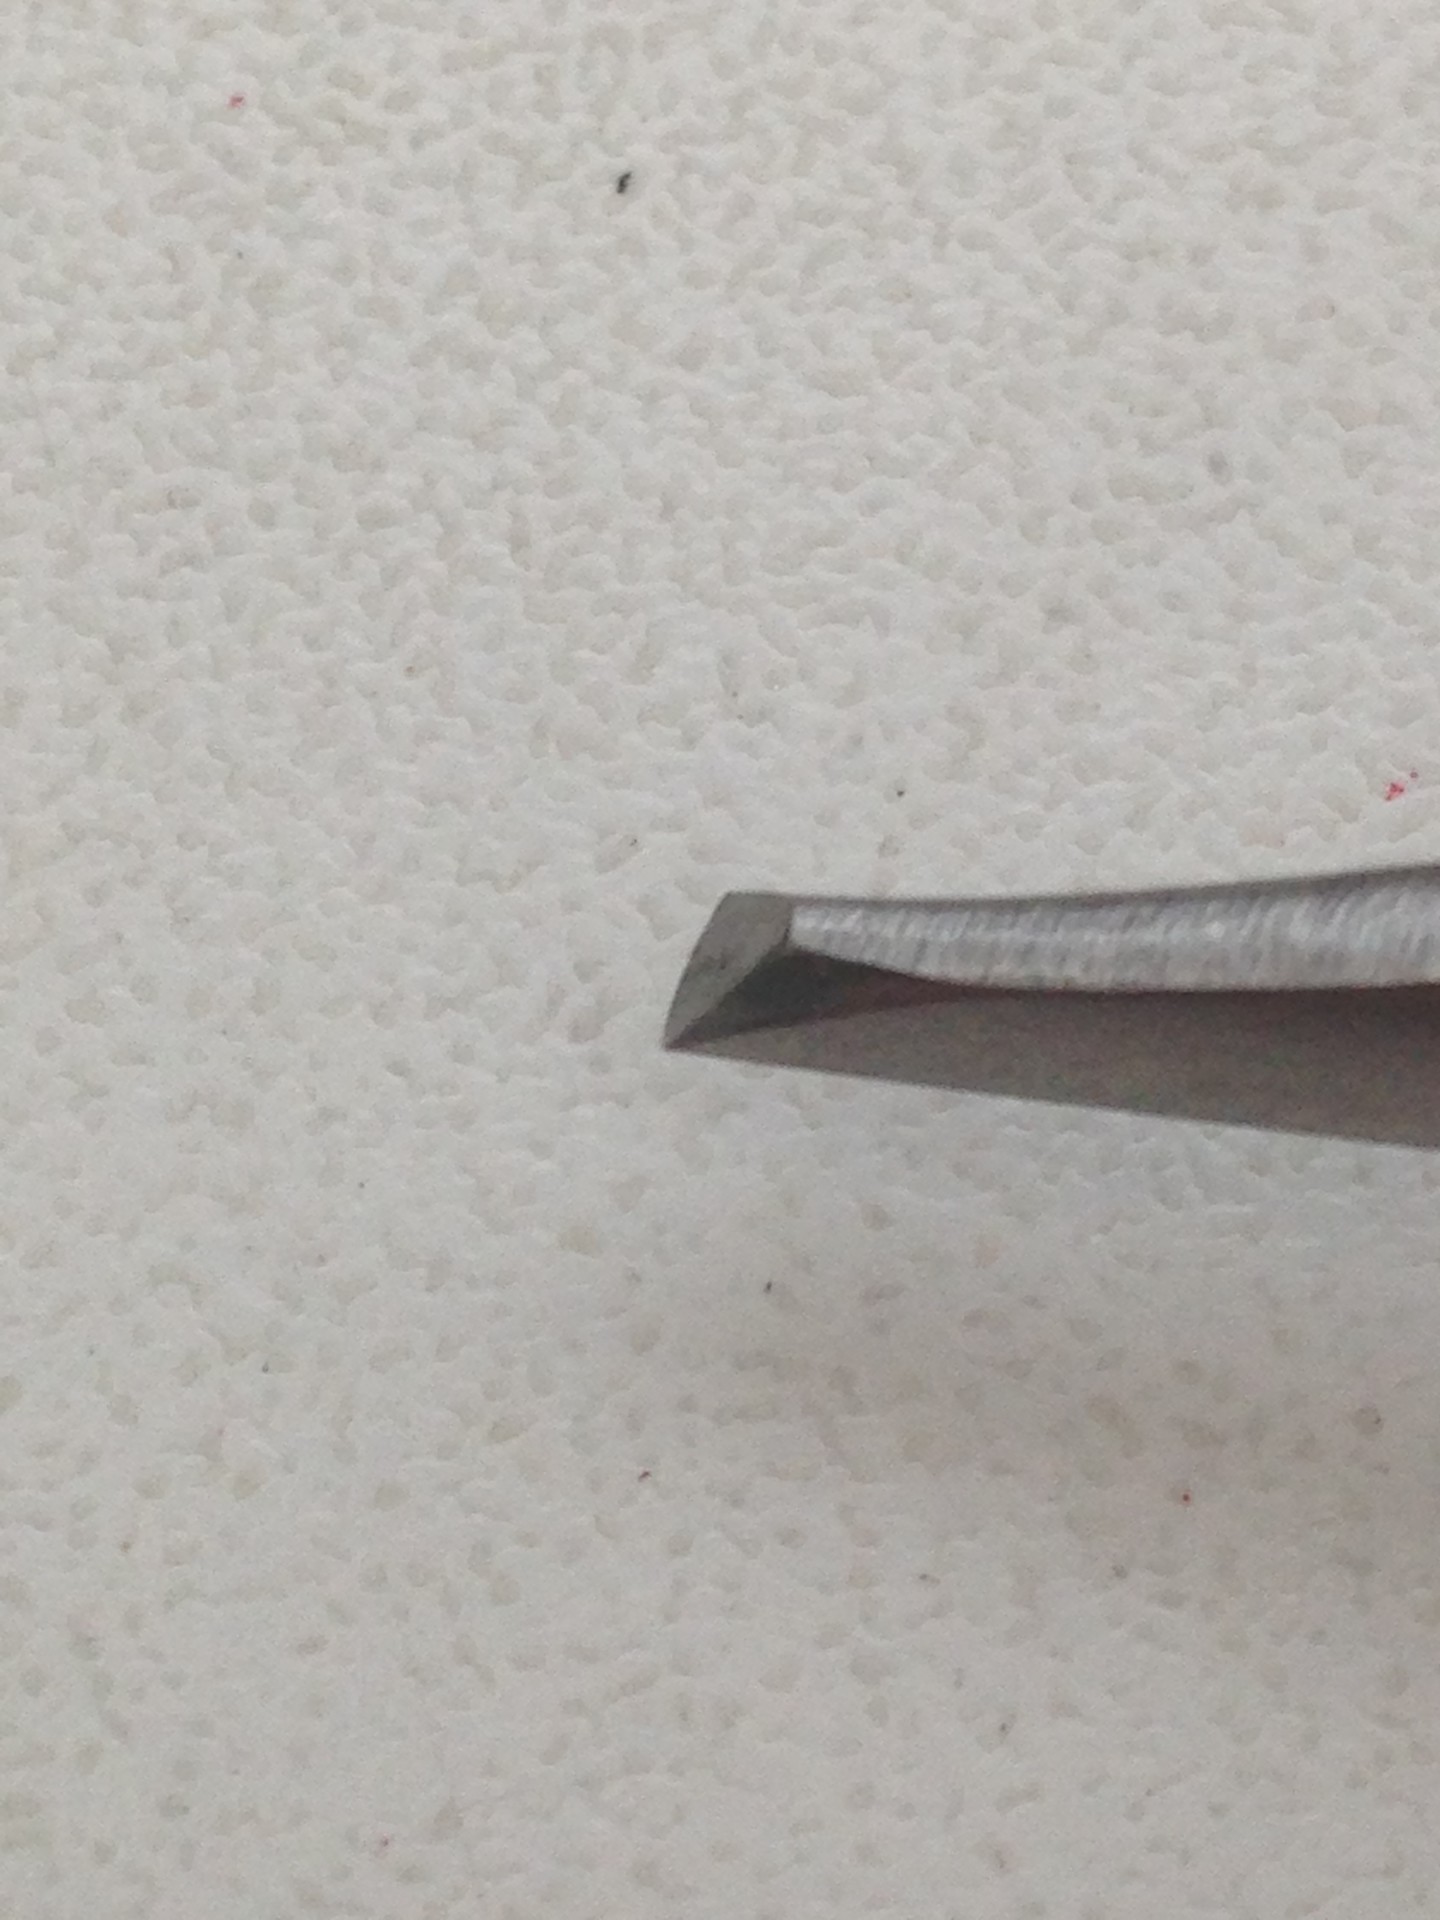
Unsatisfied, McFadden knew there had to be a better tool out there, and he looked no further than the parrot-beak pliers he favors for bending prongs over stones while setting them. If it was good enough for setting the stones, it might be good enough for removing them. But first, it needed one critical, but simple, modification.
He used a separating disc to trim up and cut a notch into the shorter jaw. He then gave the notch a thin, sharp edge, which he can now wedge between the stone and the prong tip he's trying to lift. He places the long jaw of the pliers against the base of the prong, then applies gentle pressure to lift the prong off the stone.
"The long jaw becomes the fulcrum, so it doesn't apply any pressure to the stone. You don't even need to squeeze the pliers shut," says McFadden. "It's a simple modification that gives you a tremendous amount of control and allows you to lift the prong without snapping it off."
Suck It Up
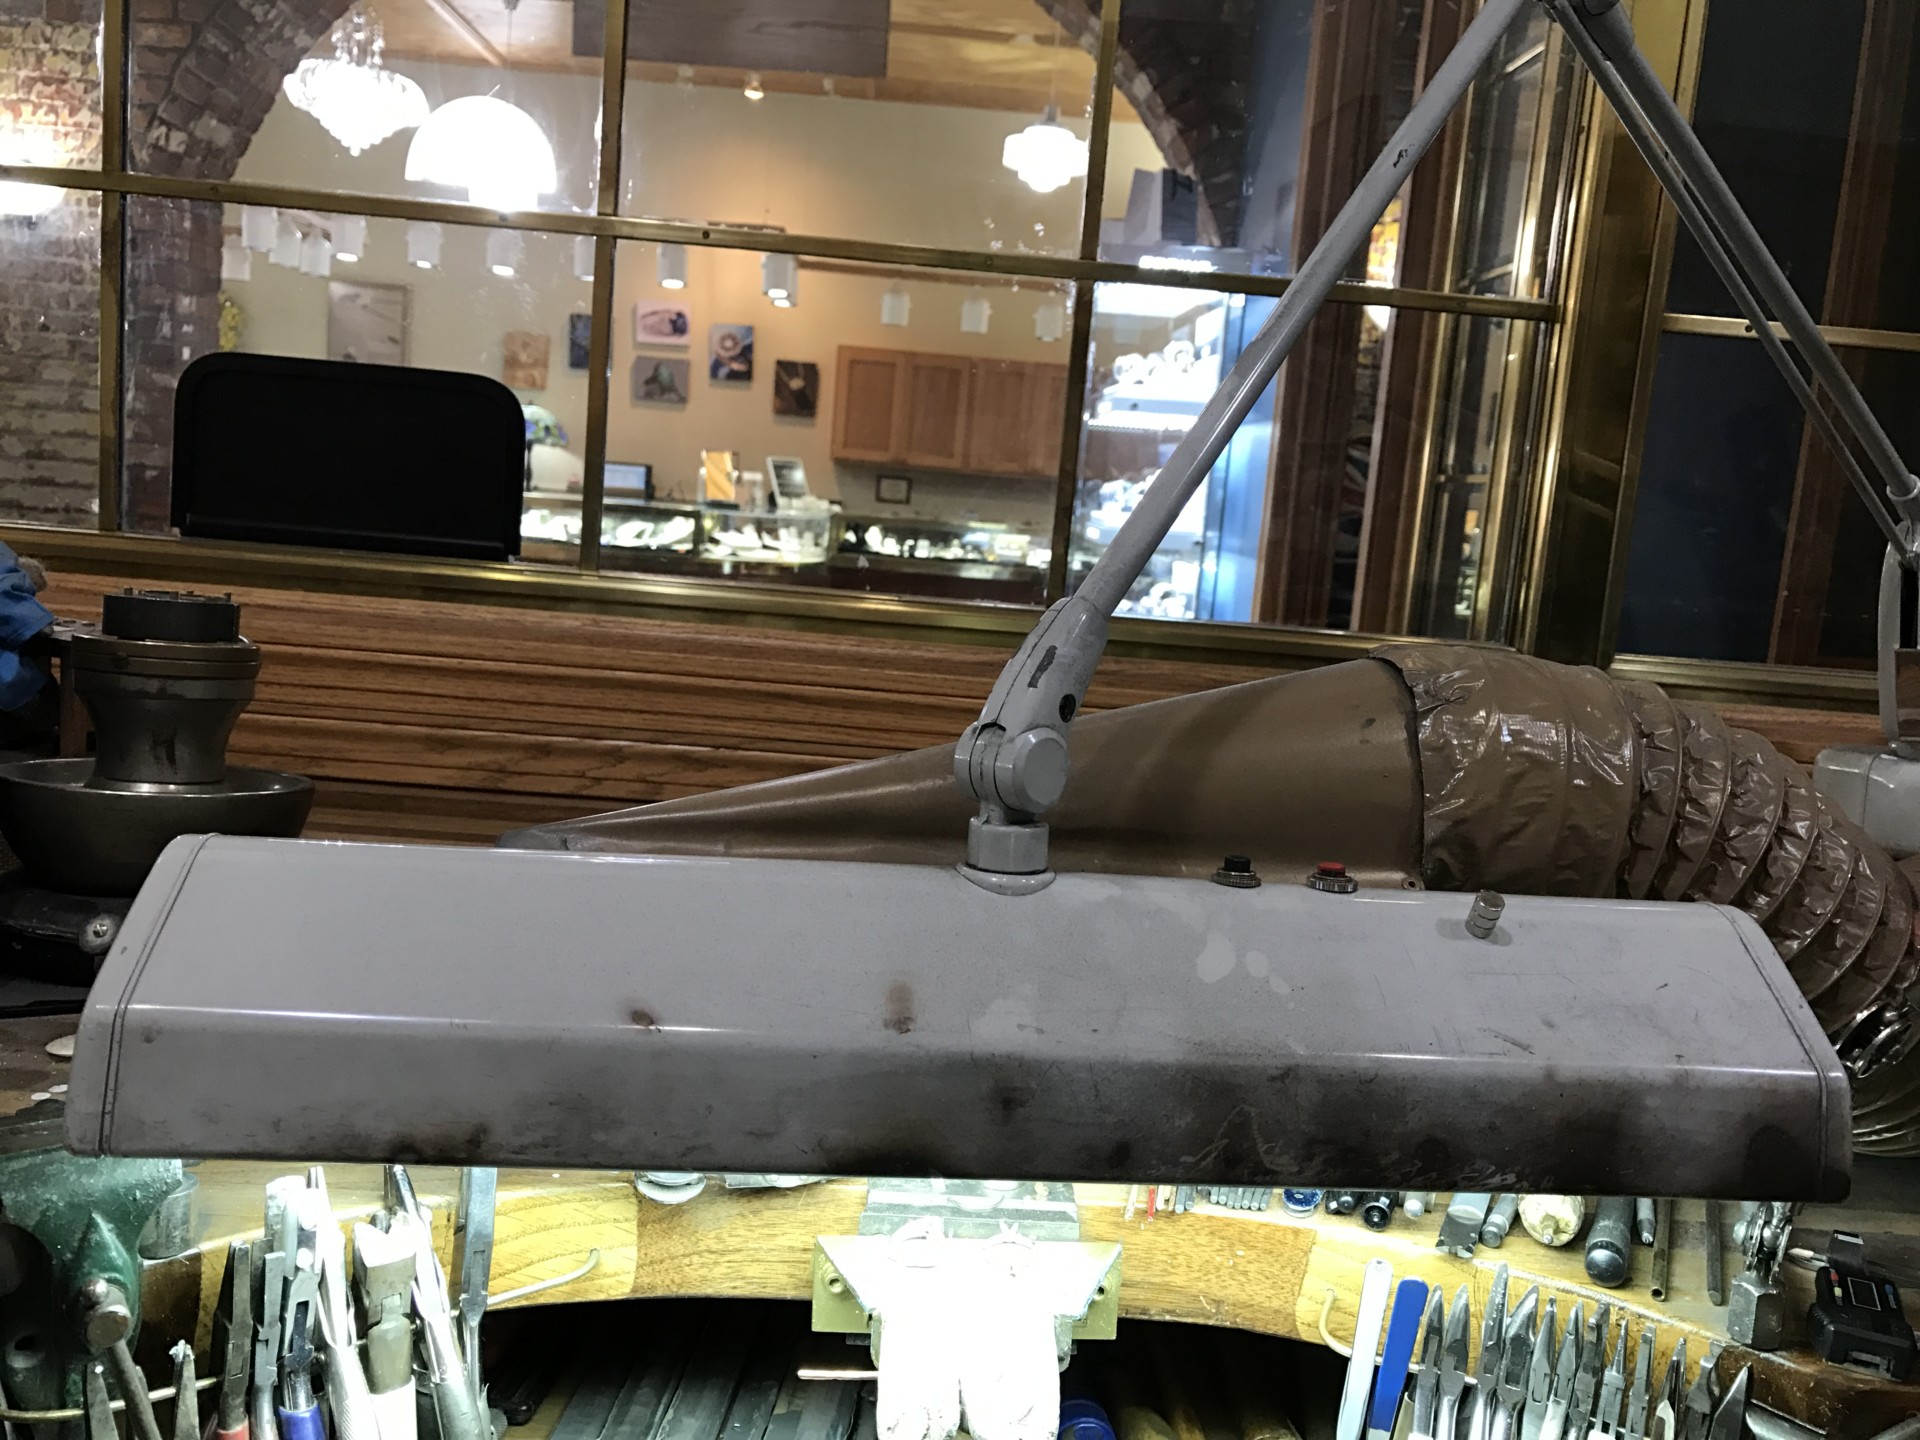
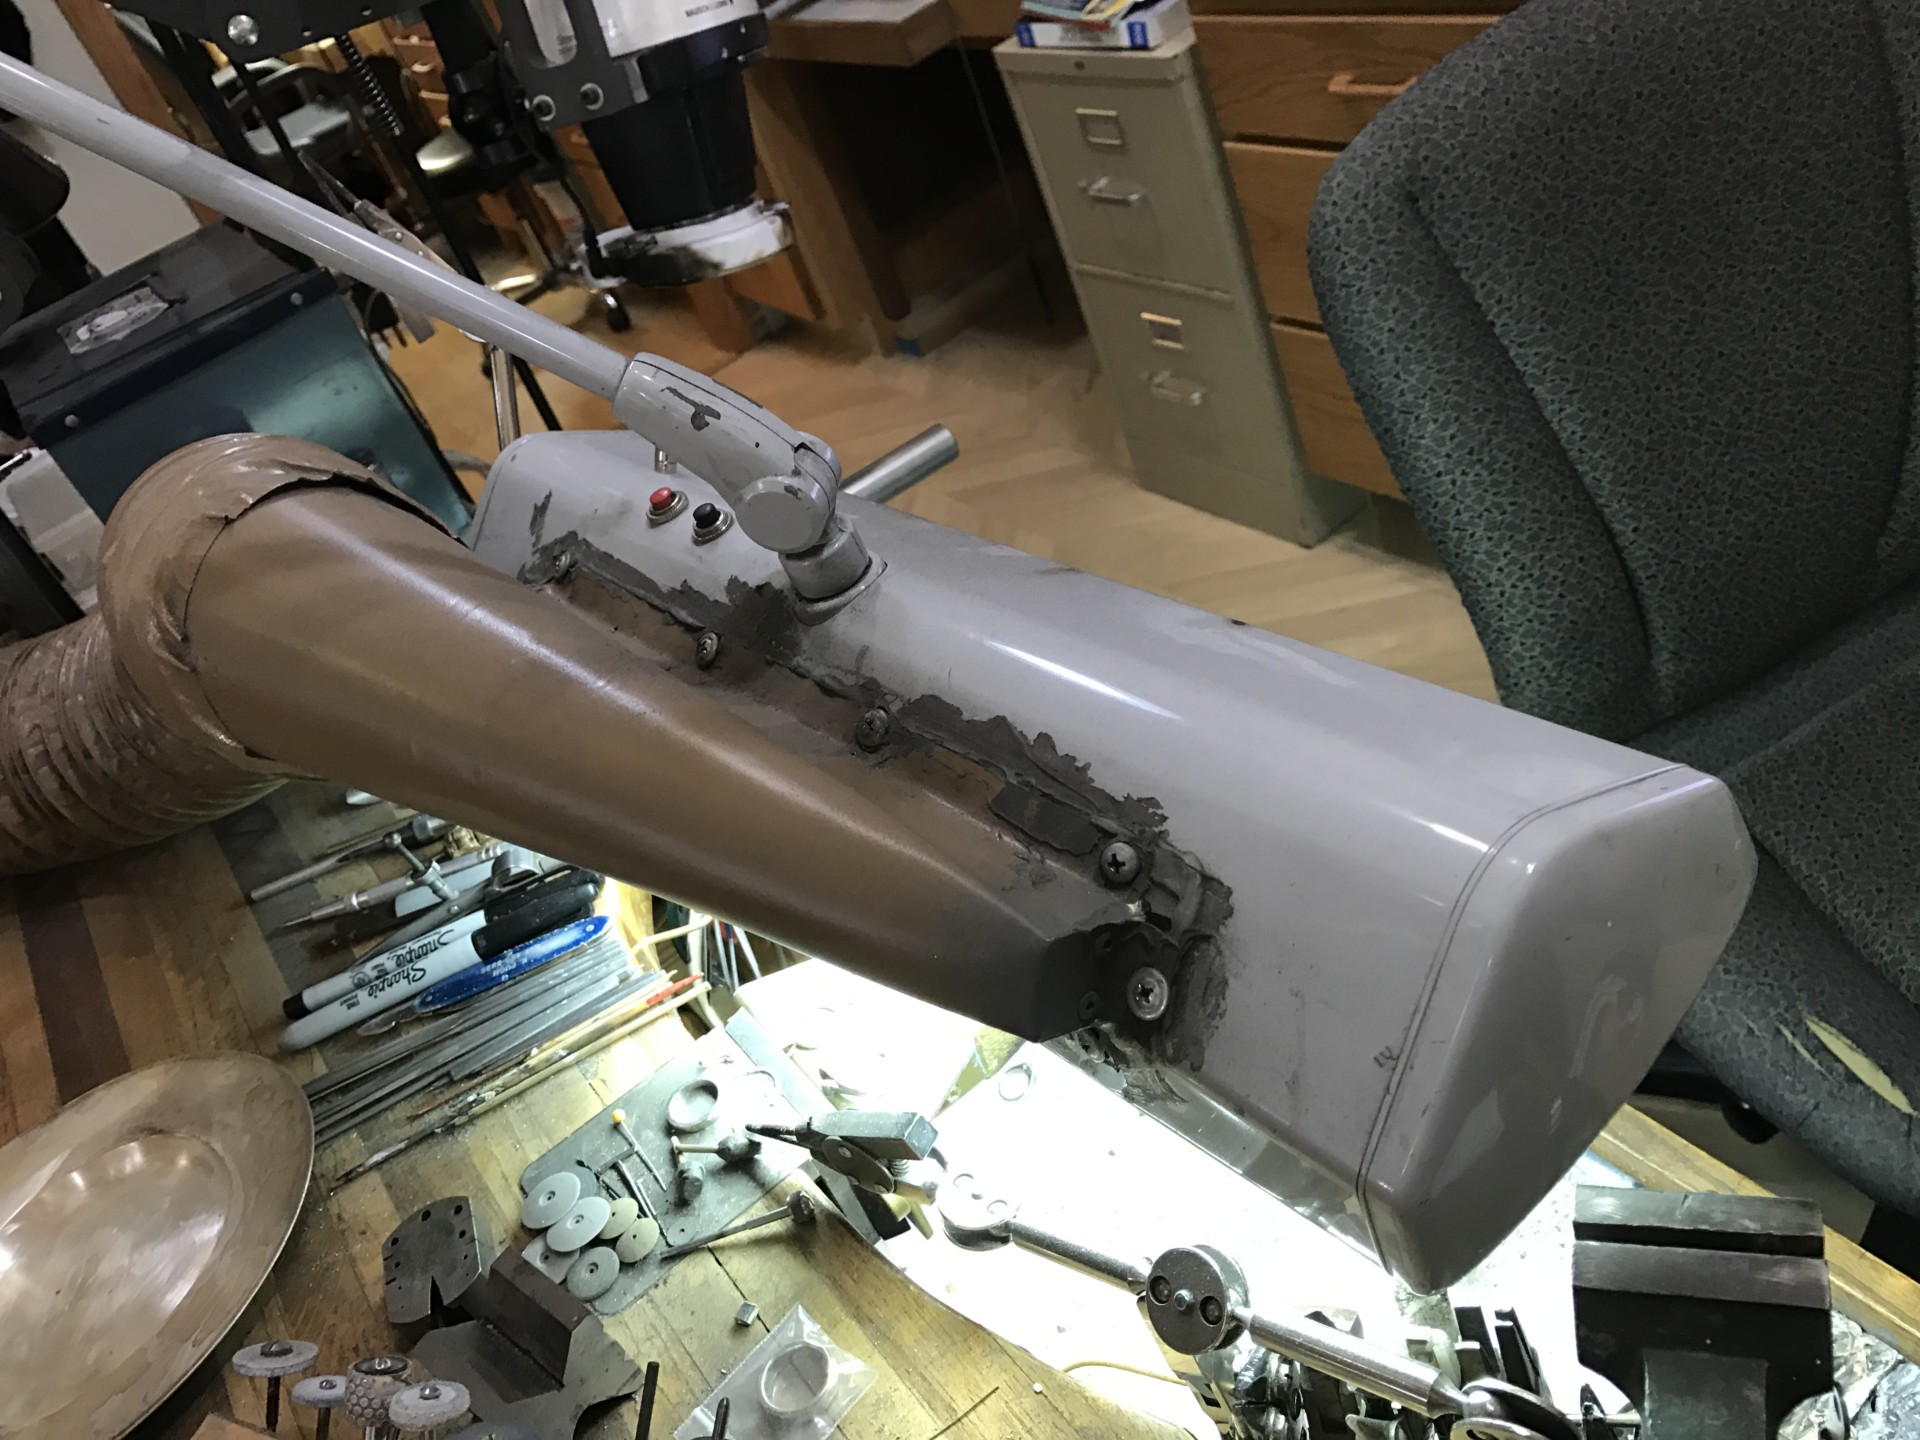
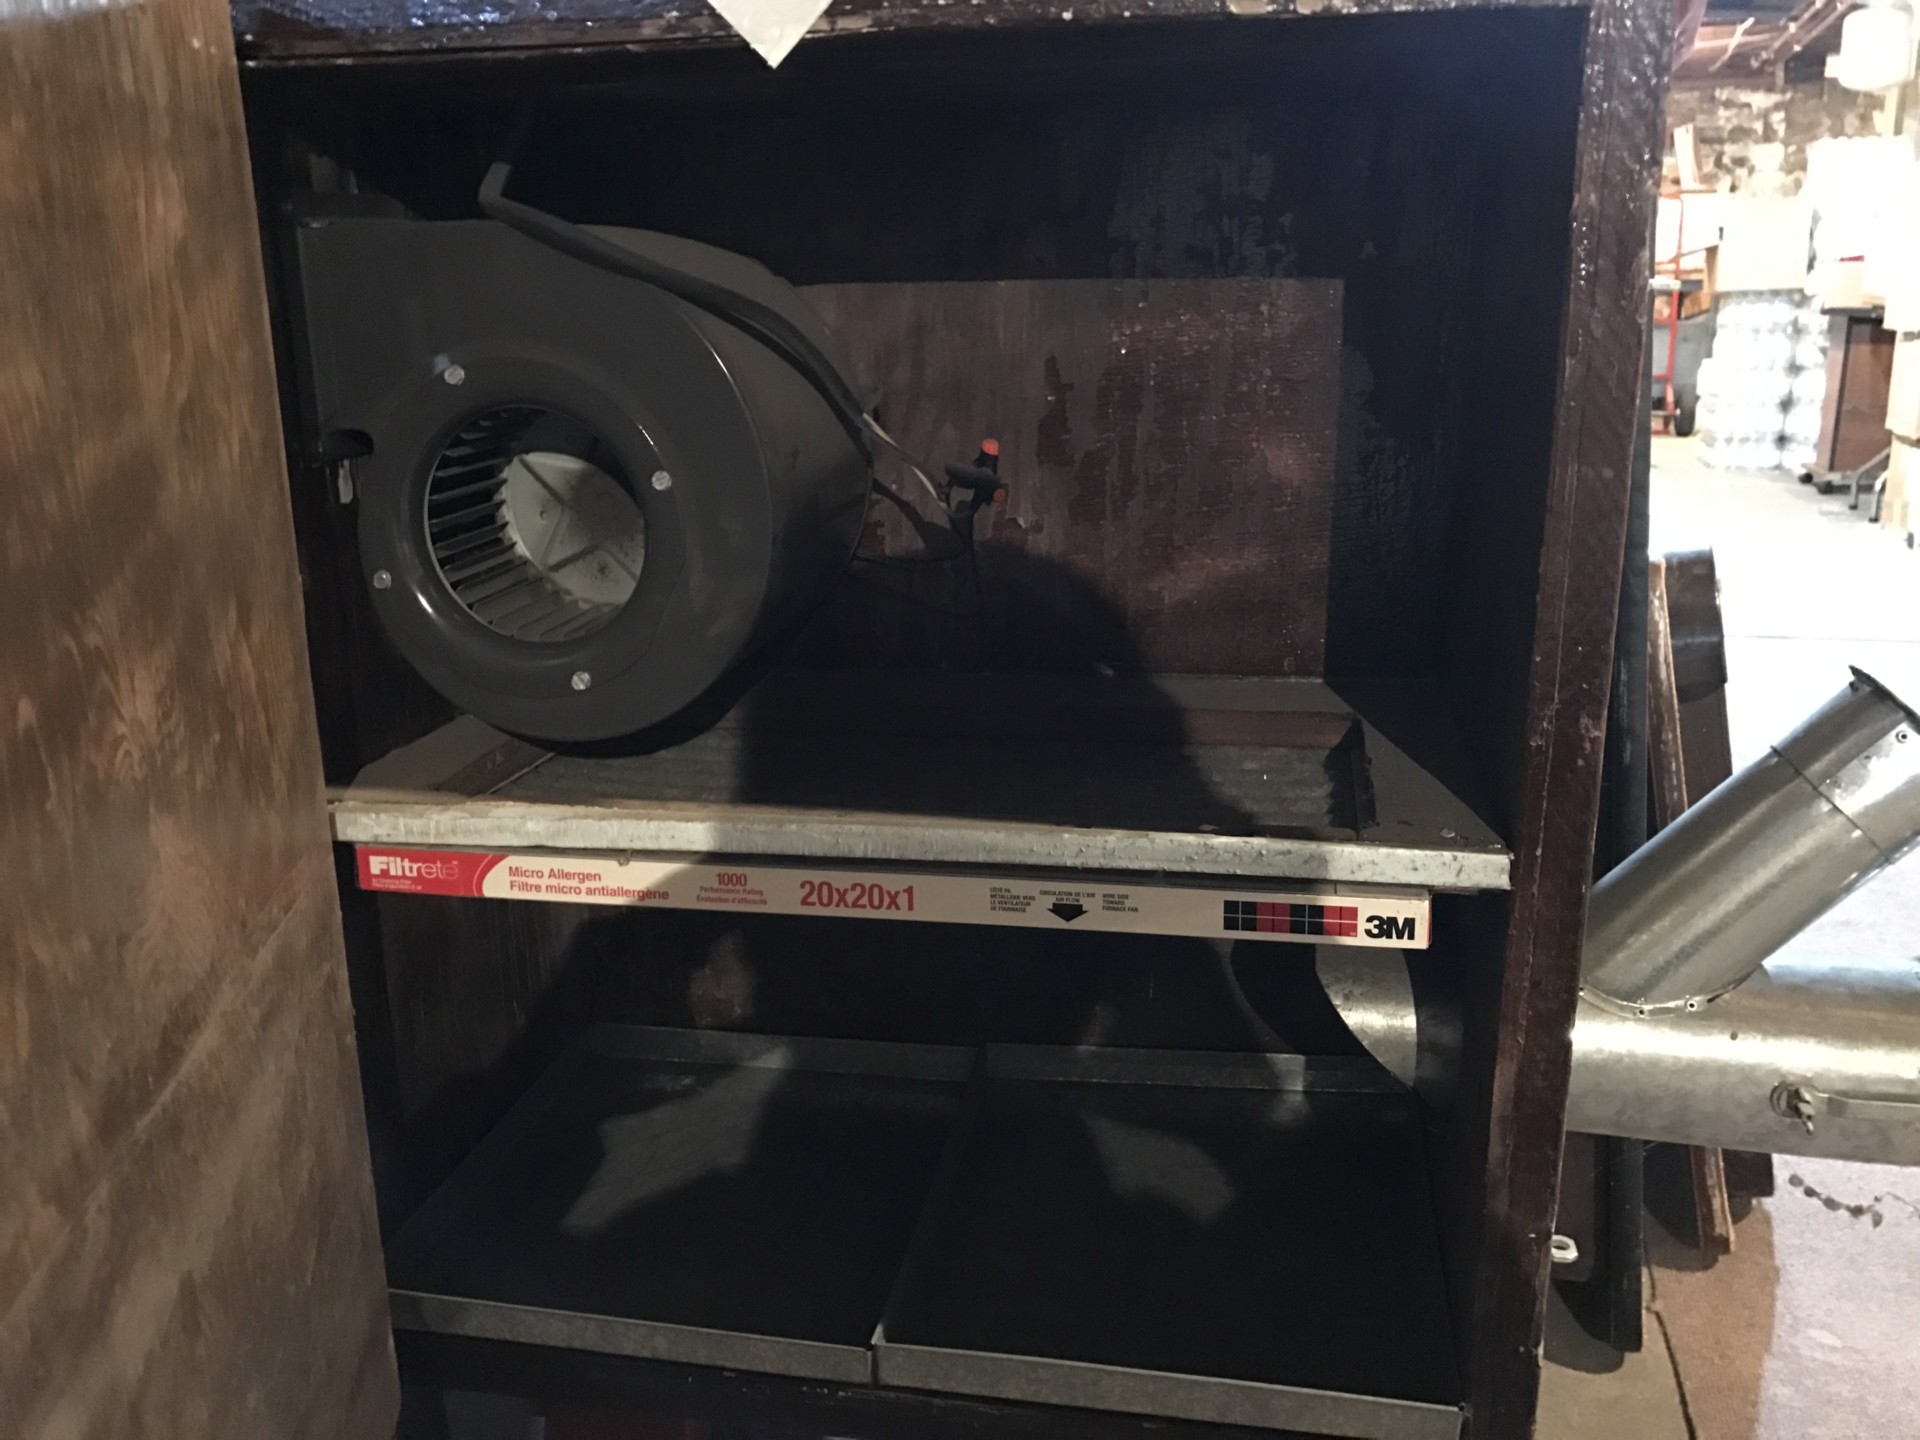
Most jewelers view the space on their benchtops at a premium. They need not just space to do their work, but also room for the many tools they like to keep close at hand. Not wanting to sacrifice precious space on his benchtop, Kevin Pugh of Pugh's Designer Jewelers in Newark, Ohio, decided to combine two critical tools into one: his bench light and a ventilation system.
The idea for the system came when he realized that the body of the light, under which he works so closely, would act as a perfect plenum for a dust collection system. "It's right there in front of you and over what you're working on," he explains.
Originally, he had a ventilation unit that sat on his benchtop, but he was unhappy with the amount of space it took up and its location. "It would draw things from the side," he says. "Fumes and dust tend to go up."
He dismantled his three-bulb lamp, cutting a long rectangular hole in the back of it. (He notes that this technique will also work with a two-bulb lamp, but the three-bulb lamp is larger and will catch more fumes.) He then made a metal attachment that he designed to fit the hole he had cut into the light.
To attach it to the lamp, he laid some silicone around the edge of the hole to create a tight seal, then used short screws to join the metals. A dryer hose runs from the back of the metal attachment through a hole in the floor into his basement. There, the hose feeds into a homemade box that contains a 600 cfm squirrel-cage fan powerful enough to suck the air from his bench and filter out any precious metal dust. "The devices on the market were only catching a fragment of the fumes," he says. "I was looking for something more effective."
Now when he's working, he no longer has to worry about positioning his work or fume extraction system perfectly for maximum efficiency. Since he's already working under his modified bench lamp, he simply steps on the foot switch he installed to activate the exhaust system. "The dust is horrible during grinding and polishing," he says. "I hit the foot pedal, the squirrel-cage fan kicks in, and I have instant suction. It's powerful."


Sharp As a Razor
Gerry Lewy of Gemz Consulting in Toronto has dedicated his life to perfecting the art of setting stones. And through his studies he's learned the importance of having a nice, clean edge on his settings—and the right tools needed to achieve that.
In his practice, Lewy relies on a series of gravers to do his cutting work, with some modifications. "Tool suppliers make good gravers, but they're very, very thick," he says. In order for them to be suitable for Lewy's cutting work, he first needs to modify them.
Lewy starts with a standard onglette graver. He begins the shaping process with a bench grinder because of the amount of metal he aims to remove, which he estimates to be about 50 percent of the material. He grinds away metal from the tip of the graver to the highest point of the graver face, creating a sharp angle.
When the graver looks sufficiently shaped, he'll use his oilstone to finish it off and remove any sharp, rough edges. If it's still too wide, he'll take it back to the bench grinder to remove and shape more material.
"I spend about 50 percent of the time working on the bench grinder, and the other 50 percent on the oilstone making subtle changes and watching the angle. Going back and forth, back and forth," he explains. "I want the right side of the graver to be almost like a razor blade, since that is the side that will come in contact with the stone."
Once he's satisfied with the shape of the graver, he'll get to work using it to bright cut along channel settings as well as bezels. "I use the modified graver to give it a nice, clean shine of an edge," he says. "It allows [me] to bright cut on the inside of the setting in one fell swoop." After every two or three cuts, he'll check the sharpness of the graver edge with his nail. "The graver edge has to be sharp at all times," he says.
![]()
In association with
![]()
The award-winning Journal is published monthly by MJSA, the trade association for professional jewelry makers, designers, and related suppliers. It offers design ideas, fabrication and production techniques, bench tips, business and marketing insights, and trend and technology updates—the information crucial for business success. “More than other publications, MJSA Journal is oriented toward people like me: those trying to earn a living by designing and making jewelry,” says Jim Binnion of James Binnion Metal Arts.
Click here to read our latest articles
Click here to get a FREE four-month trial subscription.
Related Articles

Perfect Hand Polishing Tips

Modified Split Mandrel to Bezel-Set Round Stones

Customized Beading Tool Retipper, Trays & Polisher

Fold Forming Tool List


The All-In-One Jewelry Making Solution At Your Fingertips
When you join the Ganoksin community, you get the tools you need to take your work to the next level.

