
From Titanium to a Fine Piece of Artisan Jewelry
Making prong settings for items that can not be fired in place. I would like to take you on an exploratory trip by incorporating Titanium into a piece of fine artisan jewelry that is beautiful on the front, and just as interesting on the back. Because Titanium is a unique material to work with, (and no two pieces are alike), I will discuss the method to my madness when working with it, and hopefully through this journey, you will develop ideas and methodology that will inspire you to create your own one-of-a-kind jewelry..
17 Minute Read
This article shows how to create a fine piece of artisan jewelry from a unique material as Titanium. It wasn't easy but it was worth it!
In my jewelry booth at shows, I display signs that say "Please Touch." The first thing customers do is chuckle, because they are used to seeing signs begging the customer to do the complete opposite, "Don't Touch". Then they head right for the Titanium jewelry.
 They are intrigued by it, because it's bright, colorful, sculptural, and very different from anything they have seen in the past. They pick it up, turn it about, and examine the brilliant colors on all sides. They hold it under the light tilting their hand, and suddenly they notice the subtle color changes and sparkle at every angle. They hold it up to their skin, in front of a mirror, and imagine what it would look like on.
Finally, they take a peek at the reverse side. I've always wondered why it takes less than five seconds for a customer to look at a piece, and then flip it over to view the backside. What are they expecting to see? For this reason most of my jewelry has something on the reverse side as well as the front. Something that makes turning it over worth the effort.
I would like to take you on an exploratory trip by incorporating Titanium into a piece of fine artisan jewelry that is beautiful on the front, and just as interesting on the back. Because Titanium is a unique material to work with, (and no two pieces are alike), I will discuss the method to my madness when working with it, and hopefully through this journey, you will develop ideas and methodology that will inspire you to create your own one-of-a-kind jewelry.
Supply List
|
|
Repairing the Titanium
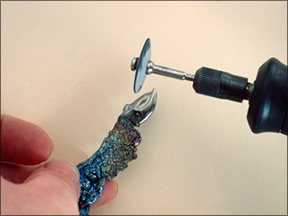
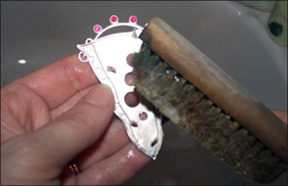
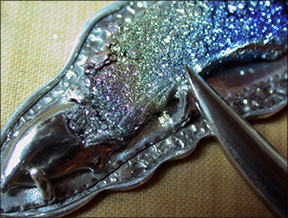
I selected a piece of Rainbow Crystalline Titanium that had a matte gray area on the bottom that I wanted to polish. When polishing select areas, or removing sharp edges, use a dremel equipped with a rubber wheel made for use with Titanium. Start with a course wheel, and progress to a medium and then a fine wheel. Remember to keep the wheel moving to prevent grooves from forming. The resulting reflective mirror finish is a lovely contrast to the rainbow crystalline areas.
Making a Titanium Placeholder
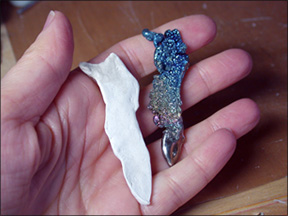
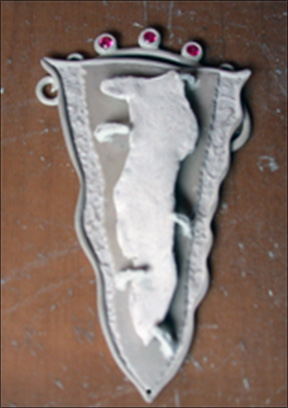
 | In my design, I created prongs to hold the Titanium in place. Since Titanium cannot withstand the heat of a torch or kiln, make a placeholder out of paper clay. The placeholder will be a support to rest the prongs when you fire the piece in the kiln. The paper clay placeholder should be roughly the same shape and size of the Titanium. Although it does not have to be absolutely perfect, it should be the same height of the titanium at its highest point. |
Making a Template of the Design
 | To begin, I start with a drawing. By putting the Titanium in the center of a piece of paper and drawing around it, it is easier to envision how it will look in a finished piece. While drawing, consider the orientation in which it will hang, and the mechanisms on which to hang it. Decide how to hold the piece in place; with a free-formed bezel perhaps, or prongs, or any other number of creative solutions. The success of any art object is the consideration of its design and balance of elements. It is no different when creating jewelry. |
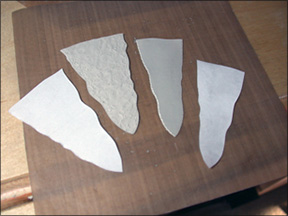
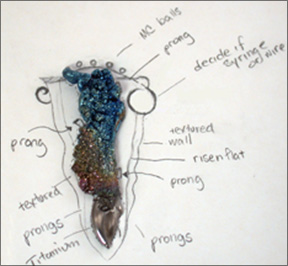 | After creating the drawing, enlarge it 118%. Make several copies, one to look at as you work, the others to cut up as templates for the various steps in the project. Use one of the copies to cut a template for the base, and another copy for the piece that overlaps the base.
|
Cutting out the Base Pieces
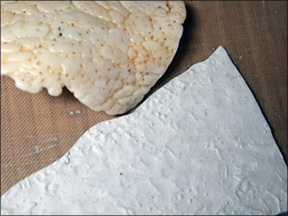 | Throughout this project, whenever working with fresh metal clay, always put a bit of oil your hands, tools, and work surface to prevent sticking. You will want to roll the base piece to four playing cards thick, put a texture on it, cut it according to the template, and set to dry. |
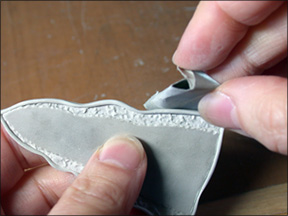
 | I used a seashell with a very unique pattern on it. After it dries, use a coarse grit sandpaper to refine the edges. Also, sand the back, beginning with the coarse grit polishing paper, and ending with the finest grit. Next, cut the panel that sits on top of the base piece by using a sheet of clay that had been rolled two playing cards thick. |
 | After it dries completely, use a coarse sandpaper to refine the basic shape. Using vertical strokes, take a round needle file, and follow the perimeter making a grooved pattern. To make a random pattern, use long and short strokes alternately. Polish the front of the panel with course to fine grits of polishing paper. |
 | Attach the two pieces together by scoring and slipping the areas that overlap, and use firm, but gentle pressure to connect the pieces. |
Framing the Base
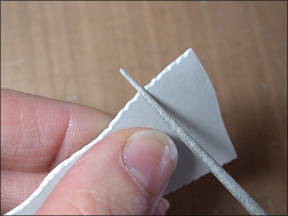
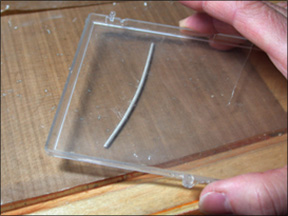 | Pinch off enough clay to make a snake that will go around the perimeter of the piece. To make a uniform snake, put a ball of clay under a flat sheet of Plexiglas or a similar see-through flat surface, and use even pressure to roll the snake. Cut the snake in pieces, making each piece a bit longer than each side of the artwork. Keep the snakes under plastic until you are ready to use them so they won't dry out. Because you used a coarse grit sandpaper to sand the edges of the bottom piece, you will not need to score it. Take a brush with a bit of water and moisten the edges, and let it sit for several seconds to reactive the clay in that area. Use this technique throughout the project any time you are attaching dry pieces to any other piece. |
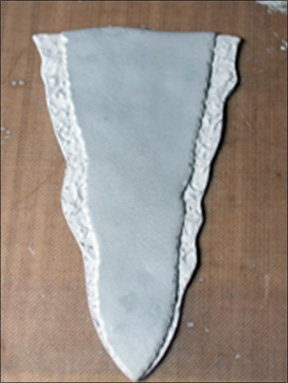
 | Working on one side at a time, put thick slip on the edges, and firmly press the snake to the edge with a smooth tool. Leave the extra clay at the corner for now and add your second snake the same way. Where the two ends meet, miter cut them, and use slip to join them together. Do all corners the same way and let dry. Flip the piece to the back, and go over these seams with a thin slip to hide the seams. Or, for a different design choice, take a needle tool and go over the seams to emphasize the line. |
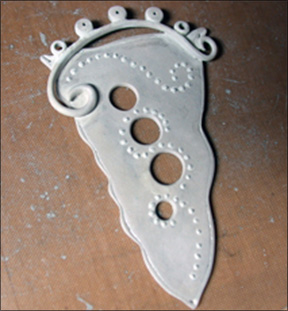
 | Let the piece dry completely. At this point, you can leave the frame alone or add interest to the lines, giving them movement by varying the line width. Do this by selectively sanding the inside curves of the frame to make some parts more refined and slender, while leaving other parts thicker and more bold. Finish the framed base by polishing the edges with decreasing grits of polishing paper. Finally, at the bottom of the base, add a hole to hang the dangle. Start by slowly turning a pin vise equipped with a drill bit; gradually add gentle pressure until the bit goes through the base. Open up the hole if need be with a round needle file. |
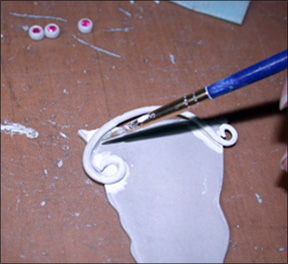
Making the Detail Scrolls
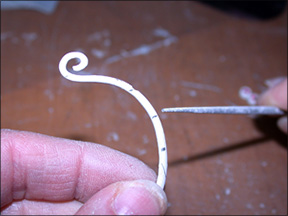 | Roll metal clay snakes as above to make the scrolls. Put an enlarged drawing under a clear, oiled plastic sheet, and use it as a guide for proper placement of your snake. Roughly position the snake over the design. Run a bead of water over the snake and use a fine brush to slowly push it into place. Keep adding a bit of water as needed to keep the snake flexible, but be careful not to make it soggy. When finished, let the snakes dry completely. Sand them using course to fine polishing papers. You may refine the shape of the details as described previously in "Framing the Piece."After the details are completely sanded and refined, I often take an extra step. I put the pieces in my "arts-only" toaster oven, and bake it at 500F for 20 minutes or so. I take this step anytime I have parts needing to be assembled that are delicate. This step of pre-baking the clay makes it hard and sturdy while working on the rest of the piece. A warning though, make sure that all of your pre-finishing and sanding is done beforehand, because you won't be able to do that easily after taking this extra step. |
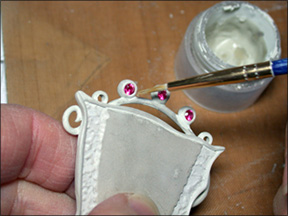
Attaching the Scroll Detail, Ball Set Rubies and the Bails
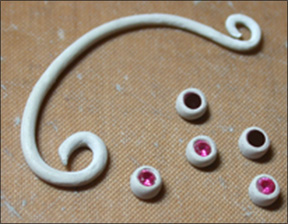 | Place the finished scroll detail in position and mark the position with a pencil where the two pieces overlap. Also mark the three positions of the rubies and the bails on either side of them. With a round file make a groove in the snake approximately the width and shape of the edge of the ball setting where the rubies and bails will sit. This is done for two reasons. First, it gives the scroll and rubies better contact between them by providing more surface area. Second, it provides more room to place thick slip in between the scroll and rubies. Before pasting the two items together score and wet the contact. After it sets up for a bit, move to a hot plate. |
 | Here is a tip for putting the scroll and the base piece together in a "blind spot" that you cannot see. Put in position the base piece and the scroll as marked with the pencil earlier. Lift the base and wet the scroll where the two pieces overlapped. Place the base down again in position for a second and lift. You will see the wet area on the back of the base, and now you know where the contact area is for scoring and slipping the two pieces together. Working on the reverse side, score, apply a heavy layer of slip, and let dry. Go over the areas of contact on the scroll, the base, and the rubies with a wet brush to smooth. Your aim is not to mere wet the pieces, but to modify the surface by wetting and activating the surface clay to make a thin slip or slurry and gently moving it around so that all major imperfections are gone. Let dry and polish using coarse to find polishing paper. The sanding steps are important if you want your surfaces and edges to be clean and crisp. |
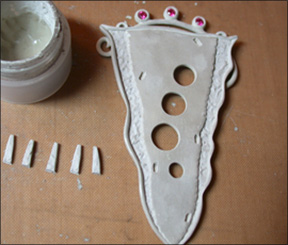
 | Take Time Out to Pay Attention to the Back of the Piece. Although you could easily skip this series of steps, this can turn a neat piece into and extraordinary piece. There is so much color on the back of my Titanium, it would be a shame to hide it, so I incorporated some windows for viewing the Titanium and then added some embellishing details to carry over some of the design elements throughout. The main challenge is to properly place the windows to be precisely on the opposite wall behind the Titanium after it is set in place. |
Making a Reverse Image Template
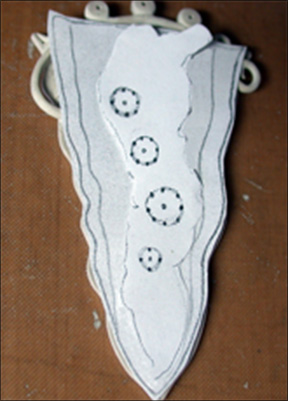 | A reverse image of the original drawing will be needed. However, this time we need to add the windows for viewing the back of the Titanium first. Scanning the drawing into a computer and used a photo program to flip the image is one possibility for reversing the image, but here is a low tech method that can be used as well. Flip the drawing to the wrong side, and hold it against the glass of a window (or a light table), so that you could see through it. With a clean white piece of paper placed on top, outline the outside of the metal clay piece, the position of the Titanium, and the addition of the windows only. Enlarge the new drawing 118% and cut the outer perimeter of the template. |
Making the Windows in the Metal Clay Base
 | With the drawing positioned on the reverse side of the metal clay base, use a needle tool to pierce through the drawing and transfer a dotted pattern that will be used as a guide to pierce the metal clay base. |
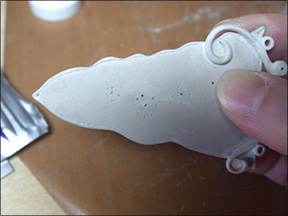
 | Also use the needle tool to indicate the center of the area to be pierced. Remove the template, and use a pin vise with a drill bit to create a hole that goes from back of the piece to the front. Start enlarging the opening with the needle files until you get the desired shape and size. Use coarse through fine polishing papers to clean up the windows. |
 | Add Embellishments on the Reverse Side as desired. I decided to add a pattern of dots. Thin the slip and use a fine brush to apply small dots in organized rows. Go over the dots with more slip if necessary. To smooth the shape of the dots, use fine polishing paper.You can use your imagination to create whatever embellishments you want, but remember 2 things. This side of the piece will be against the wearer's body, so protrusions may be uncomfortable and you will still need to finish work on the front, and you don't want to make delicate raised elements that can break off while you work on the front. |
Considerations for Creating Prongs
The function of the prongs is to hold the Titanium in place securely. Considerations for successful prongs are the size and weight of the prongs, placement, and design. All of these decisions are made when the drawing is created.
The size of the prongs should be long enough so after firing they will still be able to go over the top of the Titanium to hold it in place. The tensile strength of fine silver should also be considered when you think about the weight of the prongs. They must be strong enough to withstand wear and tear by the consumer; in addition you don't want them to accidentally bend out of place risking a loose setting for the Titanium.
The prongs placement should allow for the Titanium to be put in and taken out easily after firing. Be sure the placement of the prongs makes good design sense as well as functional sense. For the prongs to do their job, they should be placed so that the Titanium will not shift or come out. Adding an extra prong is better than not having enough.
Making and Adding the Prongs
Although I will describe 2 ways to attach prongs, the design options for plain or decorative prongs and attaching them are infinite. Use an enlarged copy of your drawing, which includes prong placement, and cut out another template of the entire piece.
 | As you did earlier, place the drawing over the base and use your needle tool to poke through the paper to mark the spot of the metal clay where the prongs are to be. Set aside. Shape and texture the prongs, as you desire. I used the shell texture that was used for the base. The metal clay is rolled to 4 cards thick and the texture is applied. Cut out 5 small, long triangular shapes, let then dry, and sand. Where the prongs were indicated on the base, I took a needle tool and gradually made a deep recession a bit longer and wider than the bottom of my prong. The two-layered base is quite thick, but be sure not to go through to the back. Wet the recessions. Retrieve the paper clay placeholder that you made earlier in the project, and put it in position. Use the placeholder to lean your prongs against if support is necessary. Add a small pea of lump clay or very thick slip into the recession and place the prong into the recessed area. The fit should be snug forcing some of the clay/slip out and around the base. Smooth the slip around the base of the prongs to fill in the joint so that the attachment is seamless. Add more slip when dry to fill in any gaps. |
 | The second prong attachment option is to add an aesthetic ball or shape of clay to the base and embed the prongs into it. Do this by scoring the base, adding thick slip and pressing the clay in place. Wet the surface a bit of the freshly added clay and insert the prong and use more slip to hide the seams. When the prongs are dried and in place, carefully use the polishing papers to sand them and around the base. You can pre-bake the prongs as mentioned earlier before inserting in the clay if breakage is a concern. |
Firing and Finishing
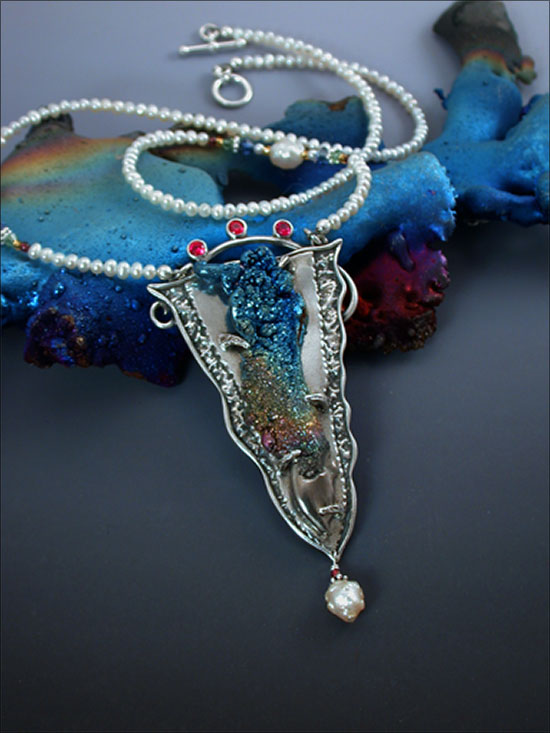
 | Fire the piece at 1650 degrees for 2 hours on a bed of vermiculite with the paper clay placeholder in position. Set the kiln to ramp up slowly and cool down gradually because of the gem inclusions. When it comes out of the kiln, you can complete the project with the finish of your choice.I suggest that what ever finish you desire, you want to work harden the piece to make the metal and especially the prongs as strong as possible. This is a simple trick I developed for work hardening a piece in a tumble. Add the piece to the tumble, a bit of hand soap, stainless steel shot, and water measuring approximately one inch above the level of the shot, and tumble for 45 minutes or longer. If you do not want the piece to be shiny, first put your piece in a zip lock plastic bag that is a bit larger than your piece and you will retain your present finish. |
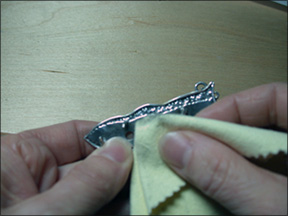 | The finish that I chose was to first polish the fired piece with a soapy brass brush and tumble in stainless steel shot until shiny. Then I added an antiqued finish by dipping the piece in a warm bath of liver of sulfur (LOS) followed by a coldwater rinse. The LOS mixture was a small crumb to 1 cup of distilled water making a pale wheat color formula. The color is built up slowly by repeating this series of steps several times until you reach black. For the final cold water rinse, add soap and baking soda until diluted, and give the piece one more dip to completely retard the LOS from developing any further. A polishing cloth is then used to selectively remove the patina on all surfaces except where the details were to be emphasized. |
Securing the Titanium in Place
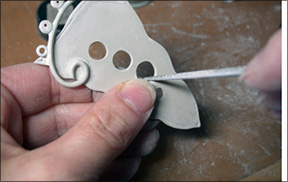
 | Slip the Titanium into position being careful not to scratch the metal with the rough parts of the Titanium. With a burnisher slowly and carefully press the prongs in place, but before proceeding, protect the adjacent areas of the Titanium, as not to scratch it should the burnisher slip. Start on one side of the piece, jump across from that position on the other side to another prong. Continue until they are all pressed in place. There should be no play or wiggle with the Titanium. |
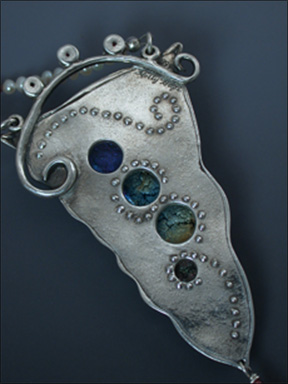 | You may add a bit of two-part epoxy before putting the Titanium in place for extra assurance. First, place the Titanium in position and note the contact areas. Remove the piece and score the metal. Mix clear non-yellowing two-part epoxy and put it on the metal. Add the Titanium. Checkpoint: Make sure the contact area on the Titanium is not porous enough to let the epoxy to seep through to the front. Epoxy on the Crystalline surface will flatten the color by preventing the light from bouncing of the small prisms. After the Titanium is in place, the dangle and chain are attached. This piece was set off with pearls, small garnet beads, swarovski crystal and a sterling toggle. The bright white shine of polished fine silver and the sparkle of Titanium make a dazzling combination, and you will find that the Titanium itself will inspire you go in new creative directions that you never went before. I encourage you to go with it, explore new journeys and enjoy the ride. |
Related Articles

Coloring Techniques for Metalsmiths

The Modern Art of Gemstone Carving

Production Jewelers: Design, Marketing and Business

The Private Secondary School


The All-In-One Jewelry Making Solution At Your Fingertips
When you join the Ganoksin community, you get the tools you need to take your work to the next level.
