
Tips on How to Master Soldering
Soldering is probably the most commonly used and least understood operation performed in the jewelry industry. Most jewelers know how to solder a joint closed, as well as join parts together, but if asked what is happening in the process, few are able to provide a good explanation. This is the difference between knowing 'how' and knowing 'what.' Knowing 'how' enables you to perform the operation. Knowing 'what' allows you to solve problems when things don't work the way they're supposed to work.
11 Minute Read
Editor's Note: Do you remember the first time you brewed a pot of coffee? Odds are it resembled either mud or dirty river water. But after a few mornings of erring on the thick or thin side of caffeinated bliss, you eventually found the perfect ratio of grinds to water. If only that could be the case for soldering.
For many of you, soldering is something you do almost every day. It's as familiar a process as brewing java, but its complexities run far deeper than combining beans and water. Whether you've just started soldering or it seems like second nature to you, take a moment to read this article. You may be surprised at how much there is to know about this common practice.
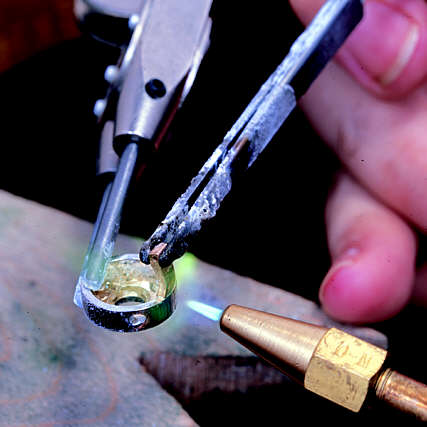 |
| Photo: Greg Gilman |
Soldering is probably the most commonly used and least understood operation performed in the jewelry industry. Most jewelers know how to solder a joint closed, as well as join parts together, but if asked what is happening in the process, few are able to provide a good explanation. This is the difference between knowing "how" and knowing "what." Knowing "how" enables you to perform the operation. Knowing "what" allows you to solve problems when things don't work the way they're supposed to work.
A basic technique, soldering often poses more questions than answers for jewelers. Whether you work in a large factory or a small shop, you've no doubt run into technical difficulties with soldering at some point in your career. By understanding "what" is happening during the soldering process, you can prevent and solve problems that could be taking up valuable time and costing you hours of unnecessary labor.
Choosing a Solder
Before choosing the right solder for an application, you should be familiar with the various types of solder available. There are two main categories of solder, soft and hard. Soft solders melt at temperatures below 700°F/371°C. Lead-, antimony-, and tin-based solders fall into this category. Hard solders melt at temperatures at or above 900°F/482°C. This category includes silver, gold, and platinum solders commonly used in the jewelry industry.
Although solders fall into two main categories, they are subcategorized by comparative melting points within each category. For example, we use terms such as weld, hard, medium, easy, and ultra easy to refer to gold solders, which are all classified as hard solders. For the most part, these terms offer a comparison of melting points between the solders in a given supplier's product line. In other words, all these terms mean is that the supplier's hard solder melts at a higher temperature than its medium. What isn't described is the overall difference in temperatures.
Since there is no standard temperature range to which solders must conform in each subcategory, you will find variation from one alloy supplier to the next. (I've found one 18k yellow gold easy solder that flows at 1,255°F/679°C, and another that flows at 1,490°F/810°C-a 235° difference, yet they are both classified as "easy.")
The lesson here is to ask the alloy supplier for the flow (liquidus) temperature of any solder you plan to purchase. It's essential that the solder flow temperature is lower than the melt temperature of the piece you intend to solder, or the piece will be destroyed.
The goal of soldering should be to produce the strongest bond necessary for the application, with a suitable color match. This is different from producing the strongest bond possible. In some applications, producing the strongest bond is undesirable, such as when attaching a head to a shank, a jump ring to a chain, or a catch to a bracelet-components that periodically need to be changed or replaced. In such instances, the strongest possible bond could lead to damaging or even destroying the piece when the component is changed. As a general rule, the lower the flow temperature of the solder, the weaker the bond.
The next consideration is to provide for the best color match to make the joint nearly invisible. This is easier to accomplish when joining components of different colors, such as a white head to a yellow mounting. White or yellow solder can be used. The eye tends to blend the colors where they come together, so as long as the solder color is somewhere between the color of either component, it will look good.
When soldering components of like colors, select the solder with the best color match for the desired bond strength. This may dictate using a higher karat solder for certain jobs; for example, when soldering a 14k yellow gold head to a 14k yellow gold mounting, you may use 18k easy solder. The thing to keep in mind is that solder occasionally flows where you didn't intend. As a result, it is best to choose the solder that will be least noticeable if unwanted flowing occurs.
Once you've chosen the right solder for the job, you're ready to complete the process. The following information will help you to better understand the "what" of soldering - and improve your ability to achieve clean, problem-free solder bonds.
Fitting the Solder Joint
It's important to make the gap in the solder joint as small as possible. A term used in the jewelry industry is "light tight": If you hold the piece up to the light, the gap should be so tiny as to let through just a sliver of light. This will provide the following benefits:
Lessens Chances of Failure
Generally, solder is softer and weaker than the component parts of the piece. Since failure is most likely to happen at the weakest area, it's best to make this area as small as possible.
Hides Defects
Using a narrower gap will hide inevitable defects. For example, the difference in material hardness between the solder and the piece becomes evident in the polishing process: The solder polishes at a faster or slower rate than the rest of the piece. Depending on the type of solder used, you end up with either a ridge or valley in the solder joint. Therefore, the narrower the gap, the less pronounced the defect.
Allows Less Area for Porosity
Solder is generally more prone to react with atmospheric gases while in the liquid state. These gases can become trapped when the metal solidifies, resulting in tiny round voids known as gas porosity. Common sense here would indicate a narrower gap will allow less area for porosity, and if any is present, it will be smaller in size. After all, it cannot be bigger than the joint.
Reduces Chances of Shrinkage Porosity in the Joint
A defect known as shrinkage porosity happens when the metal solidifies and shrinks. If the shrinkage is greater than the material's ability to compensate for it, the metal begins to pull apart from itself, leaving small, irregular voids. Since there is a relationship between the volume of material and the amount of shrinkage, less is better. The less solder needed to fill the gap, the less likely you are to have shrinkage porosity in the joint.
Ensuring a Clean Solder Joint at every stage in the soldering process, it's essential to avoid contaminants. You can start by cleaning the piece in an ultrasonic before soldering. In addition, follow these steps to ensure the cleanest possible solder joint:
Remove all polishing residue from your fingers before fitting a joint. Most contaminants affecting solder joints are introduced by a secondary process. One of the most common mistakes is having polishing residue on your fingers when fitting a joint together. Most abrasive components of polishing compounds are metallic oxides or inorganic minerals, neither of which responds well to solder. This is why it's essential to clean your hands properly before fitting a joint.
Avoid contact with oil and grease. Although some types of grease are used to form paste solders, most grease and oil will negatively affect soldering. After the grease or oil burns away, a residue of sulfur is left behind while other elements in the mix may volatize and form a gas. Solder won't flow over sulfur.
Use a fire coat or boric acid slurry to prevent oxidation. Metallic oxides left on the surface to be soldered, including oxidation, account for most solder-flow problems. Solder will not flow over a nonmetallic surface. Once a surface oxidizes, it takes on nonmetallic properties and henceforth solder will not flow over that area.
The best way to deal with oxidation is to avoid it in the first place. A fire coat should be used to prevent oxidation when the piece is heated. There are many brands on the market that are effective.
Another common surface coating is powdered boric acid. This is usually mixed with denatured alcohol to form a thin slurry, similar to condensed milk, into which the piece is dipped. Regardless of which coating you use, be sure to completely cover all surfaces that are exposed to heat. Any metal surface left unprotected runs the risk of reacting with the oxygen in the atmosphere and forming an oxide.
Remove oxidation before soldering. If light surface oxidation occurs, it may be possible to chemically strip it in a pickle solution. A note of caution here: Contaminated pickle solution can defeat the purpose by actually causing surface oxidation. If there is any question as to whether the pickle is contaminated or not, change it. In instances where the oxidation is more severe, it may be necessary to remove it by filing or using emery paper.
Use flux when soldering. You must use flux whenever soldering. Flux performs a variety of important functions. First, it reduces surface tension between the melted solder and the piece to enhance solder flow. It also forms a protective gas barrier that shields the melted solder from the atmosphere.
In addition, flux reacts with oxygen present to keep it from reacting with the metal. Some fluxes are specifically formulated to enhance this action so they are able to remove light surface oxides. However, they are not a substitute for proper cleaning. Since flux enhances solder flow, if it is applied over the entire piece the solder can flow everywhere it is present. For this reason, be sure to apply flux to the joint area only.
Understanding the Heat Source
The source of heat responsible for melting and flowing solder is one of the most misunderstood aspects of soldering. Most often, the torch is identified as the source. This is incorrect. The source of heat responsible for melting and flowing the solder is the piece being soldered. To ensure good solder flow, follow these steps:
Don't heat the solder; heat the piece. Take a look at how the heat is being applied. The torch should never be focused on the solder, but rather on the piece, so that the piece transfers heat to the solder. If the torch is focused on the solder, the piece may not be hot enough to flow the solder.
Keep the solder in contact with the surface of the piece. The solder will not flow if the surface of the metal is colder than the flow point of the solder. Occasionally the solder will float in the flux and melt due to the heat of the torch, but it will not flow over the surface without sufficient heat. To prevent this from happening, keep the solder in contact with the surface of the piece. This will also reduce your chances of overheating the piece.
If you don't want solder to flow in a certain area, don't heat that area. Heat reduces the viscosity of most liquids. As the heat increases, so does the flow rate, causing the solder to flow toward the heat. Therefore, it's important to maintain good torch control while heating the piece. If you don't want solder to flow in a certain area, don't heat that area.
Don't overheat the metal. When the solder and the piece are overheated to the point that the solder alloys with the piece and disperses into it rather than flowing over it, you have a problem called solder erosion. The surface left behind is usually a grainy looking depression. In this case, not only is the joint not soldered, but the metal where the erosion occurred becomes brittle.
The most common probable cause for solder erosion is trying to make the solder flow with the torch. During the heating process, sometimes the solder doesn't melt and flow where intended. The seemingly obvious solution is to apply more heat, because things must not be hot enough. However, more times than not, the cause for the solder not flowing is due to contamination or oxidation, neither of which is remedied by the application of more heat.
Use an ample amount of solder. Another contributing factor to solder erosion is not having enough solder in the first place. At hard soldering temperatures, there is some interaction of the solder into the surface of the metal. At times, this limited penetration consumes enough solder that there isn't an adequate amount left to flow. The surface appears to have solder coating it, but the layer is very thin and has already flowed to its practical limits. When additional heat is applied, the solder begins to alloy with the metal and causes solder erosion.
Practice preventive measures against solder erosion. If the solder doesn't flow and it appears that enough heat has been applied to flow it, stop and look for a cause that may be preventing it from flowing. It is usually contamination or oxidation, which can be remedied by following the steps outlined above.
Ganoksin Staff Note: Finding The Best Soldering Tools & Supplies
You can find current reviews, recommendations and buying advice for all your soldering needs in our buying guide section:
Best Soldering Station Reviews
![]()
In association with
![]()
The award-winning Journal is published monthly by MJSA, the trade association for professional jewelry makers, designers, and related suppliers. It offers design ideas, fabrication and production techniques, bench tips, business and marketing insights, and trend and technology updates—the information crucial for business success. “More than other publications, MJSA Journal is oriented toward people like me: those trying to earn a living by designing and making jewelry,” says Jim Binnion of James Binnion Metal Arts.
Click here to read our latest articles
Click here to get a FREE four-month trial subscription.
Related Articles

Master Metalsmith John Prip

Richard Reinhardt: Discontinuous Continuity

Soldering Parts Using Pourable Soldering Jig

Set Up Your Torch


The All-In-One Jewelry Making Solution At Your Fingertips
When you join the Ganoksin community, you get the tools you need to take your work to the next level.

