
Testing the Wolf Adjustable Trimmer
In my 25 years of working as a goldsmith, I have always looked for tools that make my life easier -- tools that make me more efficient and therefore more profitable. And I'm not an easy sell. Although I have embraced CAD/CAM in the past few years and produce many of my models on a milling machine, I frequently hand-carve wax models in my shop. I often modify models that have been milled, or add hand-carved elements to them, which is a great way to personalize designs that can otherwise have an overarching CAD look. When laying out a design on wax, I scribe lines for the silhouette of the top of the piece and side views directly onto the wax. With the framework in place, it's time to remove the excess wax -- which is where the Wolf Adjustable Trimmer really shines. This tool allows you to remove wax quickly very close to the layout lines.
6 Minute Read
In my 25 years of working as a goldsmith, I have always looked for tools that make my life easier — tools that make me more efficient and therefore more profitable. And I'm not an easy sell.
I have a very thrifty attitude toward spending my hard-earned money on tools, but I don't buy the cheapest tools around to save a few bucks, either. Because I expect tools to last a lifetime, I choose carefully and invest only in those tools that I believe will really make a difference in my productivity. So when MJSA Journal asked me to test the Wolf Adjustable Trimmer ($109.95), I approached the review with the same cautious buying attitude that I use when shopping for new tools.
Trim Test
Although I have embraced CAD/CAM in the past few years and produce many of my models on a milling machine, I frequently hand-carve wax models in my shop. I often modify models that have been milled, or add hand-carved elements to them, which is a great way to personalize designs that can otherwise have an overarching CAD look.
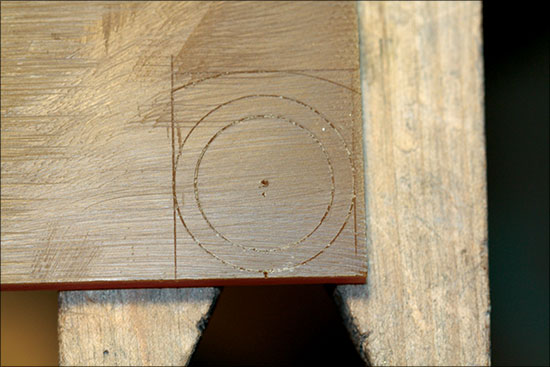
When laying out a design on wax, I scribe lines for the silhouette of the top of the piece and side views directly onto the wax (1). With the framework in place, it's time to remove the excess wax — which is where the Wolf Adjustable Trimmer really shines. This tool allows you to remove wax quickly very close to the layout lines.
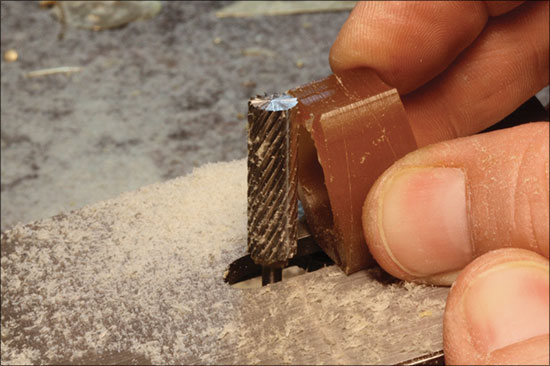
To test the effectiveness of the trimmer, I chose two simple ring designs to model. I scribed the outline of each ring on the surface of the wax and used the trimmer to remove the excess. With the angle set at 90 degrees, I did this freehand (2a and 2b).
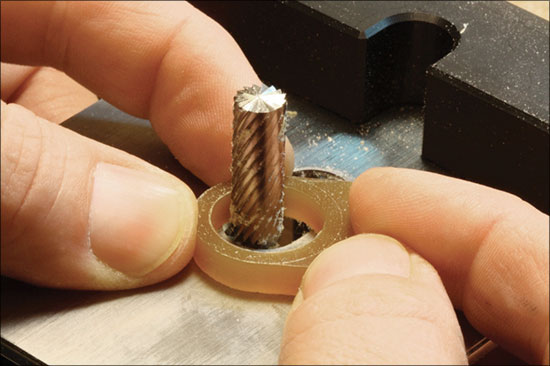

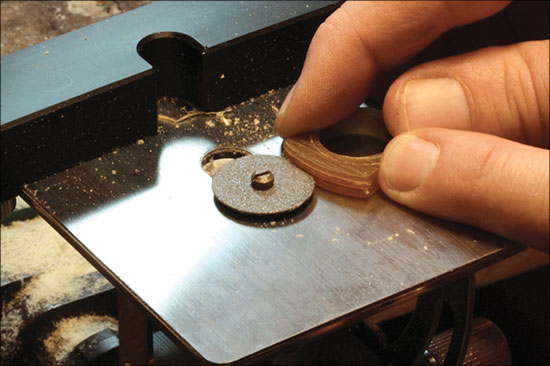
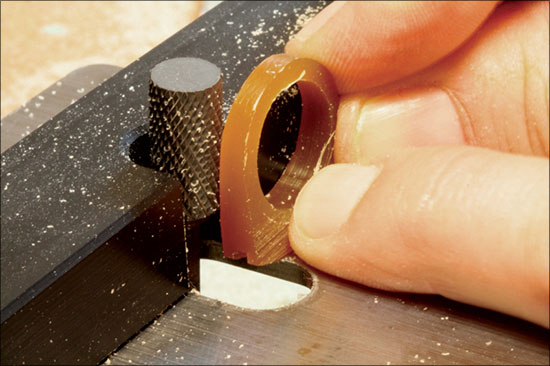
For the ring that required a channel to be cut into the top, I used a separating disc to cut the channel (3) because I didn't have a steel saw-style bur on hand that might work a little more effectively. I set the depth of the handpiece in the trimmer so that the separating disc was 1.25 mm off the surface plate and cut to the desired channel depth. I then flipped over the ring and repeated the process so that the channel would be dead center.
Both ring styles that I created have a taper to the shank. I cut one of the tapers freehand, by sliding the wax flat on the plate, thus ensuring the angle stayed the same on both sides of the centerline (4). This technique allows easier access to the cutter but requires a greater amount of hand skill.
I trimmed the other ring by sliding the wax along the guide fence, with the cutting bur set at a slight angle (5). This guaranteed that the angle would be equal on both sides of the ring, and it was easier to manage a perfectly flat angled surface because of the increased surface area in contact with the guide fence.
Using the trimmer, I was able to roughly shape both of the rings in about 15 minutes, as opposed to between 45 minutes and one hour by hand filing without any power tools. When hand filing, it takes more time to physically remove the wax surface. In addition, it's very time-consuming to constantly check and adjust the filed angles to 90° — a step that is eliminated with this tool.
Lastly, I used hand files to finish and smooth the rings. The final finishing up to the scribed lines went very quickly on the milled surface because it was already at the proper 90° angle and needed just slight smoothing. This was much faster than final finishing when hand carving, which can be very slow and gradual because you are constantly adjusting for the 90° angle.
Observations
When working with the Wolf Adjustable Trimmer to rough out ring models, I made the following observations about the tool:
Construction
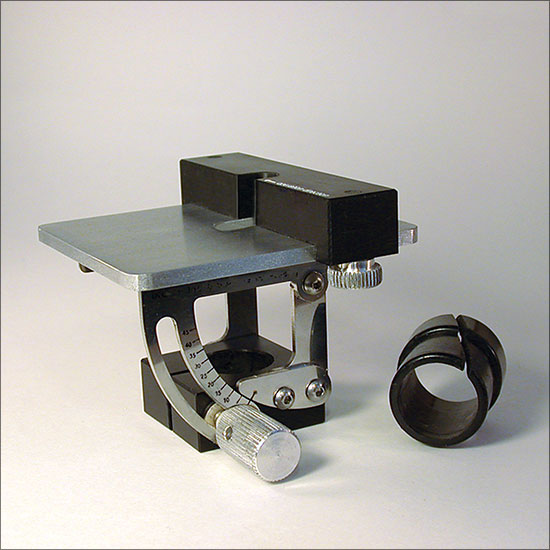
The trimmer is very sturdy. The steel portions of the tool are heavy gauge and are nicely plated, with a precision-milled veneer on the top plate. The adjustable fence section and the fitting designed to accommodate a #30 handpiece (not included), as well as the plastic collar for use with the GRS BenchMate, are of a high density plastic that seems to hold up well to wear and tear.
Versatility
The best feature of the trimmer is its versatility. It takes the idea of a standard 90? wax trimmer and adds the options of a tiltable table and a guide fence for controlled and repeatable cuts. You can use the trimmer by simply holding it against a bench pin; however if you have a GRS BenchMate, the collar included can be slipped into the GRS BenchMate and used on a very stable platform, allowing you to use it with two hands. There is a great advantage to this, as the control in maneuvering the wax along the cutter can result in very smooth surfaces.
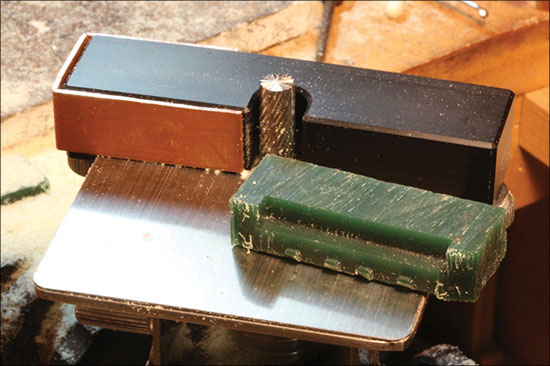
In addition, the tiltable table can be adjusted up to a 45° angle. If the wax model is flipped for proper access to the cutter, you can create a cut at almost any angle. The guide fence ensures repeatability, and it can also be used as a stop to control the depth or length of cuts. I even discovered that if I added a copper plate to the guide fence on one side and adjusted the cutter flush to the copper plate, I could create what is essentially a planer, similar to the ones woodworkers use (6). This is ideal for smoothing out rough surfaces on scrap wax, which I can then use as a reference for laying out scribe lines.
I think there are many additional uses for the angle adjustment and the guide fence that will become apparent to me the more I use this tool. Ease of use. In general, I'm pleased with how the trimmer works. The angle guide is accurate to 90? out of the box and operates smoothly; however, the lack of a degree guide means that you have to measure your own angles for accuracy. The guide fence operates with ease and stays in place with only light tension from the hand screws.
When installed in the GRS BenchMate, the overall height of the tool is a little high for me (I'm 6 feet, 1 inch tall), and it makes some operations a little awkward. But there's a quick fix for this: Simply adjust the height of the BenchMate bracket.
Since everyone favors certain cutting tools for wax, it's important to note that the surface plate and the adjustable fence are large enough to accommodate many tools. Changing the tools in the trimmer can be a bit tricky, as the handpiece is buried beneath the apparatus. Using a chuck key with a handle of some sort makes it easier to get in there to tighten the chuck. Overall I am very pleased with the Wolf Adjustable Trimmer. It fulfills all of the criteria that I have when considering which tools I want to use. The trimmer allowed me to more quickly shape and trim my designs to their rough shapes, leaving me more time to do the detail work on my waxes. Perhaps most important, it gave me the confidence to know that all my starting angles were very accurate, thus ensuring optimum results.
![]()
In association with
![]()
The award-winning Journal is published monthly by MJSA, the trade association for professional jewelry makers, designers, and related suppliers. It offers design ideas, fabrication and production techniques, bench tips, business and marketing insights, and trend and technology updates—the information crucial for business success. “More than other publications, MJSA Journal is oriented toward people like me: those trying to earn a living by designing and making jewelry,” says Jim Binnion of James Binnion Metal Arts.
Click here to read our latest articles
Click here to get a FREE four-month trial subscription.
Related Articles

Pumice Finishing and Brass Wire Brushing

How to Handle the Flexshaft

Pulse Shaping: Energy Over Time

Ronda Coryell’s Foredom Micromotor K.1050


The All-In-One Jewelry Making Solution At Your Fingertips
When you join the Ganoksin community, you get the tools you need to take your work to the next level.

