
Studio Visit – Milt Fischbein
6 Minute Read
Safety is key in Milt Fischbein's studio. Milt Fischbein of Milt Fischbein Metal Arts in Calgary, Alberta, Canada, recently moved his 20-year-old business into a new studio location. While he reused most of what he had in his original studio, he was able to configure the new setup so that it better matches his workflow. He also kept ergonomics in mind by giving consideration to the heights of his work surfaces, minimizing distances that he has to reach for tools, and providing ventilation and dust removal.
*******************
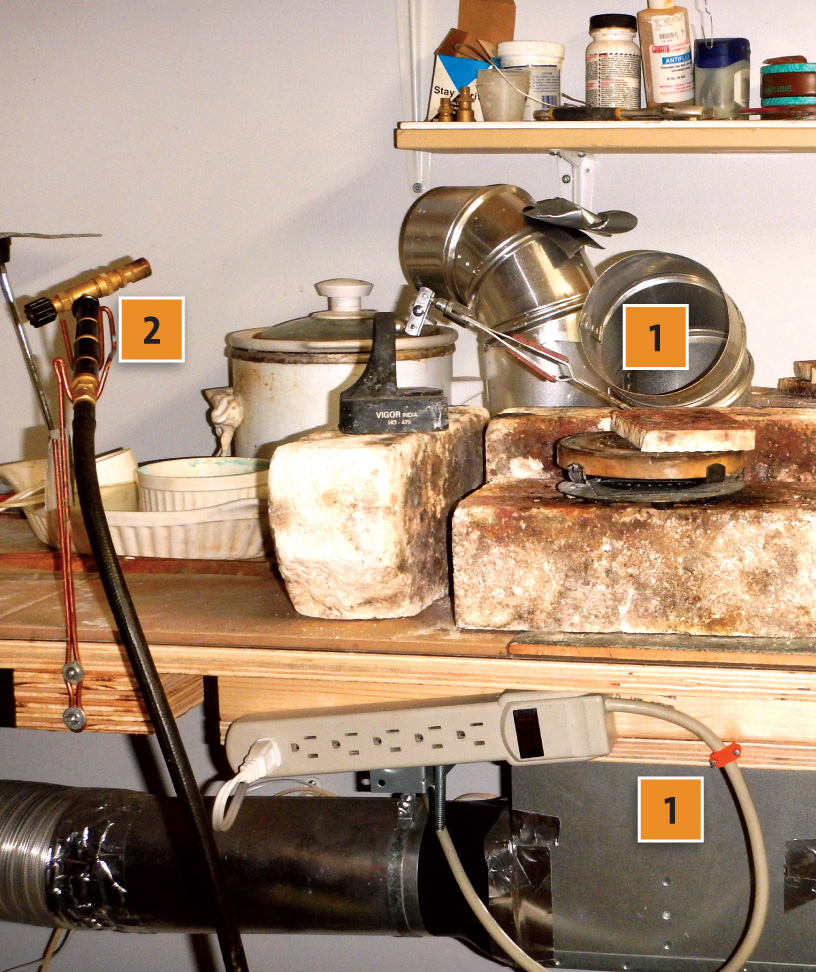
- I'm fortunate that I have enough room for a separate soldering area away from my bench. Ventilation in this area is key so I installed a fan below the soldering surface. The fan creates suction and pulls soldering and pickle fumes back and away so they do not sweep past my face while I am working. The fumes are then exhausted to a safe location outside the building. I run this system whenever I am soldering or when the pickle pot is on.
- Previously I used a Little Torch that ran on oxygen and propane, but I've switched to an Orca (which is also sold as the EZ Torch) propane and air torch. I wanted to minimize the amount of compressed gases stored in my studio, and the Orca torch runs on a 1-lb disposable propane tank, allowing me to remove the compressed oxygen tank from my studio. I devised a torch holder using copper rods to support the torch when I'm not using it. I never leave the torch burning while in the holder. (Note the melted handle on the pickle pot located behind the torch.) Although not visible in the photo, I keep three fire extinguishers in my studio as well as a carbon monoxide/propane detector.
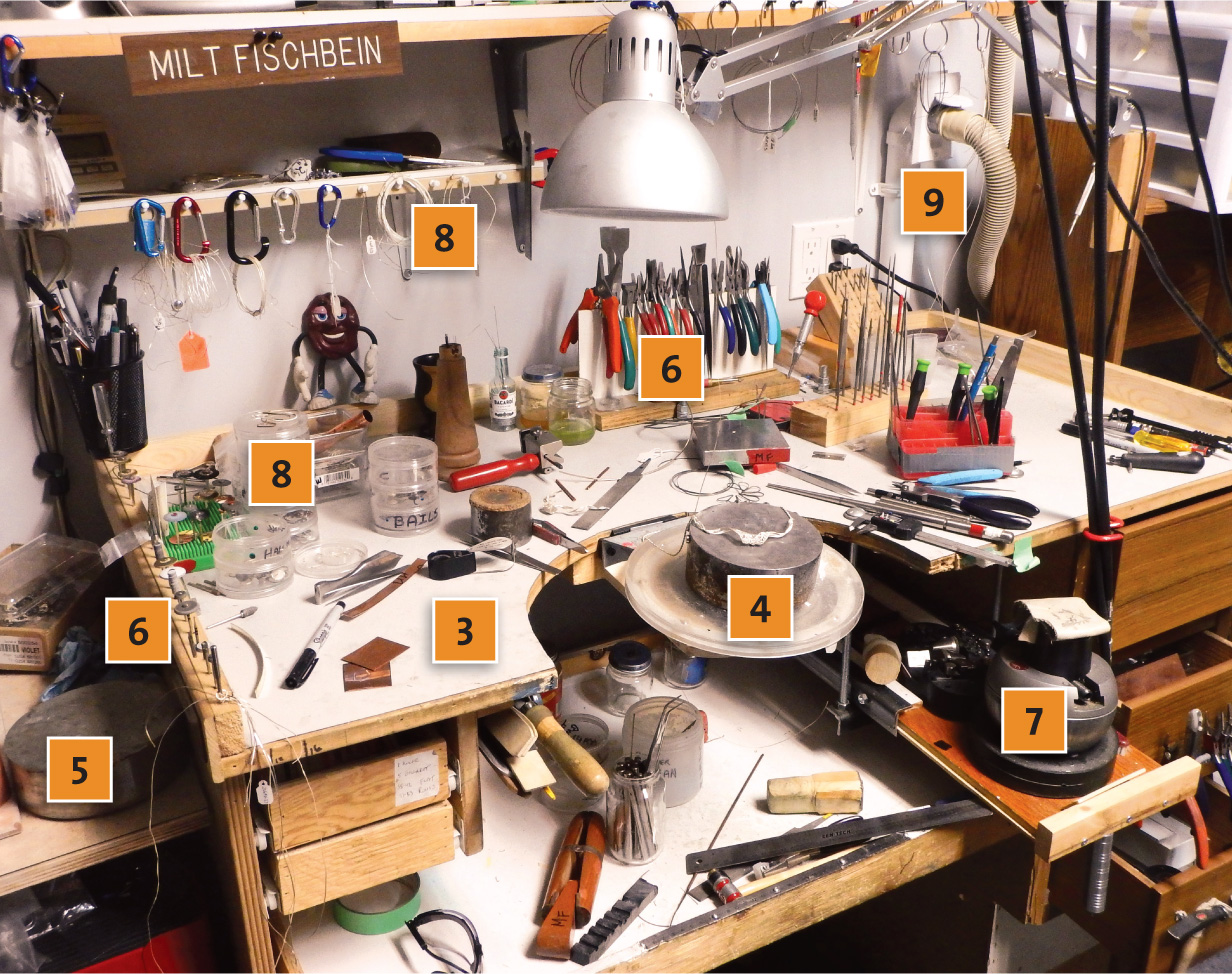
- My bench is custom built. The bench top is 3/4-inch plywood with a laminate surface. Drawers on the right-hand side were salvaged from a bathroom vanity, while the left-hand and sweeps drawers were specifically built for the bench.
- I use a homemade bench pin with my GRS bench pin holder. My studio practice is currently predominantly filigree work. For this type of work, I need a large stable surface so I use a 5-inch diameter piece bar stock that I picked up at a scrap yard. It sits on a turntable that is positioned on a plywood bench pin. The bar stock weighs about 5 kg so it is very stable. When I am doing other work such as sawing or filing, I can switch out the bench pin for a more traditional one, or I can swing my chair around and use a second bench pin that is attached to my rolling mill stand.
- I keep a second piece of 5-inch diameter bar stock on the soldering table next to my bench. I use it as a heat sink to accelerate the cooling of the filigree pieces after soldering. This avoids the need to quench between soldering operations and allows me to work much faster as I don't have to take the time to dry the piece. Many of my filigree pieces are soldered multiple times so the time savings can add up.
- I try to keep my bench top organized while keeping my frequently used tools close at hand. Since I use a variety of tweezers for my filigree work, I made a tweezer holder out of several ammunition cases that I secured together with duct tape. I made a series of wooden holders to secure my pliers, files, and burs. I also made a holder out of the edge of the left side of my bench, which I use to hold the flex-shaft polishing wheels I use most often. It is an efficient use of space and keeps the wheels visible and close by.
- For stone setting, I keep a GRS engraving block on a 3/4-inch plywood shelf that slides out from under the bench when needed. It is supported by steel angle iron and is hung from the bottom of the bench top using long threaded lag bolts. The height of my bench chair is adjustable so I can set it comfortably for working at the bench pin or at a lower level for stone setting work on the engraving block.
- For my filigree work, I like to have an easy-to-reach inventory of supplies always sat hand. I pre-fabricate various filigree components such as bails and keep them handy on my bench top in stackable clear plastic containers. I also prepare filigree wire in 2-meter lengths that I keep in a variety of sizes hanging above my bench where they can be easily reached.
- Traveling along the wall behind my work areas is a dust collection system that is made out of central vacuum system tubing. The network of dust collection tubing attaches to a shop vac I have sitting in an adjacent storage room. This helps to keep the noise down when the dust collection system is operating. I have several convenient locations where I can plug in a number of different dust collection attachments made of flexible vacuum hose. I use magnets on the hose ends to position the tube as needed. For example, if I'm using my fl ex-shaft to polish, cut, or grind, I'll attach a length of flex vacuum hose to my metal bench pin turntable.
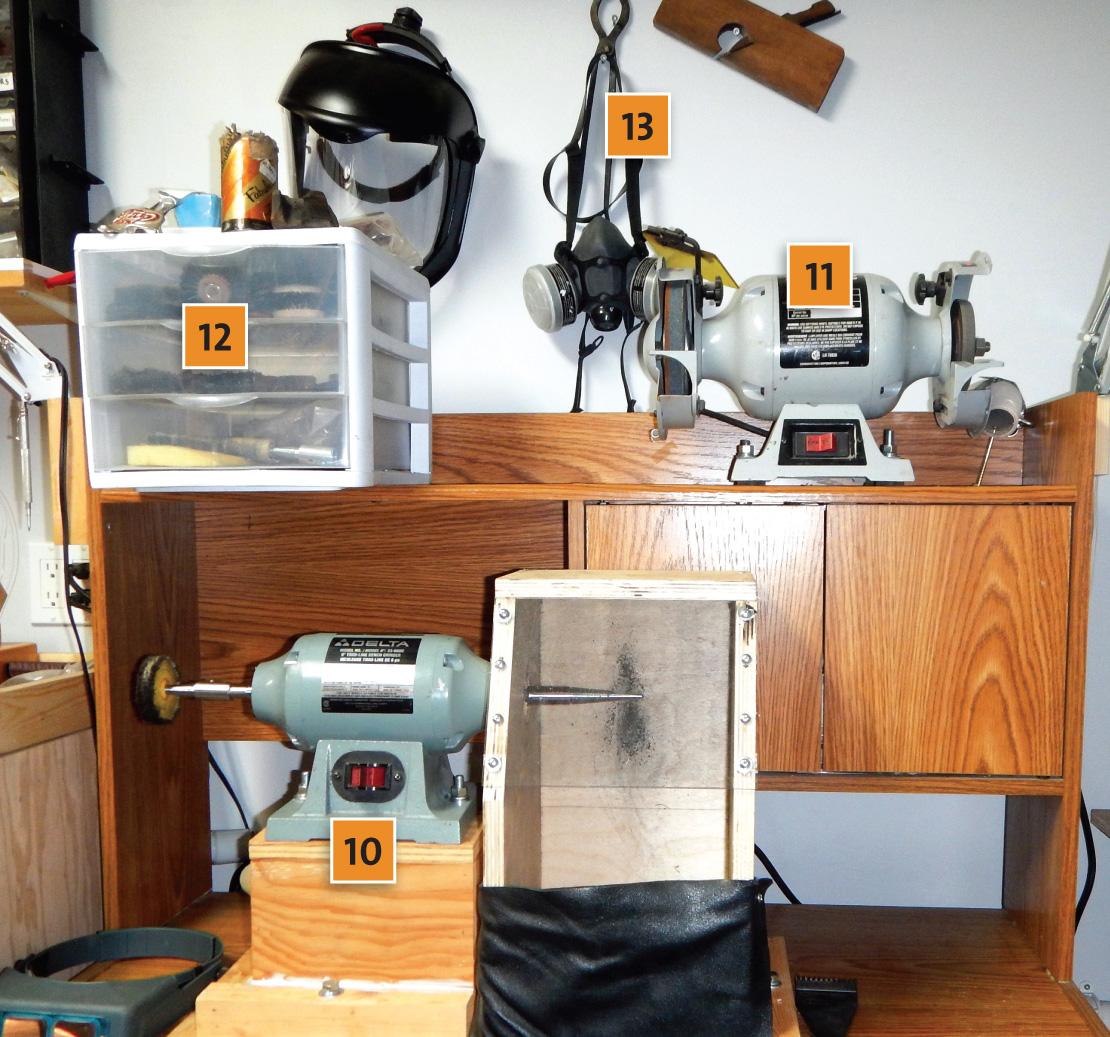
- To the right of my bench I have a separate polishing area. My polisher is a converted grinder. One side is enclosed in a wooden box with a clear Lexan shield. A dust collector is attached to the bottom. I use the other side of the polisher for larger pieces that can't fit into the box.
- I keep my grinder mounted on the top shelf. The right side of the grinder has a Cratex wheel and dust collection hose. The left side has a grinding wheel without dust collection because I did not want to pull sparks into the dust collection system, which could be a fire risk.
- I keep my polishing wheels and buffs in a clear storage container. To minimize contamination, finer polishes are stored in top drawers, while coarser ones are kept in lower drawers.
- Safety first—I keep a dust mask and face shield hanging nearby. They hang next to an antique wood planer that once belonged to Leo, my wife's grandfather.
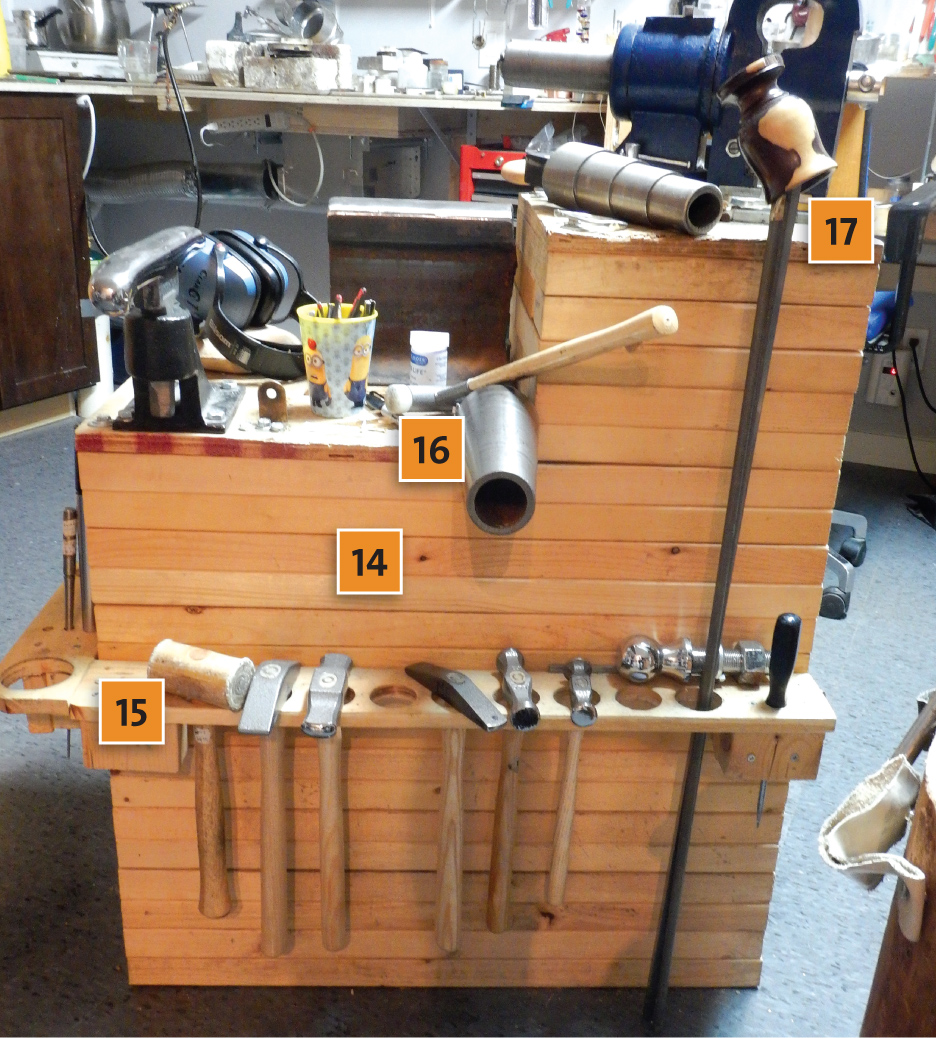
- My studio affords me the space to have a separate forging and forming area that I use primarily to forge bangles and cuffs. The station is made from 2 inch by 12 inch and 2 inch by 4 inch wood pieces that are stacked, glued, and screwed together. The wood alone weighs 90 kg so it's a very sturdy structure. I designed it to offer me two working heights based on what is comfortable to me both while sitting and standing.
- I added a shelf around three sides of the station. It's an easy way for me to keep my hammers nearby. The only downside to this arrangement is that sometimes when I am sitting on a stool and working close, I end up banging my leg into the shelf, though generally I sit far enough back that this doesn't happen.
- On this station, I keep my main anvil. It's a piece of salvaged railway track that I've ground flat, cleaned, and polished.
- In addition to keeping bracelet mandrels and raising stakes on the platform, I have steel rods attached. They have shaped and polished ends that I use for forming small components. I cover the ends with a wooden cup so I don't accidentally poke out my eye if I have to bend down to pick something up off the floor.
![]()
In association with
![]()
The award-winning Journal is published monthly by MJSA, the trade association for professional jewelry makers, designers, and related suppliers. It offers design ideas, fabrication and production techniques, bench tips, business and marketing insights, and trend and technology updates—the information crucial for business success. “More than other publications, MJSA Journal is oriented toward people like me: those trying to earn a living by designing and making jewelry,” says Jim Binnion of James Binnion Metal Arts.
Click here to read our latest articles
Click here to get a FREE four-month trial subscription.
Related Articles

Studio Visit – Cynthia Eid
Studio Jewelers Sabbatical

Master Metalsmith Alan Adler

Sansone Studio


The All-In-One Jewelry Making Solution At Your Fingertips
When you join the Ganoksin community, you get the tools you need to take your work to the next level.

