
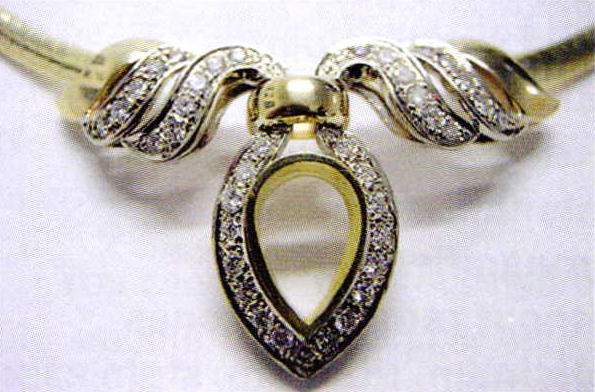
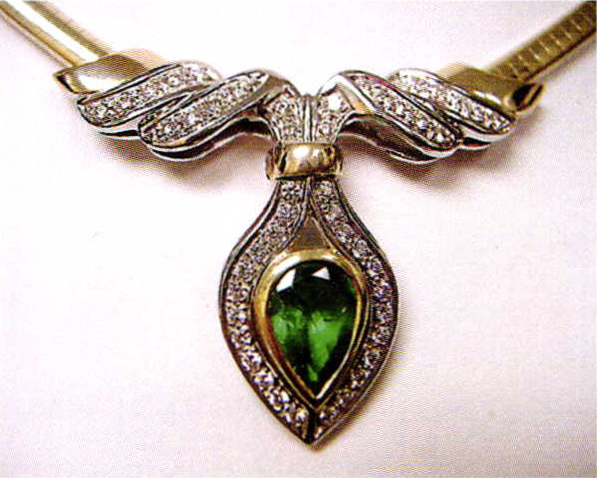
Setting a Pear Shape Emerald in a Full Bezel
6 Minute Read
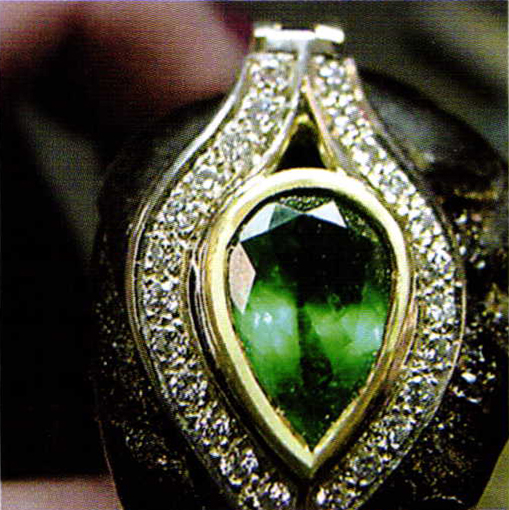
For this demonstration of Setting a Pear Shape Emerald in a Full Bezel I will be setting a large emerald surrounded by many small diamonds in a pendant. The approximate value of the emerald stone is $7,500. When setting a stone this delicate I find myself most comfortable using a shellac stick. I cannot stress how important it is to have no distractions when setting a stone this fragile.
The first thing I do is examine the emerald. It is important to locate all of the inclusions in the stone. Study the girdle looking to see if it is thick or uneven. It's important to see how deep the pavilion is and if the culet is well made. Other things to look for are the angle the pavilion is cut to and possible defects on the girdle including broken or unpolished surfaces. It is important to remember that this is a very soft stone with problems waiting to happen.
After examining the stone under my 10x loupe I am ready to move on. Next look at the bezel, the thickness of the wall, the evenness of the wall: check the wall for uniform height and to see if all the solder points are to satisfaction. Look for metal defects due to casting or manufacturing and see if the inner walls of the bezel are pre-polished. This examination must be made prior to setting the emerald. Once all of this is to your liking it is time to start this setting project.
Carefully warm up the pendant and allow it its own weight to sink it into the shellac. It is a good idea to contour the shellac stick to the shape of the pendant before sinking the pendant into it. It needs to be well secured for the long setting process so the pendant should be totally supported.
Next visualize how the stone will be set. Place the stone on top of the bezel and see if it overlaps too much. Is it just sitting on the frame with the gold showing on both sides and ends? If necessary use a thin pair of pliers to open the very top section of the bezel wall or frame. When finished setting the table of the stone must be set level with the top of the bezel walls. If necessary use a pair of dividers to scribe all the way around the bezel wall. This line will follow the girdle of the stone.
Once you have decided on the stone's future placement you can start coring out the walls to accommodate this stone. Remove all shellac that is under the culet or pavilion before beginning, as it might prevent the stone from sitting well.
File with very light pressure all over the top of the pear shape walls until they are level to the line of sight. I use a round bur that is just a tad large than the widest part of the girdle to groove into the wall to about a 30Vo depth at the most. Then I use a small #007 bud bur to make vertical grooves in length to compliment the sharp facet edges of the stone. This will allow the stone to fit exactly against the lower bezel frame.
Now use a #010 round bur and drill right into the pear shaped corner. This hole must be at a depth to ensure the point of the stone is not touching any metal. Cut with your round bur all around the scribed line.
Start at a minimum depth and subsequently repeat this maneuver many times until you see that this line of cutting is of a uniform depth and not deviating off of your scribed line.
Next you are going to prepare to set the pavilion of the stone. Use your high speed steel 90 degree bearing cutter. Place the bur's edge at the lower end of the round bur cutting edge and cut at an angle that matches with the stone. Parts of the stone will have minute angle deviations. You must be prepared for these little errors of stone cutting. I find that these deviations occur at the round section of the stone.
Now place the stone in its new home and see how it sits. If the stone is rocking around, immediately take it out and remove any gold that is preventing it from sitting evenly. This is very important because if your stone is pivoting on a piece of gold, when you set the stone it will most definitely break. At times I will use a very large bud bur to do the final finishing or smoothing of the inner bezel wall.
Using your #1 cut pillar file, file it to remove a back portion of the tip of the bezel wall to give you a 45 degree facet. It is exactly here you will place your brass pusher to start the bending of the metal. This filing must be uniform in angle all around the bezel wall. If the thickness of the wall is 1mm, then only file off about half of it's thickness (1/2 mm) leaving the balance of metal towards the front.
Now you can place the stone into its new home. At this point there should be no rocking. The point of the stone must be directly inline with the bezel point. Now use your brass pusher with a large serrated face and push over the metal. It is very important not to use a steel pusher. Do not use a metal hammer either as it produces too much heavy, downward pressure. Also too much heavy pounding and a seam might open in the emerald.
On a pear shape I will start the pushing-over just back from the point, on either side of the V. This will prevent the forward action of the stone from pressing against the V with the point of the stone. Once this is done, you can now mold over the rest of the bezel frame in sequence all around the bezel tip.
You must not have any gaps or spaces occurring under the bezel wall tip. If you find that the gold is not moving with any ease flle again to make this frame easier to bend. Now very carefully bend over the pointed section of the V to cover the point of the stone.
You can now use your number #2 or #4 pillar file to file smooth the 45 degree area you were pushing over. To create a direct point on the Y I would use a triangular file of #2 or #4 cut to achieve this final affect. The bezel's V should match the stone's V perfectly. The bezel wall frame has to match directly to the stone as if it's one continuation of both designs. Use #1 and then #2 emery paper on the vertical sides of the bezel wall and then use a flat edged pumice wheel for the finishing touch.
Lastly you need to finish the inner section of the bezel wall tip i.e. the area that is over the stone and touching the crown facets. This is a very critical area. I use my #40 flat graver to very carefully cut a little facet in the gold, cutting in little increments along the inner seam of the frame. This gives the setting a real finished look. I cut to finish towards the point, this way you are achieving a nice clean sharp inner cutting with a sharp V.
I will go over every part of this setting with my pointed pumice wheel for any touch-ups. I will leave nothing for the final polishing step to alter my setting. Then only minor buffing is needed.
Next carefully chip away the shellac to remove the pendant. Do not heat the stone. After polishing remember not to immerse the emerald into any hot liquid or ultrasonic cleaner. To clean the stone use a slightly warm soapy solution and a toothbrush with soft bristles as this cleaning will not -:::: ,.o*,r*ili cause any harm.
Related Articles

Polishing and Finishing Aids

Making Custom-Designed Earrings Using Welding Technology

Inside Ring Polishing

Aluminum: Welded and Wearable


The All-In-One Jewelry Making Solution At Your Fingertips
When you join the Ganoksin community, you get the tools you need to take your work to the next level.
